Pine in pencil step by step. Drawing a pine tree in watercolors for preschoolers step by step with photos. Drawing a spruce forest
There is a wide variety of trees in nature, as well as a wide variety of animals or birds. All this huge variety is classified according to different criteria. But features are important for an artist appearance tree. And in order to learn how to draw it, you need to observe the shape of the trunk, the shape of the branches, leaves, and the shape of the entire crown of the tree. After all, each breed has its own characteristic features. Therefore, we will discuss these features of 6 types of trees - maple, birch, pine, spruce, willow and oak (but I recommend reading first).
Maple.
- The maple trunk can bend and branch, which gives it a sinuous shape.
- Bark dark color, is generally similar to the bark of most trees.
- The top of the crown of this tree is rounded, but may also have an irregular shape.
- The maple leaf is known to have a pointed shape, similar to a star. Large masses maple leaves create a “spiky” texture of the crown surface.
- When shading the crown, you can also use longitudinal strokes, but to show the character of maple foliage, it is better to add a “clumsy” or “prickly” textured stroke to the drawing, similar to maple leaves (I wrote about the texture of shading). The same principle should be followed in painting, painting the canvas with strokes that would create the illusion of foliage. Considering that leaves and branches combine to form separate groups, the texture of shading and painterly strokes should be varied.
Birch

- Birch comes in different varieties. In the middle zone, the trunk of birches is usually straight and “slender”. In other areas, a birch trunk can form a “slingshot”, bifurcating at the root.
- The crown of a birch often has an elongated shape, directed upward. However, there are also birches with a spreading, squat crown.
- Birch bark is white on the surface. But it has dark “strokes”, which are essentially cracks through which the dark inner layer is visible. The closer to the ground, the more often these “strokes” appear on the bark. “Black lines” are present on the trunk at the base of the branches, i.e. in those places of the trunk from where the branches grow. They can have a triangular or rectilinear shape.
- Small birch branches are so thin and flexible that they hang down, rushing down. The leaves growing on these branches form vertically directed rows. The branches bending towards the ground bend, giving the appearance of birches a special awe and lightness.
- In pencil drawing or painting, the graceful character of birch trees can be conveyed by longitudinal vertical shading or appropriate strokes of paint. Pencil movements or brush movements can follow the movement of the branches described above.
Pine

- The pine trunk is straight. However, there are pine trees with a trunk that bends at the top and have a “stocky” character. Often there are ship pines in which the crown is located at the top of the tree and the trunk is straight and tall.
- The bark of this tree has a red color, which, as it approaches the ground, becomes much darker, turning into gray-brown. In the middle of the trunk, the pine bark resembles a flaky, scaly structure. Closer to the ground it becomes coarser and forms a dense, cracking layer.
- The crown of young pines has a triangular, cone-shaped shape. But the crown of mature trees will already be more rounded.
- The branches of perennial old pine trees can be twisted and gnarled. As a rule, pine branches do not point very upward. To a greater extent they are directed to the sides of the trunk.
- Pine needles are longer than spruce needles. Therefore, they create the feeling of a fluffy crown, which needs to be displayed by graphic means, or painting techniques, if this is not a drawing, but a painting. It is necessary to use a textured stroke or appropriate strokes in painting. Each branch has light and shadow, so the artist needs to think about how to draw the volume of individual branches in the overall mass of the crown.

- Spruce and pine have much in common, but they are different trees with their own characteristics. For example, if the trunk of a spruce tree is as straight as that of a pine tree, then the nature of the branches will already differ from the nature of pine branches. The branches of the spruce are slightly curved upward. In the lower tiers, the old branches are lowered down and resemble “paws”.
- Spruce needles are shorter than pine needles, so the overall texture of the crown of this tree will differ from that of pine.
- The crown of the spruce tree is shaped like a triangle or a cone and consists of tiers.
- When an artist paints a landscape, he paints trees in volume. To do this, you need to monitor how the entire tree is illuminated and how individual branches or tiers of branches are illuminated. For example, going inside the crown, the spruce “paw” plunges into the shadow. From the outside, it can remain light because it receives more daylight.
- The color of spruce needles is dark and rich. Therefore, both individual spruce trees and the spruce forest as a whole will differ in color from other types of trees.

- Willow trees can look different depending on the variety. For example, at weeping willow the branches are more flexible and plastic than those of ordinary willow. Because of this, its branches hang down, rushing to the ground.
- Willow is characterized by constant branching of the trunk, as well as large branches.
- Willow leaves are narrow and oblong. This greatly affects the appearance of the tree. That's why this feature you need to be able to reflect it through shading or brushwork in painting.
- The color of willow foliage is complex. On one side of the leaf the color is green. And on the other - light, gray-green. Therefore, the overall color of the tree is distinguished by gray-blue shades.
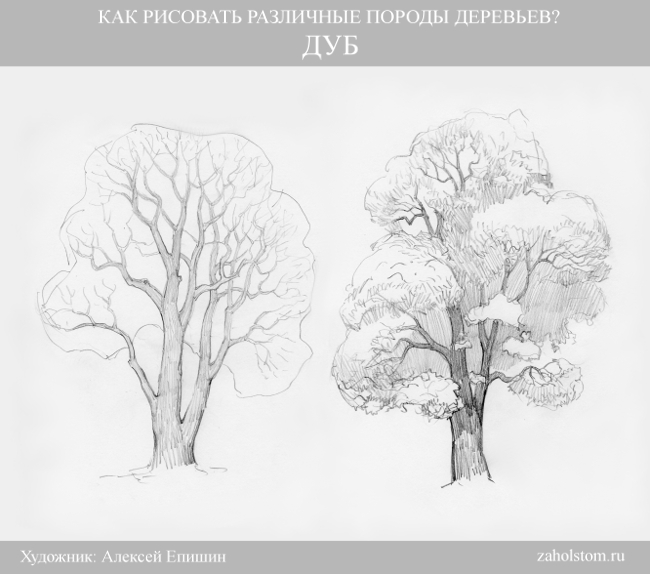
- The oak trunk is powerful. In old trees it can reach a large diameter at the base. But in dry areas, oaks can be less stocky, looking like slender young oaks.
- The branches and trunk of the oak tree are twisted and gnarled.
- The shape of the leaves is wavy. That's why general view the foliage as a whole will be “gnarled and curly.”
- The bark is rough and dense.
- The foliage color is dark green, rich.
Here I looked at the appearance features of only six varieties of trees. In nature there are a huge variety of trees and other plants. How can you learn to draw, if not all of them, then at least a couple of dozen varieties? To do this you need to develop observation skills. If an artist has a good eye and good powers of observation, then it doesn’t matter what he draws. The main thing is to understand nature and notice key points. And what points you need to pay attention to are discussed in educational material. For those who want to learn how to draw landscapes with trees well, it will also be useful to study the diagrams and technique called (I mentioned it at the beginning of this article).
Type of lesson: combined lesson (lesson of acquiring new knowledge and lesson of forming and consolidating methods of activity).
Lesson technology: Traditional lesson using ICT.
The main didactic goal of the lesson:
Study the basic visual and expressive means of graphics as an art form.
Learning Objectives:
- Ensure that all students understand the basic visual and expressive means of graphics.
- Ensure the application of acquired knowledge in practice.
- Continue developing skills in analyzing the shape of the depicted object.
- Continue to consolidate the concept of composition.
- Continue to develop the skill of sequential drawing from the general to the details and the ability to compare your drawing with nature.
Developmental goals:
- Continue to develop students' horizons through the integration of science and fine arts.
- Continue developing attention and perseverance.
- Promote the development of the ability to apply graphic techniques to create an artistic image.
Educational goals:
- Create conditions for emotional perception of reality.
- Contribute careful attitude to nature.
- Instill artistic taste.
Lesson plan (45 min.)
- Organizational moment 0.5 min.
- Lesson topic message 0.5 min.
- Presentation of new material 15 min.
- Consolidation of knowledge 4 min.
- Job requirements 2 min.
- Independent work 20 min.
- Summing up 2 min.
- Organized end of lesson 1 min.
Lesson progress
Organizational moment.
State the topic and purpose of the lesson.
Guys, on this lesson We will try to create an image of a branch of an amazing tree using graphics. Let's remember what graphics are, and find out what these tools are, and also try to apply them in practice. But everything is in order.
Presentation of new material.
So, today we will talk about an amazing tree. Of course, this tree is not as huge as, for example, a mammoth tree (slide 2) , which grows in California (its height sometimes reaches 110 meters, and its trunk diameter is 12 meters!), and is not as funny as the baobab from Africa, which looks like a bottle, and its branches are like roots growing into the sky (slide 3) . Look at the picture (slide 4) . This is an evergreen, resin-rich tree, usually very large (up to 40 meters in height), less often small, sometimes almost a shrub (slide 4) . Have you already guessed what kind of tree this is? Of course it's pine. And yet pine, so familiar to us, is a truly amazing tree! Listen.
Pine has become the champion of the plant kingdom: it can be found in the Arctic Circle and in the far south, high in the mountains and on the plains, in swamps, in sand dunes, on chalk cliffs and on rich black soil. (slide 5) , that is, pine trees are scattered throughout almost the entire Northern Hemisphere. There is hardly any soil, other than salt marshes, on which pine could not grow and develop. Naturally, trees grown in different conditions are very different from each other. (slide 6) : a pine tree from black soil grows 25 meters in a hundred years, and its crown is lush and lush. But a pine tree in a peat bog reaches a height of only 1 meter in a hundred years, its crooked trunk is no thicker than five centimeters.
And this photo shows bristlecone pine (slide 7) . It grows in the White Mountains of eastern California. Scientists have determined that among the trees surveyed around the world today, this is one of the oldest. He is 4700 years old! Out of respect for such a venerable age, the tree received its own name. They called him “Methuselah.”
Pine has a powerful root system. Its basis is a taproot that goes deep into the soil. (slide 8) . It holds the tree firmly even in stormy winds. Pine trees do not break in a storm, much less fall, like spruce trees, turning out their roots.
Pine is a very strong tree. If the tree is healthy, even bark beetles cannot cope with it. Mikhail Mikhailovich Prishvin described the battle of the pine tree with the bark beetles: “No matter how the bark beetles fought with this huge tree, it had enough strength for everyone, for each bite it had enough drops of resin, a transparent sticky resin that turns each worm into a motionless mummy.”
Pine is our most light-loving species. Filled with sunshine, it is festive and elegant. One of the lightest, perhaps, and, moreover, typical pine forests is the white moss pine forest. (slide 9) . Since ancient times, pine boron has been called pine boron in Rus' - pine boron! - a forest, and they call it a white moss for the gray cover under the trees. These are lichens. The love of light brings the pine tree to open places: it settles on the edges of the forest, in quarries, and on dunes.
Pine is undoubtedly one of the most beautiful and poetic trees. And when it is a ship grove with copper-yellow trunks, as if scorched by the evening sun (slide 10) , and when this tree-tent, standing alone in the open space, squat, with powerful branches wide open, as if with twisted arms lowered to the very ground (slide 11) . Her scent, even her amber tears - everything is wonderful! It is not for nothing that pine is one of the most revered and beloved trees among all peoples of the world. In the east, it is considered a magical tree that brings happiness; in many countries it is a symbol of longevity and greatness.
Let's walk through the gallery (slides 12-16) , in it we will admire paintings in which artists glorified the beauty of pine. Each picture is charming in its own way!
Today we will try to draw pine twig from life(we can’t bring a whole tree here).
I hold a pine branch in my hands, look at the branch and slide 17 .
– Is the stem of the twig smooth or not?
– That’s right, the stem seems to be covered with scales. Long needles grow from each scale on a shortened shoot.
– Is the branch all covered with needles?
- Of course, not all. It turns out that pine needles remain on the shoots for a maximum of 5 years, and then they fall off and never grow again in that place.
– How many needles grow on one shoot?
– You are right, usually 2 needles grow in a bunch on one shoot, but sometimes there are up to five needles in a bunch.
– Where are the needles thicker (more needles)?
– Yes, there are more needles at the tips of the branches.
-What are these thickenings at the tips of the branches?
- Undoubtedly, these are the buds and embryos of cones.
So, we studied the structure of the branch. Now we will depict the twig using graphics.
What's happened graphics?
– That’s right, graphics are a type of fine art. (slide 18) . The word “graphics” comes from the Greek “scratch, write, draw.” As in painting, its images are created on a plane, and volume and space are illusory. Based on the technique of execution, graphic works can be divided into two large groups: drawing and printmaking. (slide 19). We'll talk about prints another time. The drawing is made by the artist in one copy using various “dry” or “wet” materials.
Pencil, charcoal, chalk, sanguine are dry materials (slide 20) .
What means of artistic expression Is it possible to create this or that image?
The line is the main visual and expressive means of graphics: it creates the image itself, the illusion of a plastic form (slide 21) .
A stroke, parallel or cross, light and soft or energetic and hard, also serves not only as a pictorial, but also as an expressive means in the art of drawing. (slide 22) .
Spots of black and white are also the most important means of visual expression. A spot can be created from lines or strokes (slide 23) .
Now we are deciding the issue of composition, that is, the question of the most beautiful placement of the drawing on a sheet of paper. Place the sheet vertically. Who can tell me what visual means should be used to determine the location of the branches? That's right, exactly light line we plan the image (slide 24) . I note that the drawing should occupy almost the entire sheet, but it is necessary to leave space for the subsequent image of the needles. I remind students that, having completed the initial sketch, they must look at nature and compare the resulting image with it.
Teacher's work on the blackboard.
Teacher's work on the blackboard.
Independent work of students (5 min.).
Now you need to depict scales and short shoots, from which long pine needles will “grow” a little later (slide 26) . We depict scales with short strokes.
Teacher's work on the blackboard.
Independent work of students (4 min.).
The teacher needs to go through the rows and help some students cope with the task.
And finally, it's time to draw the pine needles. We found out that from each scale on a short shoot two needles grow in a bunch. How to draw them? (slide 27) . First, on the board I show the technique of drawing needles with chalk, and then on a sheet of paper with a simple soft pencil: place the sharp tip of the stylus on a scale with a short shoot and, with a slight movement of the hand, draw one stroke, a second, etc. It should be remembered that some shoots no longer have needles, but there are a lot of needles at the ends of the branch.
Teacher's work on the blackboard.
Independent work of students (7 min.).
Summing up.
Guys, look what wonderful pine branches you drew with a regular pencil! (slide 28). Which artistic media did the graphs help you?
Student answers: line, spot and stroke.
Organized end of lesson.
Lesson equipment:
for the teacher:
– pine branch, attached to a white sheet of paper;
– graphite soft pencil;
– blank slate white A4 paper for the teacher to complete the assignment;
– computer presentation “Drawing from life. Pine branch”;
for students: a simple soft pencil, a sheet of white A4 paper, an eraser.
Exposition on the board
1 – pine branch on a white sheet of paper;
2 – a sheet of paper on which the teacher performs the task in class.
Aids are posted as the lesson progresses.
Literature:
- Lomonosova T.M. Graphics and painting: Textbook. – M.: Astrel LLC, AST LLC, 2002.
- Alekseeva V.V. What is art? – M.: “ Soviet artist”, 1991
How to draw a pine tree.
Pine is an evergreen coniferous tree. and, since spruce is also a coniferous tree in the same color in winter and summer, they are often confused. That is, I know that my students don’t see much of a difference. And she is. Now let’s figure it out. Let’s start with the lesson “how to draw a pine branch.”
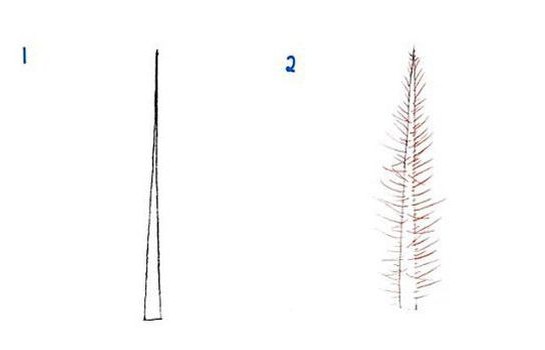
Let's start drawing with a diagram of the branch. The branching is whorled. That is, the side branches do not grow one by one, but several at a time from the nodes.

Spruce needles are single and short, they are sharp and usually quite straight. They grow on the branch in an orderly and even manner (like a lawn))). Pine needles grow in pairs, they are long and can be straight, but this is rare - usually they are arched or even twisted. The direction of growth of the needles is approximately the same, but at the same time they - some in the forest, some for firewood - stick out out of order.

Let's draw exactly as we see it - are the pine needles tousled? - So we draw:

Do not give in to the temptation to draw the needles even and neat, draw as if they were true. And for this, it’s best to have before your eyes not only a lesson on “how to draw a pine tree,” but also a living pine tree itself, to be honest.
Spruce? It is very difficult to find a person who has never drawn this tree in his life. But if you don’t know how to do this, our article will teach you this simple task.
Spruce is a symbol of the holiday!
Spruce is something that everyone certainly associates with the holiday, the New Year! This evergreen coniferous beauty becomes a real green fairy for children, delighting them on the morning of January 1 with gifts hidden under the branches. Does your child ask you to draw a Christmas tree? Or maybe you need to make some kind of composition with it for children's party or a matinee in the garden?
We will be happy to provide you with several simple master classes that will teach you how to draw a spruce step by step.
Method number 1: from top to bottom
The first method, which we will consider in our article, will be based on drawing a tree from its top. Learn to draw such a spruce. And then it won’t be difficult for you to create an entire forest on a piece of paper!
So, how to draw a spruce, starting from its top? It's very simple!

Method number 2: from bottom to top
The first method of depicting a spruce is not bad, but, you see, it is much more convenient to draw from the bottom up, and not vice versa. This makes it much easier to adjust and plan the height of the tree.
How to draw a spruce from bottom to top? Now we'll show you!

Method number 3: as easy as shelling pears!
How to draw a spruce in the simplest and most unpretentious way? We know it and will definitely share it with you. Using this method, even a small child can draw a Christmas tree.
How to draw a spruce branch
But what if you don’t need the whole tree, but, for example, only one branch? Well, we'll tell you about that too. Arm yourself with a pencil and paper, let's get started!

The drawing is ready!

Now you know how to draw a spruce branch yourself. You can even teach this, for example, to your child.
Using the methods described above, you can draw a branch of a coniferous tree or the spruce itself with a pencil, felt-tip pens and even paints. The tool in this case does not matter much. Draw, create yourself and together with your children.
This is an average difficulty lesson. It can be difficult for adults to repeat this lesson, so I don’t recommend drawing a pine tree using this lesson for young children, but if you have a strong desire, you can try. I also want to note the lesson “” - be sure to try it again if you still have time and desire to draw today.
What you will need
In order to draw a pine tree we may need:
- Paper. It is better to take medium-grain special paper: beginning artists will find it much more pleasant to draw on this kind of paper.
- Sharpened pencils. I advise you to take several degrees of hardness, each should be used for different purposes.
- Eraser.
- Stick for rubbing hatching. Can be used plain paper, twisted into a cone. It will be easy for her to rub the shading, turning it into a monotonous color.
- A little patience.
- Good mood.
Step by step lesson
True nature in all its beauty can only be revealed if you draw it from life. It will be much better to draw if you look directly at the pine tree. If this is not possible, then they can help regular photos, which are simply in abundance in search engines.
By the way, in addition to this lesson, I advise you to pay attention to the lesson “”. It will help improve your skill or just give you a little fun.
Please note that every object, every living creature, every phenomenon on paper can be depicted using simple geometric objects: circles, squares and triangles. They are the ones who create the form; they are the ones the artist needs to see in the surrounding objects. There is no house, there are several large rectangles and a triangle. This makes building complex objects much easier.
Tip: create a sketch with as thin strokes as possible. The thicker the sketch strokes are, the more difficult it will be to erase them later.
The first step, or rather the zero step, is always to mark a sheet of paper. This will let you know where exactly the drawing will be located. If you place the drawing on half of the sheet, you can use the other half for another drawing. Here is an example of marking a sheet in the center:
To draw correctly, you need to understand the characteristic features of its structure and growth.
Pine is a very light-loving coniferous tree. The rare arrangement of branches is proof of this. As they grow, the lower ones, darkened by the upper ones, die off, hence the abundance of knots on the trunk. And the upper branches develop nervously in the struggle for light. Depending on the place in which the pine tree grows, the character of its crown is formed. Pines growing in are different from those standing in the open. Forest pines have a tall trunk, almost no branches, and a dense crown at the top. The pine tree that will now be shown is growing at the edge of the forest. Its branches grow quite low, but only on one side of the trunk, which faces an open, illuminated place... The other side is almost always hidden from the light by trees.
1. The drawing of a pine tree begins by determining the height and inclination of the trunk, denoting general shape crowns are a triangle.


3. We work out the details of the drawing - we draw the knots remaining from the dead branches. Short strokes can show the character of the crown. It is most convenient to tint the barrel with vertical strokes.

Note: Pay attention to the compositional structure pine forest. Strict vertical lines trunks, almost without branches, form a unique rhythm.
So you learned how to draw a pine tree and I hope that you were able to repeat the lesson. Now you can pay attention to the lesson “” - it is just as interesting and exciting. Share the lesson on social networks and show your results to your friends.
-
 April 17, 2015When a corrective alcohol return may be required
 -
 April 17, 2015"Marble" cupcake: recipes and cooking methods
 -
 April 17, 2015Recipe without sterilization with onion sautéing


