Drawing a portrait in Photoshop. Create a colorful effect for a portrait in Photoshop
Photoshop is truly a wonderful tool in your hands. knowledgeable person. With its help, you can change the original image so much that it turns into an independent work.
If you are haunted by the fame of Andy Warhol, then this lesson is for you. Today we’ll make a portrait in pop art style from an ordinary photo using filters and adjustment layers.
Almost any images are suitable for processing. It's difficult to imagine in advance how filters will work, so choosing the right photo can take quite a long time.

The first step (preparatory) is to separate the model from white background. How to do this, read the article at the link below.
Posterization
- Remove visibility from the background layer and desaturate the cut out model using a keyboard shortcut CTRL+SHIFT+U. Don't forget to switch to the appropriate layer.

- In our case, the shadows and highlights are not very well expressed in the image, so we press the key combination CTRL+L, calling "Levels". Move the outer sliders to the center, increasing the contrast, and click OK.

- Go to the menu "Filter - Simulate - Outlined Edges".

- "Edge thickness" And "Intensity" we remove it to zero, and "Posterization" give the value 2.

The result should be approximately the same as in the example:

- The next step is posterization. Create a corresponding adjustment layer.

- Drag the slider to the value 3
. This setting can be individual for each image, but in most cases, three is suitable. Look at the result.

- Create a merged copy of layers using a keyboard shortcut CTRL+ALT+SHIFT+E.
- Next we take the tool "Brush".

- We need to paint over the extra areas in the image. The algorithm is as follows: if we want to remove black or gray dots from white areas, then press and hold ALT, taking a color sample (white) and painting; if we want to clean up the gray color, we do the same on the gray area; with black areas everything is the same.

- Create a new layer in the palette and drag it under the portrait layer.

- Fill the layer with the same gray as in the portrait.

Posterization is complete, let's move on to toning.
Toning
To add color to the portrait we will use an adjustment layer "Gradient Map". Don't forget that the adjustment layer should be at the very top of the palette.

To color the portrait, we need a three-color gradient.

After selecting the gradient, click on the window with the sample.
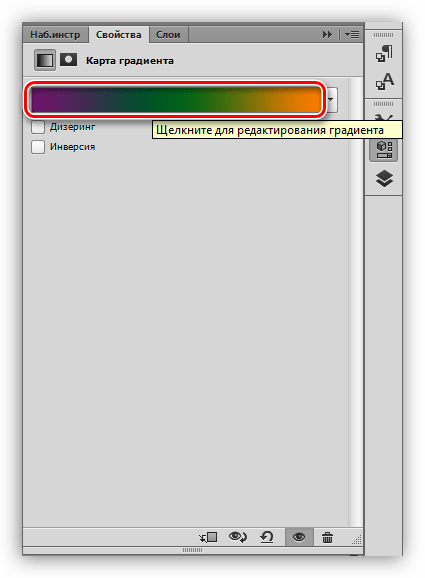

The color is adjusted as follows: double-click on the point and select a color.

Thus, by adjusting the colors for the control points, we achieve the desired result.

This concludes the lesson on creating a portrait in pop art style in Photoshop. In this way you can create huge amount color options and place them on the poster.
Portrait is considered the most popular type of photography. Every aspiring photographer, sooner or later, will have to conduct a portrait photo session. In addition to the basics of photography, every self-respecting photographer should be able to process a photograph, being able to deftly remove facial imperfections and flaws made during the photography process.
The work of processing a portrait includes three main stages:
1. Removing flaws. Flaws include all kinds of pimples, wrinkles, moles that can disfigure the face. This does not apply to facial wrinkles, without which the face will turn into plastic, as well as moles, which give the face a certain charm and zest.
2. Lightening eyes, teeth, correcting makeup.
3. Skin retouching. It will help make the skin smooth and radiant, and the picture will become very attractive.
Getting started.
So you have uploaded a photo to Photoshop program. Create a new model layer by pressing Ctrl+Shift+N. On the left side of the program there is a vertical toolbar in which you need to find and activate the Spot Healing Brush tool. A horizontal settings panel for this tool will appear above the photo itself, on which you need to check the box next to “Sample from all layers.” Set the tool settings as in the screenshot below. 
For each skin defect there is 1 click with the left mouse button. Change the brush size depending on the size of the defect. Don't try to make the skin too perfect; remove only the most prominent defects.
Now press the rather long keyboard shortcut Ctrl+Shift+Alt+E, which will merge the two layers into one and place it on top of the existing layers. 
Now let's move on to working with teeth and eyes. To lighten the eyes and teeth, you will need the Lightener tool. Having selected this tool, you need to configure it by setting the “Mid Tones” parameter in the “Range” column, and 20% in the “Exposure” column. Now brush over the iris and teeth. If the result is excessive lightening, then press the keyboard shortcut Ctrl+Shift+F, which will reduce the lightening effect of the last action. 
Try to match the brush size to the area being treated, otherwise you may spoil the image. But if you go beyond the established boundaries, for example, accidentally lighten your eyelids, it's easy to fix it with the help of the Eraser. Apply this tool and erase highlights from areas of the face.
When treating your teeth, go over each tooth separately, rather than painting over the smile with a brush, which will turn it into a solid “monotooth.”
As a result, your smile will be attractive and snow-white, and your eyes will be clearer and more brilliant.
You may notice that in addition to the defects that we have already removed, red blood vessels are visible on the white of the eye, which noticeably spoil the entire impression of big picture. Apply the Brush tool and turn on the Mask mode at the very bottom of the vertical toolbar. 
Select the whites of the eye and click on the icon again to turn off the “Mask” mode. You may notice that it is not the proteins themselves that are highlighted, but the entire image excluding them. Therefore, go to the “Image” menu and select the “Inversion” item, which will change the selected object exactly the opposite. 
Now open the menu “Image” – “Adjustments” – “Hue/Saturation”. Reduce the Saturation to -49 and increase the Brightness by 10-15. If you are satisfied with the results, click OK. If this is not enough, try lowering the Saturation and increasing the Brightness further until you achieve the perfect result. Do not overuse these parameters, otherwise the eyes will become unnatural. 
And finally, after all the flaws have been removed, you can proceed to correcting the skin color. In the photo we're using, the skin tone goes red and oversaturated. To make the correction, you need to open the menu “Image” – “Correction” – “Levels” and first adjust the “RGB” channel and then “Blue”. 

Now you need to even out your skin tone, because... it differs significantly in different areas. To do this, create a new layer (Ctrl+Shift+N) and using the Eyedropper tool, click on the area of the skin that, in your opinion, looks most suitable. It is this color that will cover the entire surface of the skin.
Apply the Brush tool, reduce its hardness and set the Intensity to 10%. Start painting the surface of the skin, being careful not to go into areas of the eyes, eyebrows and lips. 
And with the finishing touch we will give the skin a smooth effect. Press Ctrl+Shift+Alt+E to merge the layers, and then go to the menu “Filter” – “Blur” – “Surface Blur”. Adjust the settings so that the skin smoothes, but does not lose its texture, and the eyes remain clean and clear. 

Ready!
Step 1. The first step, of course, is to find the original photo. I can look at photos of Angelina Jolie all day long, so I'll use her photo. Always. This is my obsession.

Step 2. I created a layer with black thin outlines using the tool PolygonalLasso(Polygonal lasso)(note: After you create a selection with this tool, right-click, select Stroke(Stroke) and define the outline). Areas within contour lines I painted with primary colors, a separate layer was created for each color.

Step 3. Some more color details have been added here. And again, each color is located on a separate layer.

Step 4. A bit of vector colorization. Brightly lit and dark areas are colored by selecting them with a tool PolygonalLasso(Polygonal lasso) and painting with different shades.

Step 5. The areas are mixed together with a tool Blur(Blur) and some brushes set in mode Screen(lightening) And Multiply(Multiplication) With different levels opacity(opacity). Only different shades of the same color were used.

Step 6. Pay more attention to individual vector lines to achieve greater uniformity. While drawing, pay attention to what you are drawing within the selected area, i.e. you should not paint over the outline.

Step 7 Added details to the lips, again using the tool PolygonalLasso(Polygonal lasso). I went back to the original photo several times to get the lights and shadows right.

Step 8 Individual lines on the lips were blurred, and some depth was created using a brush in screen(lightening) And multiply(multiplication). The upper and lower lips were painted separately, by first highlighting each.

Step 9 Addition additional color to the eyebrows and eyes using a tool Brush(Brush) in mode Screen(lightening) And Multiply(multiplication) from bright blue to black, gives them some depth, and I also went over the eye with bright pink.

Step 10 Finer details have been added to the eye area with a little smudging"lubrication" eyelashes, and also a small reflection was added from them. Eyebrows are lightened by mixing with a nearby color.

Step 11 The eyebrows are completed using a thin brush of various colors, slightly mixed together (approx. with a tool smudge(smearing)). I duplicated the eyebrow layer and applied it to the top layer blendingoption(mixing modes) so that both layers with eyebrows are visible. This makes the eyebrows look thicker. The very first layer of black outlines was painted over to blend the outlines into the adjacent areas, but not completely.

Finally, the hair was created using lines of various shades of brown and blonde, then mixed together using a tool blur(blur) and hard brush tool smudge(smearing).
Because the various details of Angelina's portrait are on separate layers, colors and levels can be applied to them independently. Play with them until you achieve a natural shade. Finish by merging the layers and lightly blurring the highlighted areas.
Ready. Of course, you can spend more time on this if you want to refine the details, relying on the original photo and your discretion. Hope, this lesson was useful to you.
What You'll Be Creating
Today we'll learn how to create a golden seam effect using just a few reference images and standard brushes. We make the most of color palettes, adjustment layers and textures to create a vibrant portrait in the form of artistic portrait painting from black, white and golden tones.
What you will need
To complete this tutorial, you'll need the following source materials, available on Envato Elements!
1. Create a Textured Background
First we'll create a fairly simple background using a few textures.
Step 1
Create a new document with the following dimensions 2834 x 3803 px.
Add a fill layer Color(Color Fill Layer), and then set the fill color to a dark gray shade #090909 .
By using soft brush Very large size, Pressure(Flow) brushes 50% , brush color white, add large spots throughout the canvas.
Step 2
Add the original texture "21" from the Artistic Textures set to our working paper or any other watercolor texture, placing it in the center of the canvas. Change the blending mode for this texture layer to Soft Light.
Remember that the color of the texture doesn't matter in this case, since the whole scene will be in black and white at the end!
Add the original texture "6" on top of the texture layer "21" and also change the blending mode for this texture layer to Soft light(Soft Light).
To the texture layer "6", add a layer mask and use a soft black color to hide the bottom left part of the texture.
Step 3
Add an adjustment layer Gradient map(Gradient Map), set the gradient to black and white. Reduce Opacity(Opacity) layer up 78% .
Duplicate the Gradient Map adjustment layer. Increase the Opacity of the duplicate layer to 100%. This will add contrast to the background.
Step 4
Next, let's add a texture from the original texture pack. I used texture "8". Change the blending mode for this texture layer to Hard light(Hard Light).
Add a new layer to the gold texture layer as a clipping mask, and then change the blending mode of the new layer to Soft light(Soft Light).
Using a medium-hard brush, varying the brush color between black and white, add diagonal strokes from the top left corner to the bottom right corner of the scene to add more shine to the gold.
Finally, add an adjustment layer Color Balance(Color Balance) as a clipping mask to the gold texture layer. Set the following values for Reds(Red) -35, Greens(Green) +7 and Blue tones -30.
Group all layers related to the background, name them new group Background.
2. We carry out Color Correction
I usually save this step for the end of the tutorial, but in this case it helps to make a little general color correction early on. This is largely due to the fact that the atmosphere of the image is very dependent on these handful of adjustment layers.
Please note that almost all other layers after this step will be located below this group of layers.
Step 1
All layers are numbered because the order in which layers are added is very important.
- Adjustment layer Color Lookup: (3DLUT), select the FoggyNight filter. Opacity 42%.
- Adjustment layer Color Balance: Set the following values for Red (Red) -8 and Blue (Blue) tones +15
Step 2
Now the second part of the adjustment layers.
- Adjustment layer Color Lookup: (3DLUT), set filter Kodak 5218 Kodak 2395
- Adjustment layer Curves:
Group all adjustment layers into one group, name this group "CC".
3. Prepare and Correct the Model Image
Step 1
Open the original image with the model. Move this image onto our working document, placing it in the center of the canvas, so that the model’s shoulders and upper chest fit very tightly to the edges of the canvas.
Separate the model image from the original background, using the technique you prefer to work with. And since this image does not have complex contours of clothing and hair, any technique for selecting objects is suitable here. Personally, I used the Pen Tool.
Step 2
Add an adjustment layer Brightness/Contrast(Brightness/Contrast) as a clipping mask to the model layer. Set value Contrast(Contrast) to -50.
Create a new layer as a clipping mask to the model layer. Change the blending mode for this layer to Overlap(Overlay).
Using a soft brush, add contrast to certain areas of the model's image, painting in the shadows with a black brush and the highlights with a white brush. Make sure to have more brightness on the model's left eye and darker areas at the top of the head.
Step 3
Create a new adjustment layer Gradient map(Gradient Map) as a clipping mask to the model layer. Set the gradient to black and white.
Step 4
Portrait retouching - open the first photo.
Nice portrait, but often you need to remove all sorts of small details on the skin. These are not always even defects. Often, during commercial retouching, the client demands that the model’s face be made smooth, like on magazine covers. Therefore, now we will look at several useful tools for this.
The first is the Spot Healing Brush Tool.

An excellent tool for quickly correcting fine textures. In the settings, always set the hardness to 100%, the texture is corrected only with rough edges, otherwise the quality of the retouch will suffer. Select the size according to the irregularities that need to be removed. It’s convenient to simply click on the square brackets to change the diameter while working. The mode for this operation is only Normal. And the Content-Aware type. And now I would recommend creating a new empty layer.

If you do retouching on an existing one, then you won’t be able to go back and correct anything; if you copy an existing layer, this will significantly increase the size of the document, so it’s most convenient to work on a new empty layer. And we put this checkbox, so the tool will take into account information on all visible layers, and all adjustments will be saved on our selected layer.
This tool is very easy to use, you simply select the diameter corresponding to the irregularities and simply paint over them, and Photoshop itself will select a surface in the image with the same texture, but smooth, to replace the one being corrected.
But there are cases when automatic algorithms are not suitable, or you simply want to maintain control over the retouching. To do this, we will use the HealingBrushTool (Healing Brush Tool).

The principle of its operation is almost the same, with the difference that we ourselves choose the area from which to take the clean texture. With the Alt key held down, we select where we will take the sample from, and then simply paint over the unwanted area.


And Photoshop itself will adjust this area in color and brightness to the surroundings. This is the tool I always use when retouching and recommend it to everyone. Just remember that this is exclusively for correcting minor defects. If the area is large, then completely different techniques for copying and adjusting the texture in color and light are already used. Almost like collaging.
It often happens when the irregularities that need to be corrected are located too close to some contrasting area. Then the SpotHealingBrush and Healing Brush tools, due to the peculiarities of their algorithms, will give a result that is unlikely to suit us. To prevent such unwanted color transitions from being created at the boundaries of the corrected areas, there is another tool, CloneStampTool.

We leave all settings as default. And to work on a new empty layer, you just need to set in the Sample column that we will take the area from the current and underlying layer.

The principle of this tool is quite simple. Hold down Alt, take a sample that will serve as a material for adjustments and paint over the area we don’t like. Please note that neither the brightness nor the color of this area changes, so you need to be careful with this tool not to do things like this.

It's good if there is graphics tablet and you can set the dependence of the opacity of the stroke on the pressure of the pen. But if this is not possible, then to soften the effect of this tool you can lower the Opacity parameter in its settings. But it’s also better not to get carried away with this, otherwise you can end up with a completely smooth texture, which will greatly stand out from the overall picture.

Chapter 2
Often a photographer needs to somehow correct the figure or face of a model. Especially if he works in the field of beauty photography. And Photoshop has a great tool for this.
First, create a copy of the original layer, and then go to Filter – Liquify (Filter – Plastic).


A new window opens before us, in which we will work. On the left you see a panel with icons different instruments, on the right are their parameters, which are no different. The very first Forward WarpTool is the most basic one that you will use 90% of the time when working on shape editing. In the parameters, everything is simple - we set the brush size according to the area that we will edit, and it is better to set the brush pressure to 100%, and somewhere around 30-40. This will help you make adjustments more accurately.

Let's now try to correct the figure a little. We simply move the unwanted areas with a brush, giving them a shape that is pleasing to us. The tool works very simply - all the pixels in the image move, and those on the borders of the corrected area are stretched.

It is better to work carefully and not make strong adjustments, otherwise it will look unnatural, and the quality of the work will also suffer. Along the way, you can change the brush size using square brackets. If suddenly you can’t do this, then simply switch the keyboard layout from Russian to English. For large areas we set the diameter larger, for small ones smaller. This way you can correct almost any figure. Naturally, we can not only reduce some strongly protruding parts, but also increase them.

When making any adjustments, try to place the center of the brush not directly on the border of the edited area, but slightly beyond it. This will make it easier to save correct form and there will be no need to make many small edits, therefore the quality of the image itself will be preserved as much as possible.
If you decide to correct the contours in smaller areas, then simply select the ZoomTool tool, it is the last one in the list and click on the desired area. The image will enlarge. Holding down the Alt key will decrease.
If we want to undo the last action, then the same keyboard shortcuts work here - Ctrl+Z undoes one action, and Ctrl+Alt+Z undoes all others.
The following tool restores the original position of pixels in the picture. Those. if we have already corrected enough and we don’t really like some area, then we can always return to its original form to correct it again. Just choose the size of the brush according to the area, and just set the amount of pressure to your liking. You can set it small to more accurately regulate the recovery speed.

The next tool pulls all the pixels towards the center of the brush. Visually, this looks like a reduction in some area, but not in the shape of the object, but simply spherically. For more correct operation of the tool, it is better to choose a brush size larger than the area you are going to edit.

This tool acts exactly the same as the previous one, with the only difference that it does not shrink pixels, but pushes them apart, visually enlarging the edited object. It is also better to set the brush size to be slightly larger than the edited area.

The last tool does some chaos. I never use it and I don’t recommend it to you, let me just show you what it does.

When you are finished editing, just click OK and Photoshop will draw all the changes on the selected layer.

Chapter 3
Often when shooting a beauty portrait, it is not possible to comb and style your hair so that it looks perfectly smooth.

Yes, for some creative portraits this is not particularly required, but if it is a commercial order or a shampoo advertisement. Sometimes the client just wants to look like on the cover of a magazine and with disheveled hair it will be very difficult to convince him that the result meets his expectations. Let's learn how to style our models' hair in Photoshop.
First, let's remove small hairs from the face. To do this, we use those already known on HealingBrushTool and, where the tool fails, there is CloneStamp.

Often I just take a ready-made clean texture and copy it onto the area with hairs. I select the desired area using the lasso tool, press Ctrl+C, and then immediately Ctrl+V and this area appears on a new layer created on top of the image. Then I drag it to where I want it using the MoveTool and soften the edges of that area so it blends in with what's around it.

This can be done either using the EraserTool, selecting a brush with soft edges, or using a mask. I would not recommend erasing with an eraser, since this is still a destructive operation, but doing such manipulations with a mask is just right. Create a mask for this layer, take the BrushTool, select a brush with soft edges, or set the Hardness to 0% in the settings and carefully paint the borders over the mask with black.

If this area needs to be adjusted in tone, you can use the Levels tool with a clipping mask. Create an adjustment layer with levels and, holding Alt, click between these layers. Now let's make our adjustments.

Now it’s the turn of small individual hairs along the edges of the hairstyle. They are removed very easily; usually all retouchers use CloneStamp for this. Try to set the brush size smaller and just carefully, taking a sample from the area nearby, paint over these hairs. We don't use the HealingBrush for this because if we're retouching so close to the edge of the hair we're bound to end up with some unwanted gradients.

Now it’s the turn of the bulk of the hair. Small hairs are usually removed with the CloneStamp tool. But if doing this is not very convenient, then we will do it differently. We simply select those areas of the hair that are well combed, copy them to a new layer and, using transformation, adjust them to the area to be copied to. Press the keyboard shortcut Ctrl+T and rotate the layer.

Now let's explore a new transformation feature - Warp mode. Click on this icon and a grid appears on the layer. Using this grid, we can easily bend the area so that it completely matches the retouched area.

When finished, click OK. Now we create a mask for this layer and use the BrushTool tool with black color, having previously placed soft edges on the brush, paint over the borders.
When we see discrepancies in tone, we simply adjust the gamma with the Levels tool.

Chapter 4
Your models don’t always have perfectly white teeth, and often in amateur photography natural lighting only emphasizes this. Let's learn how to fix this using Photoshop.
The picture clearly shows not perfectly white teeth.

In general, nothing in life is ever ideal, but let’s do everything to the maximum, and then we can always weaken the effect. To make your teeth look white, you just need to discolor them and, in most cases, also lighten them. Therefore, we select the area of the teeth in any way convenient for us. I may go the least obvious way, but for teeth it turns out to be the fastest and most accurate. You just need to draw them manually. I'll just create a new layer and use a soft-edged brush to paint this area with black.

We will not save this layer; it is needed only to create a selection. While holding down the Ctrl key, click on the layer and create a selection. Now we create a Hue/Saturation adjustment layer and, as you can see, a mask was automatically created based on our selection. Now delete the black paint layer by selecting it and pressing Backspace. In Hue/Saturation we simply lower the Saturation parameter.

But not until the teeth become gray, otherwise it will look completely unnatural. Now take the Levels tool and either, holding down the Alt key, copy the mask from the desaturation layer onto it, or while holding down the Alt key, simply click between the layers. The effect of these actions will be the same, do as you wish. Here we adjust the gamma towards lightening.

The result is already quite decent. Now let's create a ColorBalance adjustment layer and add the finishing touch. In middle and light colors Let's add some cool colors.

If the teeth seem too shiny, then simply combine all these layers into a group, to do this, hold down Shift and click on the topmost one, then on the bottommost layer that needs to be combined and press Ctrl+G. Now we simply lower the Opacity parameter for this group.

Now let's adjust the eyes a little. First of all, on them, like on leather, there are many undesirable parts that it is advisable to clean. Small vessels can be easily removed using the same HealingBrush or CloneStamp.

When you have cleaned the texture, you can slightly adjust the tone of the protein. Usually, if the whites are light, then the eyes attract much more attention. But the main thing here is not to overdo it. Select the area with whatever you want and create a Levels layer.

If the selection was created with hard edges, then it is better to increase the Feather parameter in the mask parameters, which are shown when you click on it, to blur the edges. Now we just move the gamma towards lightening.

If you need to return shadow areas (this often happens, otherwise the eye will look unnatural), then simply draw a soft black brush over the mask where the shadow should be.
Now it's time for the rainbow. Firstly, it is advisable to increase the glare, since this is the most contrasting area, it will attract greatest number attention. Select the iris and copy it to a new layer using the keyboard shortcut Ctrl+C, Ctrl+V.

Then take the DodgeTool. It is located on the toolbar on the left, the first in this list. We will look at the tools from this list in more detail later, but now all you need to know is that this tool allows you to highlight pixels in an image based on their tone. Since we will first highlight the iris, select Midtones in the Range field, and set the Exposure parameter to no more than 50%. It is better to always check the ProtectTones checkbox; it allows you to perform all manipulations without fear of oversaturating the shades. Now we just make a couple of brush strokes on the iris. Great. Now we set the Hightlights parameter here and enhance the highlights in the same way.

If you go too far, simply lower the Opacity of the layer.

Chapter 5
There are many ways to create the “creamy skin” effect that is so popular with commercial retouchers. We will get acquainted with the easiest and relatively quick ones. But their principle always boils down to ensuring that the skin everywhere is more or less the same light coffee shade. To do this, you need to somehow paint the entire surface in this shade and thereby equalize and bring together the existing colors.
Let's first start creating a skin mask. Let's create a new Hue/Saturation adjustment layer and adjust the red area.

Let's expand this range to yellow by simply pinching and dragging between the two bottom sliders. Now we move the Hue parameter completely to the right or left, it doesn’t matter. The main thing is that all the red and yellow shades change a lot.

This is necessary to make it easier to separate them by color, and therefore easier to build a selection on this. Now set the already known Difference blending mode. Now we can practically see what our skin mask will be like. Go to the Channels tab and hold down the Ctrl key and click on the RGB channel, thereby creating a selection. If a warning pops up, just click OK.

It informs us that there are few light areas to highlight, but we don't need that. Then we create another Hue/Saturation layer, and hide the previous one by clicking on the eye icon, or you can delete it altogether, we won’t need it anymore. We need to adjust the mask of the new layer; to do this, hold down the Alt key and click on it and use Levels. We move the white point to the maximum possible distance so as not to create clipping in the highlights, adjust the gamma to highlight the midtones and move the black point to remove unwanted highlighting and concentrate it more on the skin.

Now that the mask is ready, we can begin manipulating the skin color. First, let's lower the overall saturation by moving the Saturation slider to the left.

Then duplicate this adjustment layer and reset its settings by clicking on this icon. Now we go to the red range and slightly reset the saturation here, and shift the Hue parameter just a little bit to right side, so that the red shades change to orange.
If you wish, you can not make your lips so pale; to do this, simply go over the lips using the masks of these adjustment layers with a soft black brush and remove the correction from them. Now we will tint using a PhotoFilter adjustment layer. It is located in the adjustment layers panel.

In the Filter field you can select various color filters; we are interested in warm ones. Copy the skin mask from the previous one to this layer. And now we adjust the Density parameter, which is responsible for the strength of the filter.

If you disable this checkbox, the color will be applied using a different algorithm, in which the brightness will be reduced; we do not need this in this case. Now let's combine all the layers into a group. Click on the top one and, while holding down the Shift key, click on the last one. Press the key combination Ctrl+G. Now let’s lower the Opacity parameter of the group a little so that our shading looks more natural.
Let's now locally sharpen the eyes and lips of our portrait. Using the keyboard shortcut Ctrl+Alt+Shift+E, copy our image to a new layer and apply the UnsharpMask filter we already know. We set the parameters according to our image.

Create a mask for this layer while holding down the Alt key, so the mask will be black. Now, using a white brush with soft edges, we simply go over the places where we need to sharpen.


