Step by step drawing of wintering birds. Simple drawing lessons. Birds
Everyone loves birds, but not everyone knows how to draw them. It's actually very simple and entertaining. In our article you will learn how to draw a bird with a pencil step by step for children. Follow our instructions and you will definitely succeed. Let's begin.
Let's draw a bird step by step. Let's start with the head. We draw the shape of a semicircle with a small indentation in the place where our bird’s beak will be. We advise you not to press too hard with the pencil so that, if necessary, you can easily erase and draw again. Next, from the bend of our semicircle we draw a triangle, it will be the beak. You choose the length and shape yourself, but draw it in such a way that everything looks harmonious and natural. Next to the beak we apply an eye, its shape should be round. Place the eye at the level of the beak. Compare what you got with our drawing. If the pictures are different, then don’t be upset, you are just learning and you need experience.

Drawing a bird with a pencil is extremely simple. Next step there will be a torso. From the base of our head we need to draw two curved lines. The first circular guide is drawn from below; it will serve as the tummy. The second line is drawn on top of the bird, forming the back. Start from the head, moving up and then smoothly down. How you place these lines determines how thin or plump our bird will be in the end.
It is very important to follow how to draw a bird with a pencil step by step. If you start with the tail or wings, the proportions may not match. Moreover, the bird may turn out uneven and sloppy.

Let's start drawing the wings. To do this we will need to conduct two waves. The length of these lines will be responsible for the span of the wings themselves. Conditionally mark where you will draw these strokes from and draw them in one movement, making the outline of each of the lines. It's okay if some lines intertwine with others. Anything unnecessary can always be erased, and the necessary contour segments can be drawn with thick lines.

To draw a swallow with a pencil step by step, you need to monitor what you get. Your bird is already beginning to take shape and recognizable outlines. Next we move on to the back of the wings. Using semicircular movements we draw a circle. These patterns are similar to waves that will give beautiful shape and complete the stage of drawing the wings. Try to draw these lines smoothly. The more carefully you apply them, the more realistic the final picture will be.

You can already observe the beautiful flight of our bird, but this is not the end. As you may have noticed, the bird drawing in pencil does not yet have a tail. We begin to finish the body, which smoothly turns into the closing outline. Draw lines and try to fluff them up a little at the very end of the tail. These are feathers that are very lush on a living bird. Having drawn these lines, sudden movements round the tail until it closes between the top and bottom. You don't need to draw a lot of curves like on the wings. Three or four curls are enough.

The last final stage of the drawing is to highlight the main contour lines. How to draw a bird beautifully? Of course, you need to add the finishing touches. Draw long lines from the bends of the tail. We'll do the same with the wings. The area of the brisket should be highlighted: to do this, draw a line from the base of the neck, smoothly closing at the base of the wing.
We hope that our article helped you draw beautiful bird. Don't stop there and develop your skills further.
Birds are a very difficult topic for an artist. They have wings (real nightmare for beginners), all these feathers and they are very different from different types. In this tutorial, my goal is to convince you that birds are not that difficult to draw once you get to know them better. If you're interested, keep reading!
1. Basic Anatomy of Birds
Step 1
Although it may seem unnecessary, studying an animal's anatomy is critical to understanding it. If you want to draw a bird in every pose and situation, you first need to know how it works.
Let's start with the skeleton. There are no shortcuts below, no weird bone names, so you actually need them. In fact, you as an artist don't even need the bones as they are - you need the structure they create. So, take a look at the skeleton - can you see how different it is from humans?
It is important to note that although birds have a chest and hips, they all work as one part of the body due to their backbone. In this way, the wings can rigidly lift the entire body. Interesting fact: This is why six-pointed dragons, griffins and Pegasus will never be realistic. On the other hand, wyverns (four-bordered dragons) are the only dragons that can find their way into the sky!
Step 2
Once we remember the skeleton, we can create a more memorable structure for it. You can draw parts of the chest and hips or connect them - it's up to you as there won't really be much movement in the spine between them.

Step 3
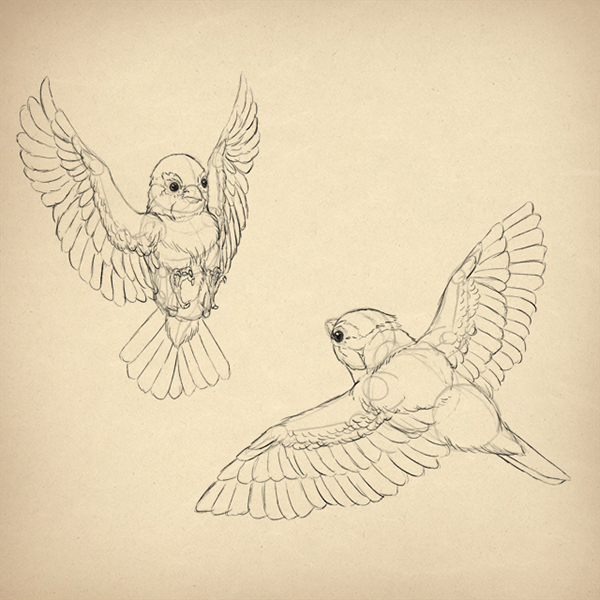
The simplified skeleton of the previous step can be used for an easy pose. To create a realistic pose, imagine you are flying. Where would you keep your feet in this particular pose? What would you do with your hands to catch as much air as possible? Keep in mind that your knees are not very useful here - they are always close to your body.
When creating poses for the legs, it's good to use your arms to represent them - think of your elbows as your ankles, your shoulders as your knees.

Step 4
All species will use the same skeletal structure, only the length or size of individual elements will vary. Before drawing any views, let's take a moment to look at a few pictures. Don't go into detail, just check how long the legs and neck are, or how large a percentage of the body feathers are.

Step 5
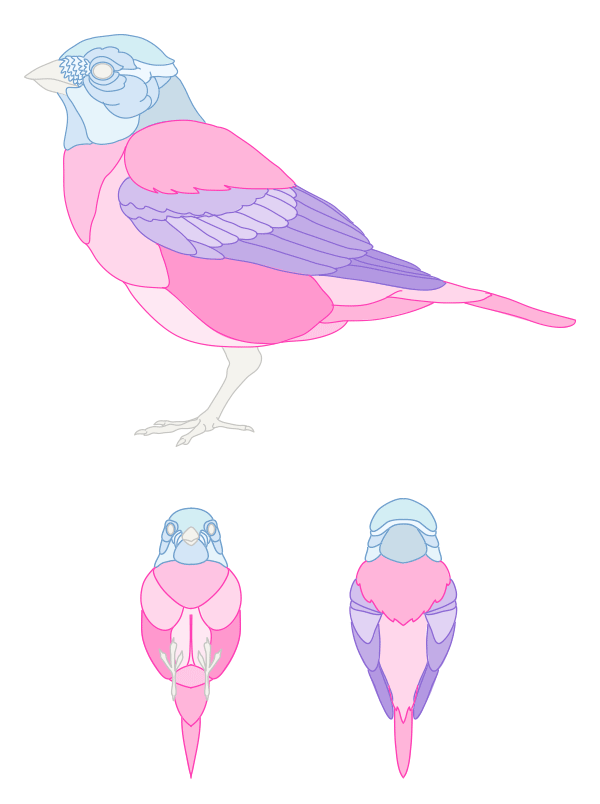
With this information in mind, you can sketch out the pose for your bird. I'm going to draw two little seed birds (not just any special types).

Step 6.
Now it's time for the muscles. I won't show you the full musculature of the bird, as there is no benefit to it. You'll need this if you want to study the advanced physics of flight or check how much modern bird has left of dinosaurs, but for drawing purposes we only need a simplified model as shown below.

Step 7
There is one more thing that we should notice - it is mainly the feathers that give shape to the bird's body. All birds, from the elegant swan to the proud eagle, look like a naked chicken without a coat. We'll discuss the rules for creating layers of feathers later, but for now just keep this in mind when creating the pose and adding muscles.

Step 8
Now add a body to your bird.

2. How to draw bird legs
Birds have different feet depending on their lifestyle. When you know what a given bird does in life, you'll know what to do regardless of the references!
Step 1
Let's start with birds of prey:
- The legs of predators (claws) are very strong, thick, with hooked claws;
- Front middle finger and the hind toe can touch each other like the jaws when the claws close.


Step 2
Small birds, such as sparrows or jays, have legs adapted for sitting:
- The fingers are long and thin;
- The claws are thin and sharp;
- When closed, the legs take the perfect shape to wrap around the branch.


Step 3
Waterfowl usually have webbed feet:
- The fingers are long, very thin and delicate;
- The claws are short and not very sharp;
- At the back there is a short, additional claw;
- The membrane connects all the fingers at the bottom.


Step 4
Running birds, such as the ostrich or emu, have legs designed for running:
- The fingers are thick and very strong;
- The claws are more like nails, short, rounded and thick;
- When drawing an ostrich, pull out one finger.


Step 5
Chicken and turkeys have scratching legs:
- The fingers are thick and strong, spaced apart for better support;
- The claws are sharp, thick and hard.


Step 6.
Woodpeckers have climbing legs:
- The front and rear toes are symmetrical;
- The fingers are very long and thin;
- The claws are strong, sharp and gripping.


Step 7
Birds, like true descendants of dinosaurs, have scaly legs. General rule: The larger the bird, the more characteristic the scale. Draw a row of large rectangular scales on each toe, then blend them into legs with slight curves.

Step 8

3. Beaks - Types and Shapes
Step 1
First we have to look at the anatomy of the beak. If you look closely, you will notice that the beak is not attached directly to the front of the skull - its structure is much more complex.

Step 2
Like the legs, each species has its own specialized beak. The beak must be light and very functional at the same time - hence there are no teeth and a variety of shapes.
You can make each beak using simple steps:
- Start with a circle about the size of your head. Add a line leading from the circle to the tip of the beak (the place where both parts meet);
- Draw a line cutting the “beak” into two-thirds. Use this line to draw the rough shape of the beak. You'll need to look at the link before doing this, but once should be enough;
- Refine the shape now by adding the head at the same time.

Step 3
Time to add a beak to your bird. The above rules apply to any perspective - you just need to draw the two sides of the beak and add some width between them.

4. How to draw a bird's eye
Step 1
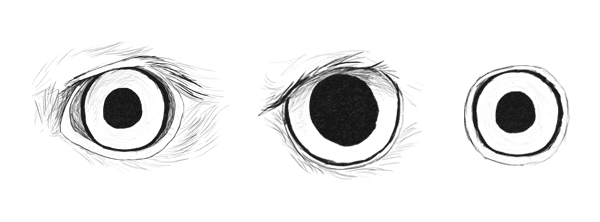
Bird eyes are probably one of the easiest eyes to draw. Since they are very simple (for example, they cannot move on their own), little is known about them. Start with a circle, add a dark outline, then add a ring around it and a pupil.

Step 2
Before you draw a particular bird, you should first view it. In general, birds of prey have a distinctive eyebrow that gives them intelligent species, nocturnal birds have large, yellow or orange eyes with wide pupils, while small birds have simple, round eyes, usually with a dark iris (so that their eyes look like small black beads). But there is still a lot to learn!
Step 3
Do you see? Two tiny beads!

5. Feather groups
Step 1
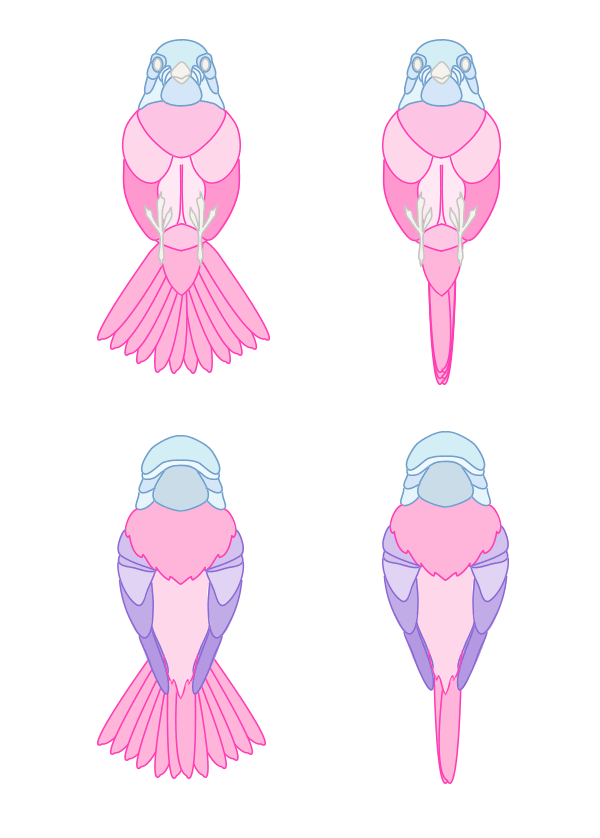
As we noted earlier, feathers are what give a bird's body its shape. The feathers are not distributed evenly - they grow in layers of different sizes and shapes. Layer outlines are equivalent to muscle outlines - draw them and the body will look real.
Additionally, each layer may have a different pattern or color. Use layers when drawing to create a believable 3D look.
Step 2
Another thing is the size and distribution of the feathers, with layers. It is highly recommended that you look up references for a specific bird before drawing, but the illustration below will also help you:

Step 3
Add feathers to your bird. If you need help with the wings, I .


Step 4
The bird's tail works like a fan of feathers. As you may have noticed in the skeleton diagram, the tail itself is very short and the feathers are attached to it.
Step 5
Various shapes A bird's tail comes from the variety of feather lengths. When creating your own bird, you can choose any shape you want, subject to only one rule - the tail must be symmetrical.

Step 6.
Attach the tail to your bird. Now everything is ready, now you can polish it, erase extra lines, add patterns, colors and so on.
That's all, guys!
Congratulations,
You have just taken your first step in amazing world birds! If you want to learn more about drawing other animals, check out our session on . Until next time!
Birds are tremulous and timid creatures; they embody freedom and rebellion. That's why everyone loves and admires birds. Birds can be found especially often in fairy tales and cartoons, because they sympathize with children. We will learn to create a real masterpiece in a few steps - we will draw a beautiful bird. Show your child how easy it is and he will start drawing more and more.
How to draw a bird step by step
- Stage 1. Draw a large oval - this will be the outline of our tail. We divide it into conditional 4 parts, separating them with thin lines, which will need to be removed at the end of the work. We draw the outline of the body and move the line to the side to draw the head. We draw two circles near the body - this will be the decor of the tail in the future.
- Stage 2. We divide the large circumference of the tail into many parts with small strips, which will also need to be removed later. These are auxiliary lines for separating the large tail feathers.
- Stage 3. As shown in the figure, we draw each feather along the contour of the auxiliary lines. We also draw a parallel line inside each feather for further decoration.
- Stage 4. We erase all the auxiliary lines; we no longer need them and complete the decor as indicated in the picture. We color either according to the example or at our own discretion.
In just 4 steps we drew a charming bird. Thus, even without knowing how to draw, you can easily teach yourself and teach your child. Show him how to do it quickly and easily, it is very useful for imagination and the development of creative abilities.
Step one
In the center of the sheet, draw a small oval - the head. Now we draw the torso from it down. It's always easier to draw if you imagine the shape of what you're drawing. Now our body is somewhat similar in shape to a cucumber. The long, angular tail needs to be continued downwards.
Step two
Let's draw a beak to the head. Long, smooth. Let's designate the eye. Let's show the wing starting from the upper part of the body. It is folded, and its tail sticks out a little over the tail. Now the bird's legs.
Step four
We continue to work on the bird's face. Shade the chin and draw a tuft on the back of the head. We will show long feathers on the wing and tail. Let's work on the paws.
Step five
Now we carefully shade the raven. Let's blend it out a little later. Well, you don’t even have to paint it! It seems to have worked out well.
How to draw a bullfinch with a pencil step by step
Step one. Draw a small branch with a small shape in which you will draw the bird.  Step two. Clearly highlight the wing, since the drawing will be in profile, and then the paws and beak.
  Step three. Make the branch more neat, add feathers and a small black eye.
  Step four. Start adding some silent shadows and sketch out the top of the head.
  Step five. Clean up the drawing, add some shading, and also draw in the tail in black. Don't forget to make the contours clearer.

How to draw a tit with a pencil step by step
Step one. Let's mentally mark the top of the head and from there we begin to carefully move the pencil to the left and then down. Let's pause on the beak and draw it as shown in the picture.  Step two. Using short strokes under the beak, thus creating the effect of plumage, we will show the bird’s neck. We continue with the same short lines and move into a fluffy chest, it protrudes forward relative to the neck. Gradually round off the contour and move on to the abdomen. Now let's go back to the top of the head and draw a line to the right and down to the neck. You can draw a broken line. At the level of the convex chest, we make a bend to the right and go down again, drawing the contour of the body. Let's show relatively long tail, and under the abdomen there are two legs. Starting just below chest level, draw a broken line - draw a wing. Divides it roughly in half vertical line. This is in accordance with the coloring of the tit. You can turn to photography again here.
 Step three. Draw a black eye - a bead. Underneath it, starting from the beak, we will draw the outline of the cheek and leave it white, unpainted. Using a fairly strong pressure on the pencil, shade a black stripe-collar around the neck. From it we will draw a “tie” down to the abdomen. Our lines should be along the plumage to make it more realistic. We also shade the area above the nose and above the cheek along the plumage. We leave the crown light, this will give us a shine effect.
  Let's continue drawing the titmouse's wing. Already with larger strokes. And only along the plumage. To prevent our bird from hanging in the air, we will show a wide tree branch under its paws.
Step four. And the last step. Let's add some more shading. Well that's it! The drawing is finished. I hope now you will know how to draw a titmouse! 

How to draw a goose with a pencil step by step
Step one. First, draw two circles, large and small, and connect them with a curve.  Step two. In accordance with the circles, draw the bird’s body, long neck, beak and eyes.
  Step three. We remove the extra lines from the first circles, outline the body itself in bold, draw the paws and the ground under them.
  Step four. All that remains is to carefully draw the main attribute of the bird - the plumage. You can add shading.

Step one.
Let's start with the head. Let's place it in the very center of the sheet. In the center of the head there are auxiliary lines in the form of a cross: the level of the eyes, mouth and nose.
 Draw a torso to the head. Swinging to the sides, we draw the lines of the wings. The wings must be symmetrical. Together they are somewhat similar to a heart.
We will draw short curved lines on the wings, then they will turn into feathers. Below the bird we draw a fairly large arc - the outline of the tail. At the bottom of the body we outline the paws with claws.
Step two.
Let's draw the owl's claws in detail. Inside the contour we will show the body, which converges to the legs.
At a horizontal level we outline the eyes. And then we draw feathers all over the owl’s body: along the line of the wings, along the tail. At the same time, the feathers do not have to be the same and their size can also be different. For especially large feathers, draw a center line.  Step three.
On the main area of the large open wings we draw small curved lines representing the plumage. In some places we will show them more densely, in others less often.
Look carefully at the owl's belly and try to do the same.
Let's put a mark in place of the beak.  Step four.

The next stage of drawing a dove will be the play of light on our bird. Neck, tail, wing and other places where a shadow falls or the plumage becomes darker in color light movements We shade our hands with a pencil.

Our creation is almost ready, but when we do, we should not forget the importance of details. We erase the auxiliary lines, add sophistication to the plumage, correct the outline, and, to the best of our ability, try to detail the drawing as much as possible.
How to draw a hummingbird with a pencil step by step
Step one. First you will need bird and flower shapes.  Step two. Draw one eye, a beak and the shape of a tail, and also add a flower that the hummingbird flew to.
  Step three. Carefully draw out all the details, the contours of the wings, carefully sketch out the eye and a branch with flowers.
  Step four. Add more shadows using shading. It should look something like this:

How to draw a seagull with a pencil
Step one.
Let's draw two circles indicating the head and body of the bird. We will also show the tail and legs.

Step two.
Let's outline the contours of the body.

Step three.
We draw the eye, beak and legs. Let's designate the wing.
 Step four.
Let's do the finishing touches and add some details. And here is the result:


How to draw feathers with a pencil step by step
Step one. Let's make a shape similar to a leaf.  Step two. Let's add a couple of touches.
  Step three. Let's make the outlines of the feathers.
  Step four. Using shading we draw a realistic feather. See how it turned out:


That's why I'll be happy to show you how to draw an owl with a pencil.
Step one
We draw two circles in the center of the sheet, and mark with horizontal lines the branch on which the eagle owl is sitting.


Step three
Let's add legs and the outline of the plumage.

Step four
Draw the eyes and key of the owl.

Step five
Let's add a couple of feathers and some shadows. And you'll end up with a bird like this:


Let's get down to business.
How to draw a stork with a pencil step by step
Step one.
Let's draw one large and second small circle in the center of the sheet. From them we will draw lines indicating the wings and legs of the stork.

Step two.
Let's draw the beak and neck. Draw a line with the approximate wing span.

Step three.
Let's draw toes on the legs, and sketch feathers on the wing. Let's outline the contours of the stork's body.

Step four.
Let's finish drawing the head (beak, eyes). Let's add feathering. Don't forget to erase the auxiliary lines.

Step five.
Let's outline the stork's feathers with a thicker line; to do this, use a softer pencil.

Step six.
It remains to add a little shading on the body and darken some areas in order to give it more realism. This can be done using shading - rubbing a pencil over the surface of the paper.
End result:


I won’t rant too much, let’s get started right away.
How to draw a heron with a pencil step by step
Step one.
Let's draw two circles: one for the body in the center of the sheet, the second higher and to the left for the head. Let's immediately outline the wingspan and show the location of the legs.

Step two.
Let's connect two circles, we get long neck. Let's add a tail.

Step three.
The heron has a clearly visible tuft of feathers on its head, so this bird is difficult to confuse with any other bird. Next we draw a cone-shaped beak and give shape to the plumage.

Step four.
Let's draw the heron's wings and darken the chest part a little. You can achieve a darkening effect using shading or shading.

Step five.
Let's make it beautiful: erase the auxiliary lines, add shadows, draw bolder contours. In the end it turned out something like this:

How to draw a starling with a pencil step by step
Step one
In the center of the sheet, slightly to the left, we will place the head - a small circle. Let's add an oblong figure to it, resembling an oval. In the future, this will be the torso!

Step two
Let's outline the open beak. Now the paws. One is raised, the other is supporting. Starting from the head, we draw a line... this is the wing. Let's show a short ponytail.

Step three
Outline the outline of the tit. You should get a smooth line. Let's draw the beak. Let's show the eye and claws on the paws. Note the ribbed skin of the raised paw. Try to do the same. On the abdomen and on the tail there are short lines showing plumage.

Step four
Let's outline the eye with a thin line. There is a small white spot in the center of the eye. Let's shade the bird's mouth.

Now we draw the feathers on the wings, as shown in the picture.
Step five
We continue to show the plumage. It is all over our bird's body. This is how it turned out pencil drawing of a starling:


How to draw a crane with a pencil step by step
Step one. First create the shape of the body, use a long line to highlight the paws, and draw the head on top.  Step two. Connect the head with the body with the neck, draw the second raised paw and the shape of the wing.
  Step three. Shade the bird, correct the contours of the lines and draw in the eyes and beak.
  Step four. Clean up the drawing with an eraser and add a little more shading.


How to draw a magpie with a pencil
Step one.
Draw two circles in the center of the sheet. One represents the head, the second the body of the magpie. From the body, draw a line for the tail and two legs below.

Step two.
Let's outline the contours of the body, erasing the auxiliary lines drawn in the first step, and using light intermittent strokes we will add the contours of the plumage.

Step three.
Let's draw a magpie's beak, eye, wing and paws.

Step four.
Let's add some more strokes to the body to give it a realistic look. Ready!

Easy and fast, right? I hope it worked out for you too!

We will draw from it.
How to draw a lark with a pencil step by step
Step one.
We draw a sketch of the future bird.

Step two.
On the wings and tail we will add lines indicating the plumage.

Step three.
Let's draw an eye and a beak. And also the hind legs.

Step four.
Let's add touches throughout the body to give the lark a realistic look.
The result should look like this:

How to draw a cuckoo with a pencil step by step
Step one. Let's sketch a bird and a branch.  Step two. Let's add a feather, a key and an eye.
  Step three. Let's remove the extra lines, add shading and sketch out the eye. It turned out like this:

How to draw a rooster with a pencil step by step
Step one. We use circles to denote three parts of the body, these are the head, torso, large tail and below an arbitrary stone on which the rooster sits above our world.  Step two. We outline the contours, add the semblance of a head, wings and the tip of the tail.
  Step three. The rooster crows almost all the time, which means we draw an open, screaming beak for him. We also draw the mane and feathers all over the body, especially on the tail and wings. Don't forget about the paws, we fix them too.
  Step four. Now all that remains is to give our rooster more contrast and shadows, let’s draw in the details. We draw the necessary lines in bold and erase the auxiliary ones.
How to draw the Firebird with a pencil step by step
Step one
Let's outline a small circle - the head. Let's frame it in a large semicircle. Below we will draw an arc. The resulting figure somewhat resembles a month. From there down are the lines of the body. Longer and curlier tail. Let's show some curls.

Step two
Let's add a beak to the head. He looks up. It seems that the bird proudly lifts its head up. We bring the curved neck down. Let's add a little more heat, that is, curls.

Step three
Let's outline the outline of the body and wings. The bird's legs are still dim. And a few curls can already be outlined brighter. There is a small crest on the back of the head.

Step four
Let's work on the bird's head in detail. The crest has become completely curly, and we can see an eye on his face. On the wings we highlight individual pointed feathers. The tail becomes more and more fluffy and curly. A pair of lines - a spring - stretches from the body. Let's also outline the outline of the body.

There you go! You can color the Firebird fiery orange!
How to draw a Phoenix with a pencil step by step
Step one
First we will define the position of our drawing. It should occupy the entire central part of the sheet. In the middle we will draw a head with a curved neck. From it downwards there is an oblong body. And now the wings. This is perhaps the biggest detail. Below we outline the waves of the tail.  Step two
Let's draw the bird's head and beak. Smoothly outline the neck and body. Inside the wings we will draw many, many lines that will show us the feathers. And below, where the tail is, we will place beautiful curls.  Step three
Draw the wings, long thin feathers. Let's show the eye and legs of the Phoenix bird. Let's add curls to the ponytail.  Step four
Remained finishing touches. Let's color the eye. Let's draw a winding crest on the head. Let's show the plumage on the body. Let's draw the paws in detail. And let's fluff our tail. That's probably all! Now you can safely paint with the brightest colors and pencils! 


How to draw a Swan with a pencil step by step
So, let's start drawing.
Step one.
In the center of the sheet, draw two closely spaced circles.
Below we will place two figures symmetrically, similar in shape to an egg. And now we need to carefully curved line connect a small circle-head with a large body. You need to draw carefully. At the same time, you can imagine the shape of a heart: this is approximately how the necks are positioned.
 Step two.
Draw the head. First, the beak: elongated and not very sharp. Almost at the very neck: dot-eye. Let's circle the top of the head several times, leaving a small sticking tail to get a tuft.
 Step three.
Perhaps the head is a very important part of the drawing. But still in second place after the graceful symmetrical bend of two swan necks. So, let's draw a triangle from the beak to the eye. We'll decorate the nose next to the beak. Let's outline the neck line.
 Step four.
We already have the neck axis. Around it you need to draw the neck itself. Starting from the head and ending on the torso. At the same time, in the chest area we make a more convex bend.
 Step five.
Draw the outline of the body. We start from the neck line and go along the back. Approximately in the middle of the back we make a small notch in the feathers, then smoothly go down along the oval, drawing out the angle of the wing and the tail.
Let's imagine a horizontal line from the sternum to the tail. But in reality it is not entirely straightforward.
 Step six.
Let's paint the red cheeks of the swans. At all thin line Let's outline the outline of the wing. There's just a little bit left.
 Step seven.
Erase all auxiliary lines. Let's make the outline clearer. Now our drawing is ready. You can color it and add a landscape. 
How to draw a peacock with a pencil step by step
Step one
Draw a large oval in the very center of the sheet. Let's step back up and show a small circle - the head. From the body downwards we will draw several long and curving lines.

Step two
Let's connect the head to the body. The neck should be thin at the head and smoothly widening downwards. Let's draw the wing. It ends at the tail. From the head up draw a peacock feather.
To the left of the body we have a curl.

Step three
Let's draw the heads: beak, eye, flowing curls from the head. Let's fluff up the tail, adding more lines there. Let's formalize it.
There are beautiful curls on both sides of the body.

Step four
Let's turn our drawing into an original, creative one, so to speak. Let's carefully inscribe our peacock into a figure similar to a hieroglyph. Graceful lines ending in either a point or a rounded curl.

Step five
Let's shade our figure. With assertive, strong pressure from the pencil. Almost ready. You can add colors and you will have a colorful peacock!

How to draw a duck with a pencil step by step
Step one
In the very center of the sheet, but at the bottom, draw a large elongated body. The shape is somewhat similar to a loaf. Above with right side- circle. This is the future head. The beak goes away from it. Using an oval we connect the head and body.

Step two
Let's outline the resulting figures with a single smooth line, turning into a sharp tail. In this case, the back is convex, the neck is curved, and the chest protrudes forward. Let's show the surface of the earth and the grass around our feathered guest.

Step three
Let's draw a wing. It extends slightly beyond the contour of the entire bird’s figure. Let's show the beak and eye. And on foreground, in front of the duck, draw small flowers.

Step four
Let's make the eye dark, dark and bright. Let's give it an almond shape. There is a spotted cap on the head. There are small feathers all over the body. Notice how the wings and tail are drawn. Let's add even more growth around.

Step five
Not much left. Let's take soft pencil, outline the outline of the bird, select the wing. Let's decorate the grass a little with flowers. The duck is ready! True, not with apples.


How to draw a chicken with a pencil
Step one.
Draw a circle in the upper left corner. This is the future head. Place a large oval in the center of the sheet. So that it touches the chicken's head.
Let's outline the bird's beak with an auxiliary line. Let's draw the center lines of the legs.
 Step two.
Now let's draw the beak. In a chicken it is very small and similar to the beak of a woodpecker, only much smaller. The line that we have already outlined should be at the bottom of the triangle.
From the beak upward we draw the line of the forehead. Then we go down the circumference of the head. And on the back of the head we will show a tiny crest. Now let’s draw a zigzag line along the entire body of the chicken to give the bird some fluffiness. (Fluffy cat in pencil) In this case, you can show individual hairs.
Let's outline the paw: it is quite massive, with claws.  Step three.
On the head, as you remember, we drew an auxiliary line. We now need to draw an eye on its tip. Large, almond-shaped. We immediately paint over it, leaving a small light dot - a reflection of the light.
Next we outline the entire body of the chicken: chin, neck, wing shape, leg. In a zigzag line to create a “fluff”. Almost like a kitten.
We will draw additional lines on the chest, forehead and cheek.
Let's draw the second paw with claws.  Step four.
Almost everything is ready. All that remains is to erase all unnecessary lines. Let's outline the contour brighter, and leave the lines along the body, the same ones on the chest, forehead and cheek, light. You can add a couple more of the same throughout the body.  The chicken is ready, congratulations! It seems that you want to stroke it... Or paint it.
How to draw a chicken with a pencil step by step
Step one. Let's draw a jug, or underpants, whatever you want to call it. This will serve well for creating a feathered bird in it.  Step two. We draw the body, correlating its upper and low points with the corners of the jug, so that the head is on the left, the tail is on the right, and you know where the paws come from - from below.
  Step three. We outline the elements of the body in more detail. There are not a lot of details here, so I won’t comment, everything is clear from the pictures.
  Step four. Let's remove the auxiliary lines. There are not enough feathers.
  Step five. Let's add more plumage, correct the muzzle, remove unnecessary lines, a little shadow under the legs in order to give the effect of movement. And we will add shading throughout the body.
How to draw a rook with a pencil step by step
Step one
We draw the main details of the body: head with beak, torso and tail. On at this stage it's just geometric shapes, located in the center of the sheet.

Step two
Let's connect the head to the body. The result is a neck. Let's mark a point - the eye. Because of the body we have two protruding wings. Let's show the paws - the legs of the rook.
 Step three
We draw the head: the eye, a point on the beak. Now - the wing. It begins in the center of the oval body, following its contour. Let's continue drawing the paws with clawed toes.

Step four
Now the shading. Using large stitches we shade the neck, abdomen, farthest from the wing. On top, blend it a little. We will leave the wing and head white - untouched. So the drawing of the rook is ready!

 So let's get started.
How to draw an eagle with a pencil step by step
Step one. All lines are first shown with a thin, barely noticeable line so that there is an opportunity to correct the mistake. First we draw the beak - typically eagle-like, hook-shaped and curved down, quite high.  Step two. From the beak to the side we draw the line of the head: we rise up, then go down to the neck.
  Step three. From the bottom of the beak, draw down the neck and convex chest of the eagle. Let's start drawing the wing from above.
Step four. We'll show you back wings and paws of our predator. At the back, using a zigzag line, we will draw the plumage.
Step five. We finish drawing the wing: draw a smooth line along the chest and end it behind the wing, drawing a couple of zigzag feathers.  Step six. Let's finish with the paws: they are powerful, with very strong claws, feathered down to the toes.
Step seven. Draw the tail. He medium length and rounded at the back.
Step eight. Claws are a powerful and strong weapon of a predator, which it needs in hunting prey. Above the beak we will place a small, but very keen eye. Draw a line above the bottom line of the beak, repeating it.
Step nine. Our drawing is almost ready. All that remains is to remove the missing lines. You can trace the outline and color it. 
 Let's start drawing.
How to draw a swallow with a pencil step by step
Step one.
First, let's outline the outline of the bird. Let's start with the body: it is oblong and pointed on both sides. The tit's belly is more rounded, and its back, on the contrary, is straighter.
Now we draw the outline of the wings. Please note that they are not completely symmetrical, but at an angle. One shoulder is slightly ahead of the other, because our swallow is now soaring in the air and we see it from one side.  Step two.
Inside the outline we will show the bird's head. It is small, with a small sharp beak. Let's show a round eye. Next - the neck and a sharp transition from the neck to the wings. On the lower part of the wing we will show jagged feathers.
Let's denote the tail.  Step three.
At this stage, we will erase all the auxiliary lines, outline the outline with a thick line and show the details. Let's draw a stripe from the beak, a pattern on the head and a spot on the chest. Let's draw feathers on the wings. Let's draw the tail more clearly, leaving long tail feathers along the edges. There are paws on the tummy.  Step four.
Let's color our little bird. I recommend using either colored pencils or watercolors to show the color transition. Just not with felt-tip pens. And before adding color, you need to carefully look at the color of the bird in photographs and pictures.
Drawing a bird is a task that often faces children and their parents. Sparrows, crows, jackdaws, nightingales, bullfinches, eagles, tits and other birds are common objects in children's albums. There is also room here for unusual characters- firebirds and Angry Birds. However, everything is not as difficult as it sometimes seems for beginning artists. Using visual lessons and acting step by step, step by step, you can make high-quality and clear drawing. After several trainings in drawing birds, the child will get better and better.
Step by step bird drawing lessons
Bird drawing lessons with step by step photos for beginners will help artists master the art of creating birds on paper.
Wintering bird: drawing a sparrow
Among wintering birds, the most popular are sparrows. Creating a drawing of such a bird is quite simple if you proceed in stages.
- You need to draw an elongated oval. This is the base of the bird's body.

- At the top of the workpiece you need to draw a figure with rounded contours. This will be the head. From below there are several straight lines. This is the tail of a wintering bird.

- Next, the beak is clearly drawn.

- Then you need to use smooth contours to create the outline of the breast, wings and make the eye.

- You need to draw the sparrow's legs with a pencil.

- All that remains is to color the drawing using colored pencils or felt-tip pens. If desired, you can use paints.

Bird in flight: drawing a seagull
- The process of drawing a bird in flight is much simpler than it seems. Even a child can cope with the task. First you need to draw a circle, which in the future will become the head, and the body of the bird. The bottom and top of the body should be a little sharp. There is no need for roundness here. Then the eye and beak are drawn, after which the contours of the circle must be erased with an eraser.

- Now we need to draw the span of the flying wings and the tail. The wing, which is located closer to the right edge of the paper sheet, should be much larger and longer than the second and the body. No need to grind!

- Next you need to finish drawing the paws and wings. The first ones need to be depicted folded tightly to each other.

- Then you need to draw lines that will make the thigh. To do this, the contour is drawn from the seagull's foot down. Next, the feathers on the tail and wings of the bird are depicted.

- It is necessary to remove all unnecessary contours.

- All that remains is to draw the shadows. The wings of the bird in flight should be made almost black and the underside of the seagull should be greatly darkened. Plus, a shadow also falls from the wing on the body. On the second wing, located closer to the left edge of the sheet, you should slightly outline the outlines of the feathers along the entire length. Similar contours need to be made on the body and around the head.

Angry Birds

Tit
This master class is designed to help you draw a tit.
- Draw a circle: this is the future head. Using straight lines we sketch out the body of the tit.

- We give the bird's head the necessary shape. We make the tit's beak and draw an eye in the upper right part of the head.

- We make the contours of the tit’s body more distinct. The head should flow very smoothly into the body. Draw the abdomen round. We remove the auxiliary lines.

- Now we draw a twig. We depict the wing of a tit and the upper part of the bird’s legs.

- We complete the image of the paws. Draw the fingers and tail.

- Using small, abrupt lines, we sketch out the boundaries of the color transitions. We draw feathers on the wing and tail.

- We complete the work: shade the tit’s head and tail. Draw small feathers where necessary.

Woodpecker
Thanks to this master class, you can draw a very cute and realistic woodpecker step by step. MK will help adults and children who have decided to master the technique of drawing birds.
- We schematically create the contours of the head and body of the future woodpecker. In this case, the sheet of paper should first be divided barely noticeably into four parts.

- Next, a sketch of the tail and beak of the bird is also schematically made.

- Now we need to draw general outline the body of the depicted object and its head.

- We are engaged in creating details and their clear drawing: eyes, beak, feathers, wings, etc.

- We complete the work on the nuances and erase all the auxiliary elements.

- Shading with a simple pencil all necessary areas according to the natural colors of the woodpecker's plumage.

Bullfinch
The proposed detailed MK will help beginners draw on our own very attractive bullfinch.
- Before starting work, divide the sheet into four segments. This will help you sketch correctly. We draw, as in the picture below, 3 circles. This is the basis of the future bullfinch.

- Next is created smooth lines general outline of the image.

- We outline the previously created silhouette of the bullfinch.

- Draw the bird's legs and tail. We create recognizable details of the bullfinch. Don't forget about the eyes. Erase all unnecessary lines.

- Add small details of the bullfinch's legs and plumage.

- We shade all the necessary areas.

Magpie
Using the one below step by step instructions You can easily portray a magpie. By following the recommendations and using drawings as tips, even novice artists will certainly succeed in creating a bird.
- First we draw a circle. From it we form the head of the future magpie, drawing the beak and eye.

- Let's sketch the silhouette of a magpie. At this stage, it is important not to forget about maintaining the proportions of the drawing.

- Let's create the shape of the magpie's body.

- We draw the tail, paws, wings.

- We depict other details. We form a contour for separating the magpie shades.

- We make the bird's plumage along the lower contour. We depict feathers and erase everything unnecessary.

- We shade all areas in accordance with the plumage of the magpie.

As you can see, drawing a bird with a pencil step by step is not particularly difficult. Tips for beginners will help you cope with the task in a few steps. Both children and adults will enjoy these drawing lessons. After all, the image will certainly turn out clear, realistic and original.
-
 April 17, 2015When a corrective alcohol return may be required
 -
 April 17, 2015"Marble" cupcake: recipes and cooking methods
 -
 April 17, 2015Recipe without sterilization with onion sautéing


