DIY New Year's gifts: Christmas tree toys made from salt dough. DIY New Year's crafts made from salt dough
Oksana Seifert
Good afternoon, dear colleagues! Winter has come into its own and very soon a cheerful and joyful holiday will come - the New Year! And as always, according to tradition, we decorate Christmas tree, forest beauty purchased toys: multi-colored balls, icicles, snowmen, snowflakes, tinsel, etc. Well, what if you decorate Christmas tree with toys made with your own hands. After all, such toys made with love, carry warmth and positive emotions of the one who gives them tinkered. Today I propose master class on making Christmas tree toys(balls) from DIY salt dough. Such toys can be done with children, since working with test develops fine motor skills of children's fingers. For making New Year's balls for us will be needed: 1 cup flour, 1 cup fine salt, a little water, a cap felt-tip pen, gouache paints, brush, sippy cup, glue "Moment", or glue "Titanium", green, blue, silver sequins, star-shaped sequins, satin ribbons. Place flour, salt and a little water in a small bowl and knead dough. It must be hard and thick so that it can be sculpted. Dough Roll out to about 1 cm thick and cut out circles using a glass. Using the cap from felt-tip pen cut a hole for threading the ribbon. Then our balls should dry. To do this, you can bake them in the oven, or you can leave them on a sheet of paper for several days. After the balls are dry, you can begin the fun part - decorating them. Here you can show all your imagination. Can be colored toys with gouache paints, draw patterns, glue multi-colored sequins using any available glue. Thread a satin ribbon through the hole and tie a bow. Our Christmas ball is ready! Can be decorated Christmas tree! Thank you for your attention! I wish you all good luck and creative success!


Publications on the topic:
 The New Year will come only in a month, but we are preparing for the holiday now. Following tradition, the senior group and I decided to do this.
 When the “Golden Autumn” exhibition was announced in the garden, I thought for a long time what we could do with our (almost) 3-year-old daughter. So that she too can participate.
Educator: Boeva Irina Yuryevna MBDOU kindergarten No. 34 Objectives: - To promote the development of fine motor skills, imagination, and observation.
Master Class. Goal: to form an idea of the type of decorative and applied art - dough plastic. Objectives: Level up.
 Good evening, dear teachers. Today I want to share again my creativity from salt dough. I made it from an ordinary half liter bottle.
Easter is a big and bright holiday in the life of every Orthodox person. This year, a charity fundraiser was dedicated to this holiday.
 MASTER CLASS “BRIGHT COLORS OF AUTUMN” (AUTUMN TREES FROM SALT DOUGH) The autumn forest, playing with colors, Weaves wreaths from the crowns of trees, with its own.
Master class with step-by-step photos “New Year's gifts” using the salt dough modeling technique.
Author: Daria Galanova, 9 years old student of the municipal budgetary institution of pre-school and youth education, association “Salty Fantasies”, MillerovoTeacher: Nazarova Tatyana Nikolaevna, teacher of additional education of the Municipal Budgetary Institution of Preschool Children's and Youth Children's and Youth, Millerovo

The master class is very simple in complexity, perhaps it will be useful to teachers of kindergartens of senior and preparatory groups. In this case, you can cut out snowmen and mittens from the dough in advance. Dry them, and during the lesson ask the children to make the rest of the molds. The master class will also be interesting
for everyone who loves to sculpt salt dough. Make gifts for friends and loved ones. As well as additional education teachers, primary school teachers, teachers of extended day groups.
Purpose: New Year gifts.
Target: creating New Year's gifts using the salt dough modeling technique.
Tasks:
Educational: master the technique of making gifts from salt dough;
Educational: develop accuracy in modeling and artistic thinking;
Educational: encourage the desire to give New Year's gifts made with one's own hands;

Required material:
Paper napkin, stack, glass of water, “Extra” salt, premium flour, “snowman” dough cutter 10.5 x 6 cm, photo frame, colored paper, “snow” floral mesh, “small mitten” 5 x 2.5 cm cocktail tube, ballpoint pen without paste, rolling pin, simple pencil.
Salt dough recipe:
Combine 1 cup flour and 0.5 cup salt. Stir, make a well. Gradually pour in 1 glass of cold water in a thin stream. Knead into a tight, elastic dough. Store the dough in a cellophane bag.
Recipe for "snow"
In a small saucepan, combine 2 tablespoons water and 1 teaspoon potato starch. Stir and place on low heat. Stir constantly while doing this. As soon as the mixture becomes transparent, remove it from the stove and immediately add 1 cup of Extra Salt. First, use a spoon, and once the mixture has cooled slightly, you can stir with your hands. The snow is ready. Place it in a plastic bag and seal tightly. It is important that no air enters the bag.
Progress:

Roll out the dough to a thickness of 5-7 mm. Use a cookie cutter to cut out the “snowman” and place on a paper napkin.

Mark the eyes with a pencil, push the mouth with a stack. Use a stack to make a mark for yourself where you will glue the snowman’s hat.

Form a flat cake from a small lump of dough. Cut it in half. Moisten the snowman's head with water and glue on the hat. We glue all elements of the composition with cold water. Roll up a small, thin flagellum and glue it to the hat. We are making a fur hat. Form a ball from a small lump and glue a bell.

Form a very small carrot and glue a nose on the snowman.

Roll up a thin rope and glue a scarf on the snowman.

From small, identical lumps, form two lumps similar to beans and glue the legs.

Using a ballpoint pen without paste, press the buttons down the center of the snowman.

Form a gift box from a lump the size of a large plum and glue it onto the snowman’s hand. It turns out that the snowman is holding a gift in his hands. Glue the gift tightly so that after the craft dries, it does not fall off.
The snowman is ready, let's start sculpting the mittens.

Roll out the dough to a thickness of 3-4 mm. Cut out two small mittens.

Stack the cuffs on the mittens. Use a cocktail straw to make holes.

Make a very small snowman on one of the mittens.

Glue the Christmas tree and toy balls onto the second mitten.
We made the mittens so quickly.
Place the snowman and mittens on a sunny windowsill. Crafts dry in air for about 5-7 days. Although the mittens will certainly dry in a couple of days, since they are not as bulky as a snowman.
The crafts are dry. Paint them with paints and cover them with glossy varnish.
We glue the snowman into a frame and decorate it with glitter. Spread a layer of PVA glue under the legs of the snowman, put “snow”. Compact it lightly. Once the glue dries, the “snow” will stick firmly. This “snow” can be stored for a couple of days in a plastic bag.
The snowman is ready.
Thread the ribbon into the mittens. Decorate with glitter
Gifts for the New Year are ready.


Happy New Year!
Friends, are you ready for the new year? But the holiday is just around the corner. And this is a reason to work fruitfully with your little ones. What am I offering? Today we will talk about how and what kind of New Year's crafts to make from salt dough. A prerequisite is that we will create with our kids. We involve them in as many processes as possible. In fact, the material is safe and easy to clean, so let’s allow the little ones to get their hands dirty.


Do you know what will add significance to these activities? The fact that the child will feel that all this is a very important matter! He will try hard when he finds out that his crafts will decorate the Christmas tree: as toys (we will hang some of them on the tree) or become part of the festive composition.
Let's decide. Remember? We have a main focus - New Year's themes. There is a basic material - salt dough. And in the kitchen, any housewife has the necessary tools. And our children have a good helper - us! All that remains is to get down to business.


Ingredients and tools we will need
All we need is:
- Salt;
- Flour;
- Water;
- A little vegetable oil.
Of course, I want the figures to be bright. Therefore, we use any dyes of our choice:
- Food paints;
- Eco-friendly construction;
- Markers;
- Gouache;
- Nail polish (if you need to use very little).
And in order to make dough with your own hands, and then products from the dough, you need tools. Let's prepare in advance:
- Bowl;
- Rolling pin;
- Cup;
- Scissors;
- Pen/felt-tip pen.
We will also need additional tools. We'll talk about this in the next topic, when we look at different ideas for creativity.
Various ideas for decorating works

And there’s a sea of ideas! And, at the same time, boundless! But don’t forget, there are 2 points to consider:
- Abilities and capabilities of babies;
- Crafts should relate to the New Year 2018 theme. This means that, if not the symbol of the year itself, the Dog, we should succeed, then at least try to ensure that golden colors dominate in our products.
And a lot will depend on what tools we have at hand. In principle, absolutely anything can be a tool! And the decoration of the works, and even their form, will depend on what we own.
Now I intend to call something that can be used as a handy tool when making crafts, and how the work will depend on it.
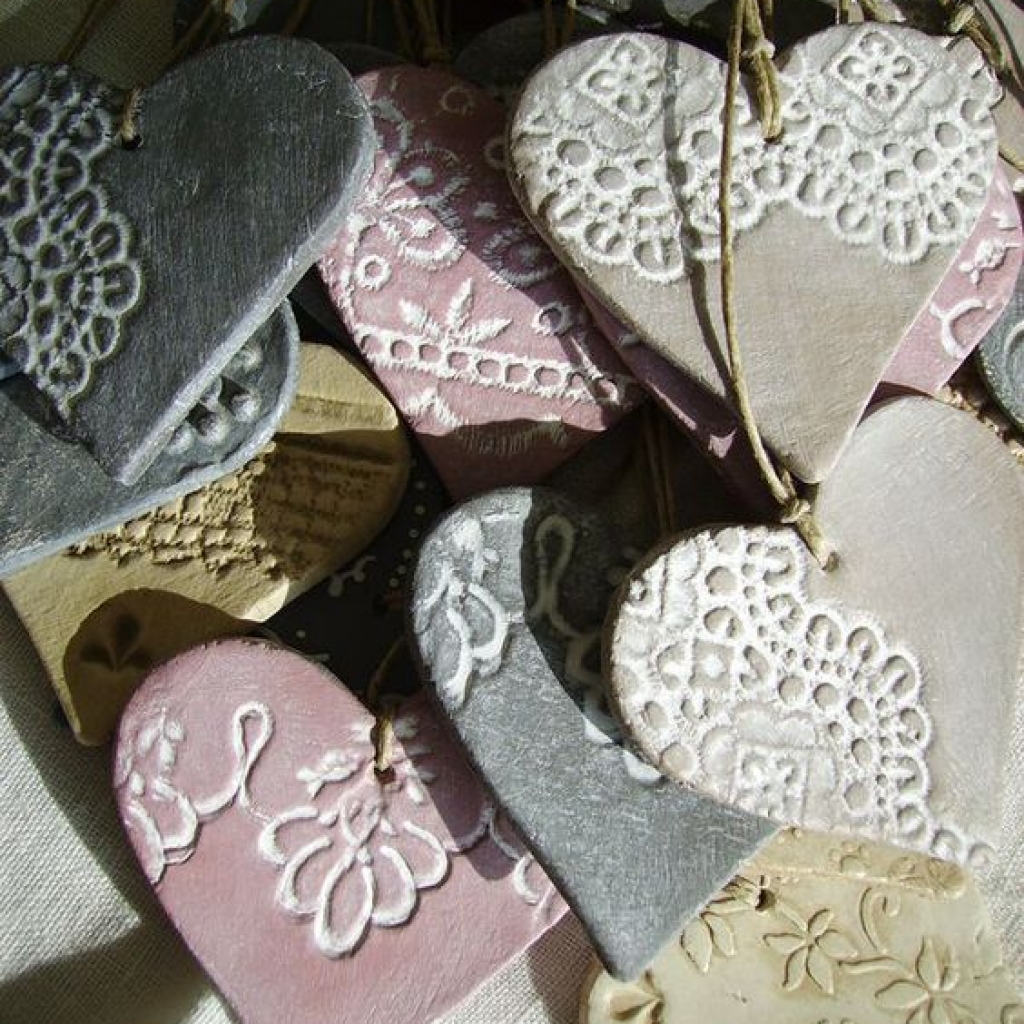
Lace. They will add delicacy to the work. All you have to do is apply them to the dough and roll them over with a rolling pin.
Buttons. It will be simple and interesting for children to press buttons into finished products to create an unusual texture.
Beads. You can simply sprinkle it on your finished work, and everything will immediately shine.
Cocktail straw- This is an excellent “hole maker” that turns ordinary crafts into lace ones.
Marker. They can draw any patterns.
Hands, legs, paws. Place your little one's hand and make an impression of the palm; the same can be done with the leg if you have a baby. If your dog doesn’t mind, then the prints of its paws will also look symbolic.
Master Class
And now I’ll share what my baby and I did. And at the same time I will conduct a small master class.
I'll start with our video. In it we show how to knead the dough, how to sculpt a big owl on a Christmas tree, how to decorate a window in the form of a Christmas tree with dough toys.
And now, as promised, a photo lesson: how to make a slightly different owl, hedgehog and snowman.
You all remember the recipe:
- Flour – 1 tbsp.;
- Salt – 1 tbsp;
- Water.
It is better to take fine salt. It is cleaner and mixes better with flour and water. But I specifically took a large one, because I mainly intend to bake all the products. And when baked, coarse salt gives it an unusual golden color. As for water. I didn’t say how much is needed. It took me half a glass. But it is better to focus on how much the dough will take so that it is not liquid.
I will try to attach a photo to each step.
So, the ingredients:
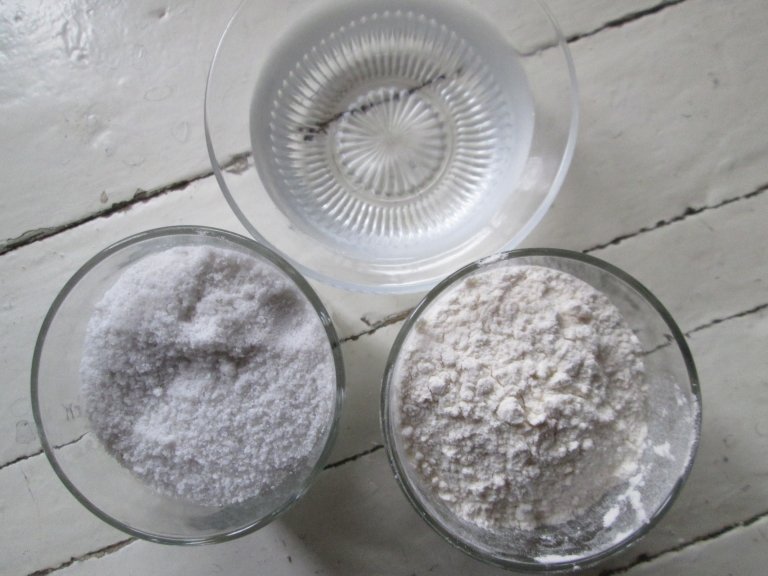
The dough turns out tough, but very plastic. I divide it into 3 parts.

Of the two, I intend to make figures of a Snowman and a Hedgehog. And I will divide the third part in half, and the baby and I roll out the mass and twist two circles with a glass.
I'm eager to try how flathead owls are made.
And the second part is a toy for the Christmas tree.

Now I will talk about each craft separately.
Snowman
1. Making the base for the snowman. I cut out a circle and decorate it, squeezing out the relief with the tip of a knife.

I divide the remaining mass into 3 parts so that one is large, the second is medium, and the third is small.
I roll the largest piece into a ball in my palms. I make a small depression in the middle.

I do the same with the second one. This way the entire structure will stand firmly without any special fastening.
I insert a thin twig into the middle ball. These are the hands of the Snowman. I place a walnut shell on top. It turns out to be such a hat.

I make the nose from the tip of a toothpick.

How to paint a Snowman? I won't put it in the oven. I'll just wait for the dough to form a crust on top. I have matching colored nail gels. I use them for painting.

The details remain: mouth, eyes, snowflakes based on the Snowman.
And this is what happened to me.

Owl
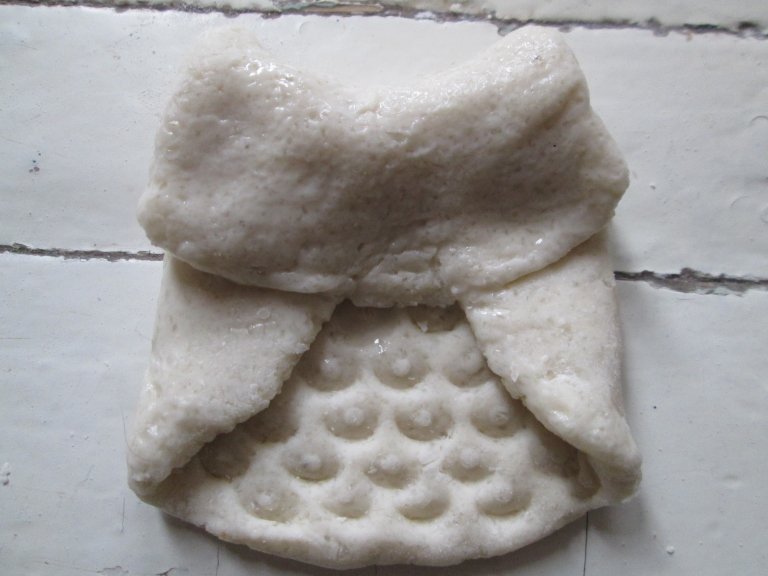
I press the bottom half of the circle with a pen cap. The result is a feather pattern.

I fold the edges on the sides so that they touch each other.

I fold the top half of the base in half and bend it slightly on top.
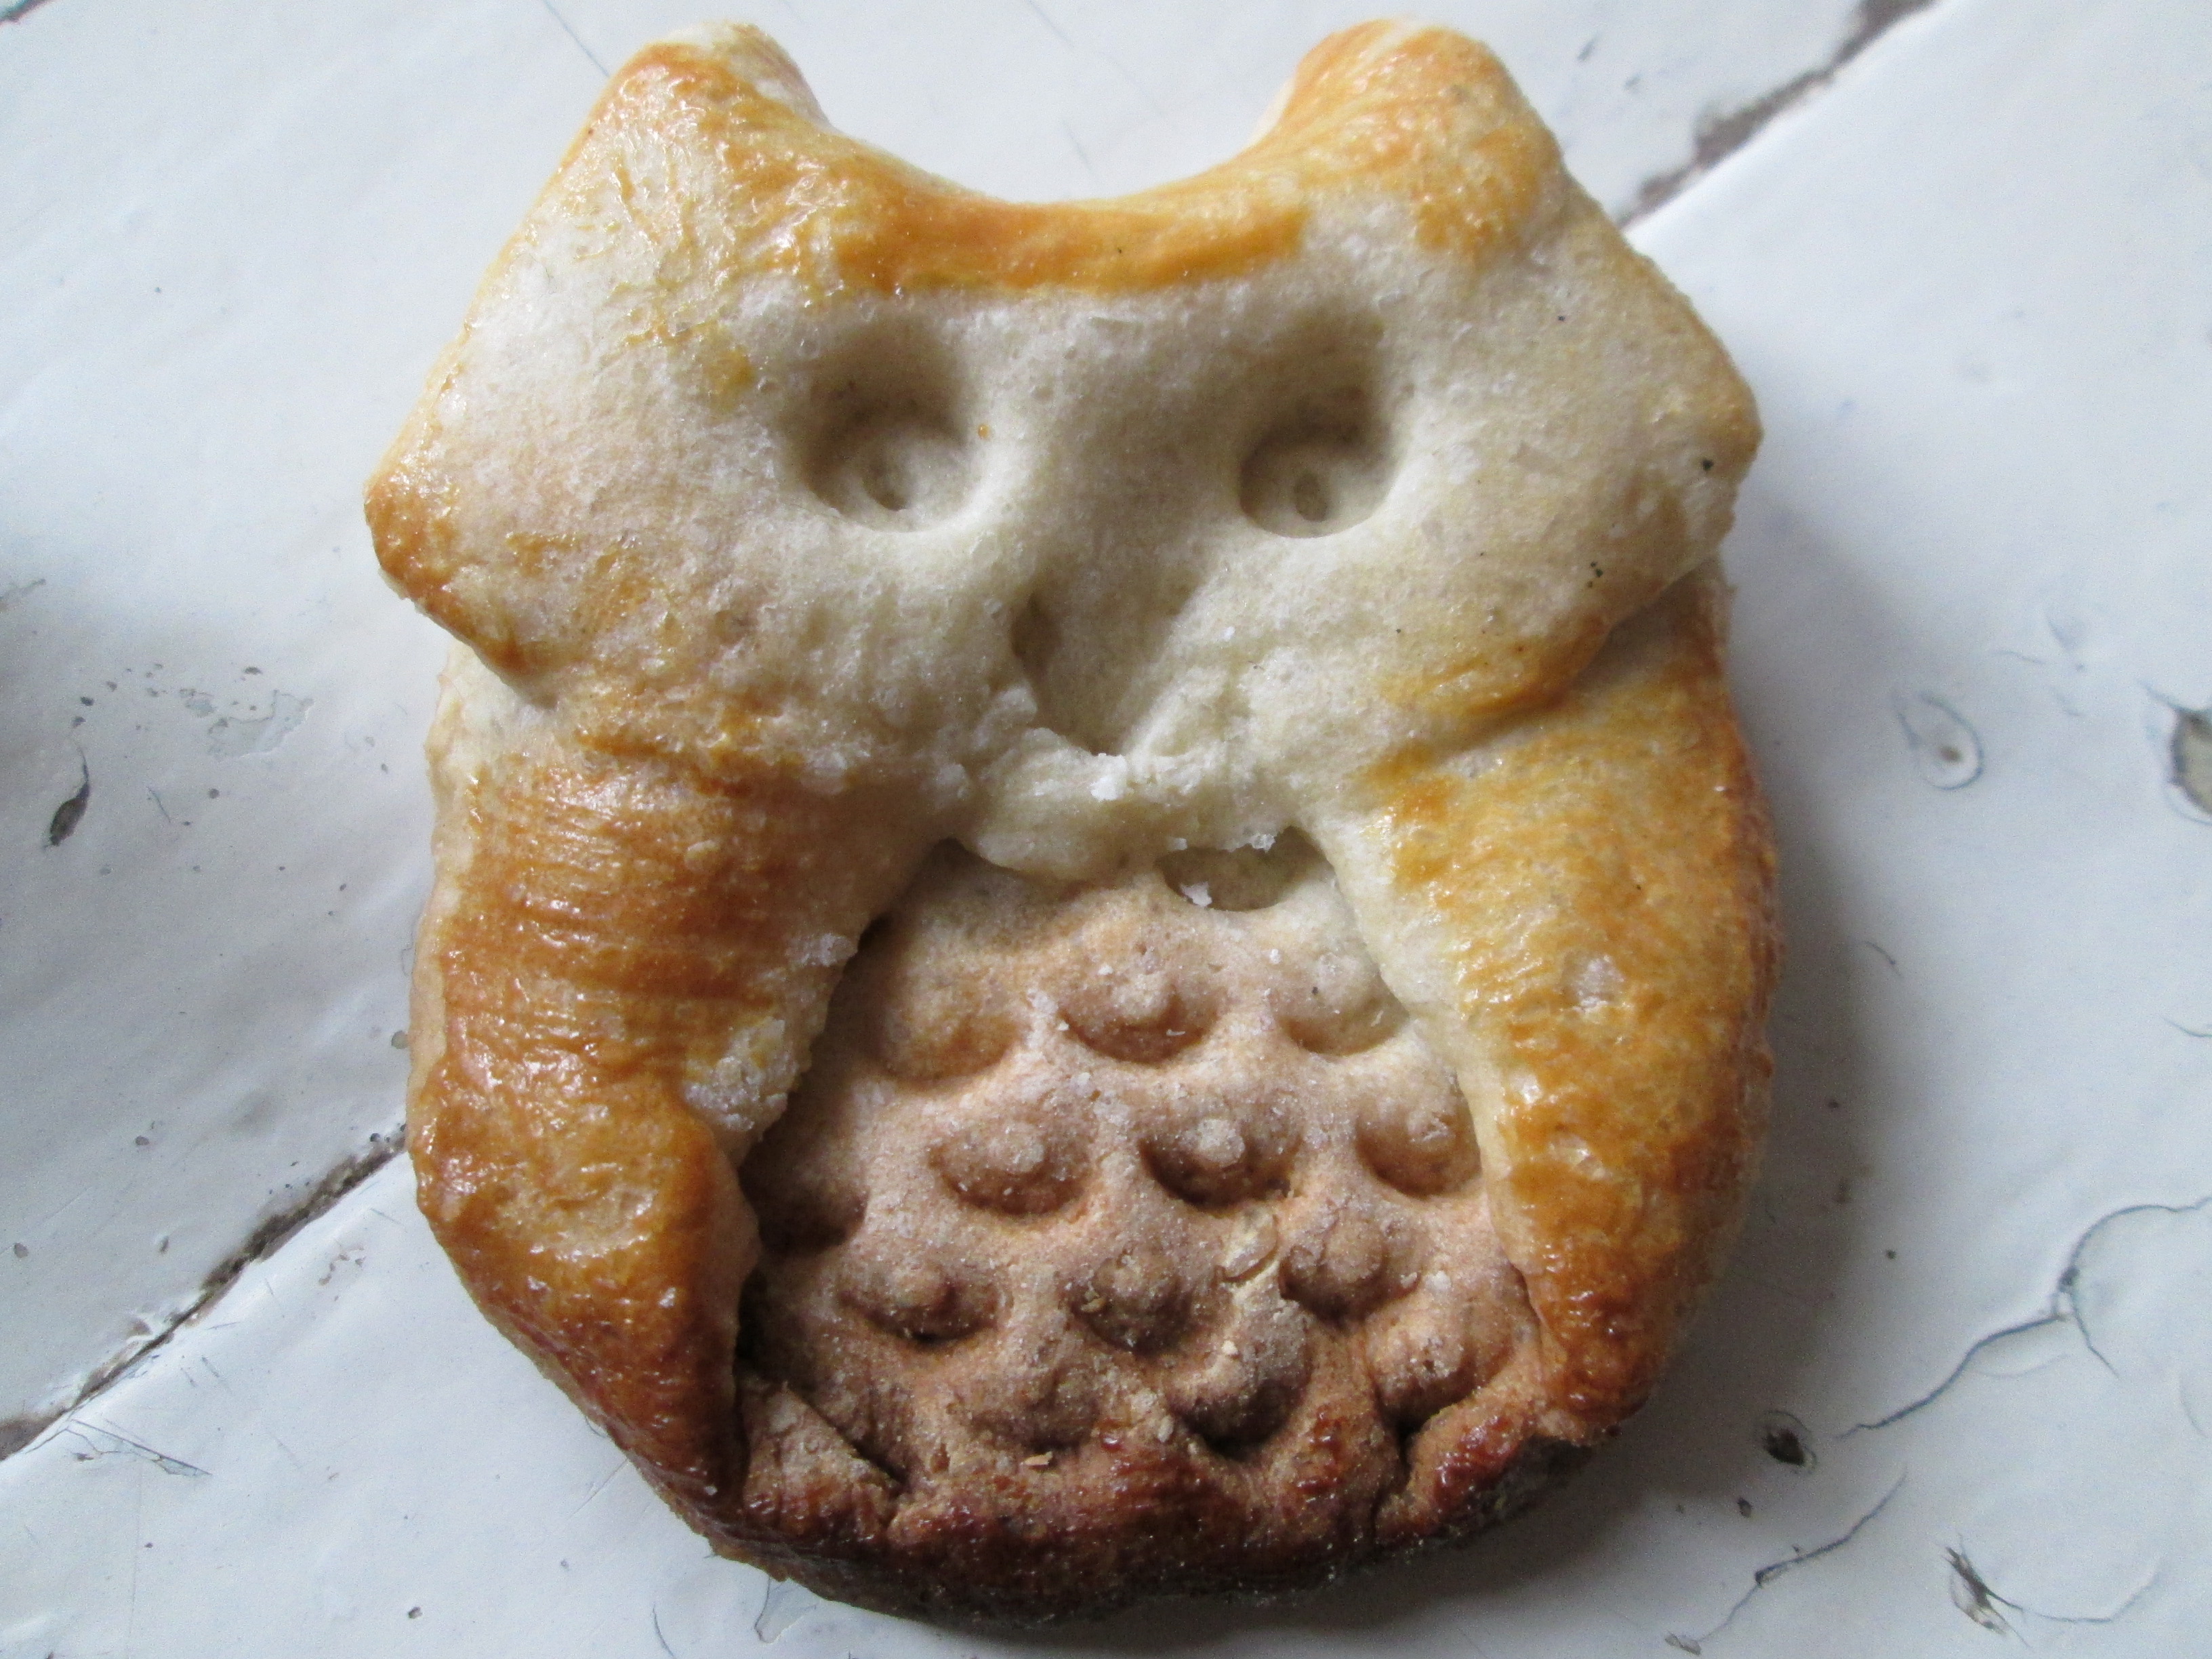
On the top part I squeeze out round eyes with a cap and draw a beak.
I round the corners at the bottom. I make the “ears” sharper.

I set it to bake, having previously greased the wings and ears with yolk.

This is the golden Owl after baking for 7 minutes at 180 degrees.
What other owls can you make?

Toy
I pierce the second round blank through the top with a cap. And below I make prints with the same cap.
I set the toy to bake.

After baking, I apply a little red varnish to all the circles, and draw leaves above them. This is mistletoe. All that remains is to thread the ribbon into the hole and you can decorate the Christmas tree with the toy.

Hedgehog
A small barrel-cylinder is rolled up, in which the nose of the future hedgehog is slightly extended.

“Needles” are cut throughout the body. To do this you will need nail scissors with curved edges.
First, the edges of the scissors are slightly pressed into the dough, then the “needle” is cut.

A Christmas tree is made from salt dough using the same principle: its branches are cut with scissors.
Now go over the face and along each edge of the needle with a brush with yolk, and the product can be sent to the oven.
After baking, make a nose and eyes by pressing in a piece of a twig, and the Hedgehog with Golden Needles is ready!

This is how I managed to make 4 toys with my baby!

Vmdeo master classes
Very! I really want you to show off your work! Send the results of your work, share your successes, so that we can be happy for you! That's all for today! I remind you to subscribe and ask, don’t forget to bring your friends: it’s more fun together! All! Bye bye!
Salt dough is a popular and affordable material for children's creativity and making their own crafts. Just like plasticine, salt dough can be used to make products of any level of complexity, so children of any age can make crafts from salt dough.
The recipe for making salted play dough is very simple; the ingredients for it can be found in every home.
Salt dough recipe. How to make salt dough
You will need:
Flour - 2 cups
- salt - 1 glass
You need regular wheat flour, without raising agents, dyes or other additives. Salt - "Extra". The water is ordinary cold.
How to make salt dough: mix flour and salt, add water, knead the dough. The degree of readiness of the salt dough can only be determined by hand. If the dough crumbles, add water. If, on the contrary, it stretches too well and sticks to your hands, then there is too much water, and you need to add a little flour. Roll into a ball and make several indentations in it with your finger. If the dough does not spread and holds its shape, it is ready. It is recommended to add vegetable oil during the kneading process. Now the dough will not stick to your hands, dry out quickly and become crusty while working. However, it should be remembered that the best is the enemy of the good! If there is a lot of oil, the dough will get dirty, and final drying can take a very long time. For our recipe, a couple of tablespoons is enough.
Well, the dough is ready, now you can proceed directly to the process of modeling salt dough.
New Year's crafts made from salt dough. Christmas tree toys made from salt dough
In this article we will tell you how to make New Year's crafts and Christmas tree decorations from salt dough. We tried to select crafts made from salt dough that, on the one hand, are easy to make, and on the other hand, the end result is beautiful.
Salty dough. Crafts made from salt dough
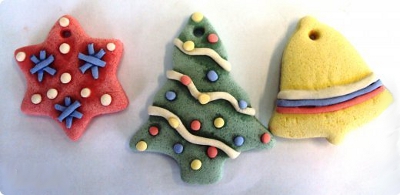
To make Christmas tree decorations from salt dough, you will need shaped cookie cutters. With their help, even a child can cut out figures from a rolled out sheet of dough.
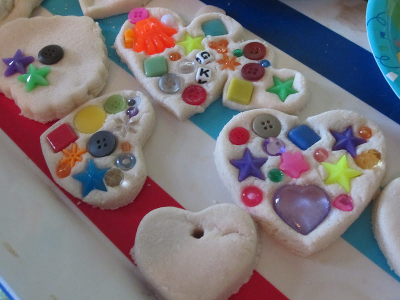
The resulting salt dough figures can be left as is, but it’s even better to decorate them. For example, like this.

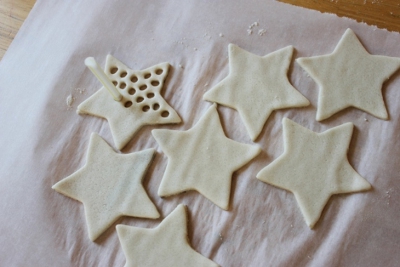
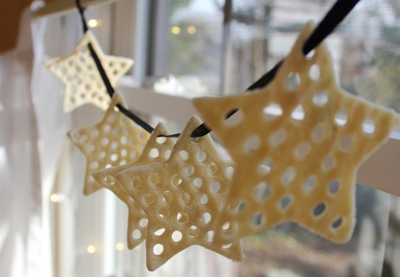
You can use a cocktail tube to make many holes in the dough and then you will get openwork figures.
Or decorate crafts made from salt dough with beads. Just keep in mind that if you use beads made of plastic, etc., then you cannot dry the finished salt dough products in the oven, otherwise the beads may melt.

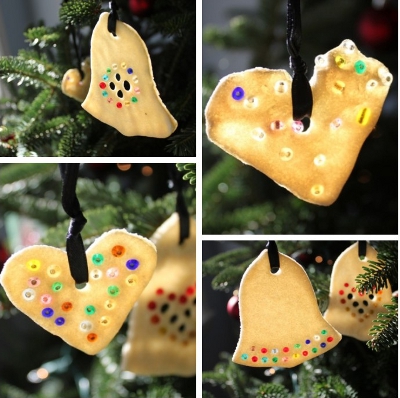

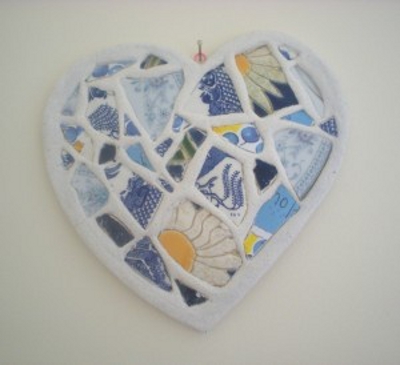
Instead of beads, you can use various cereals, shells, buttons and even broken dishes to decorate New Year's crafts made from salt dough.

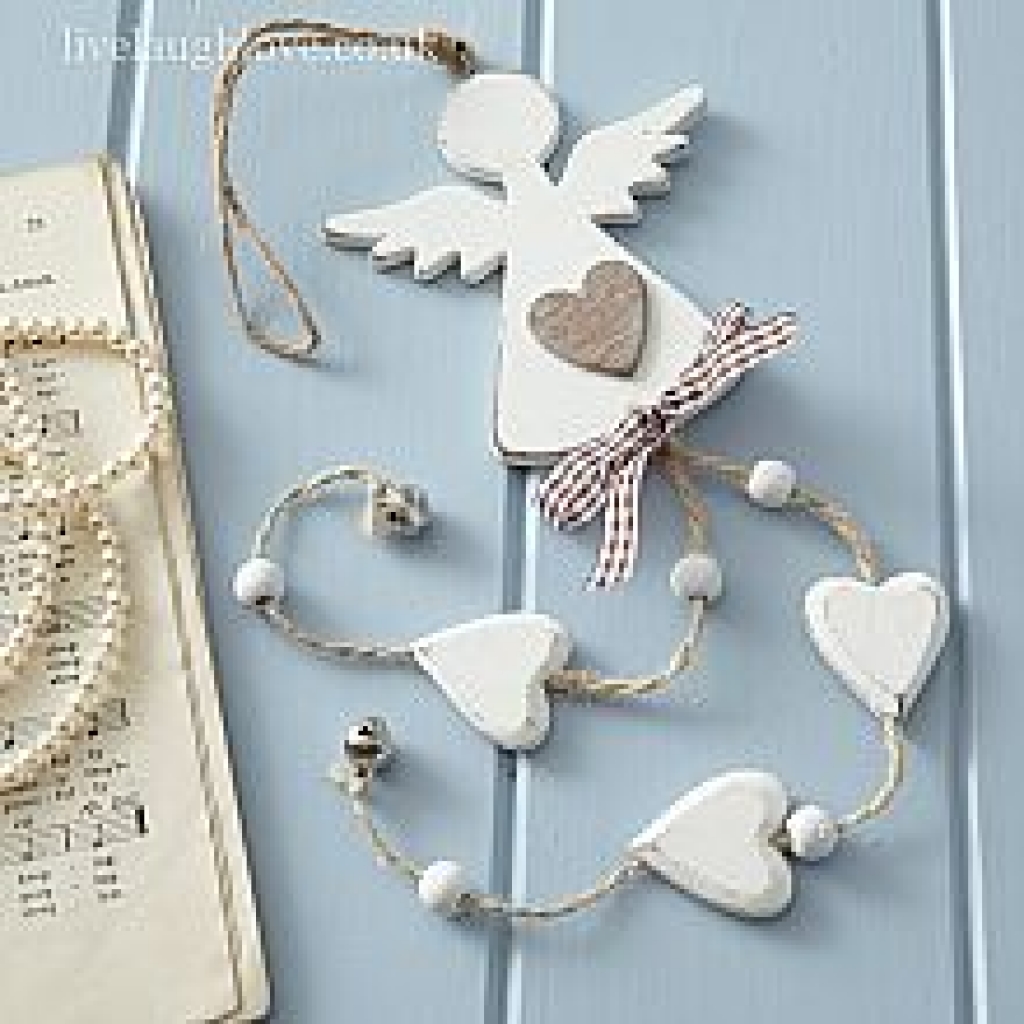
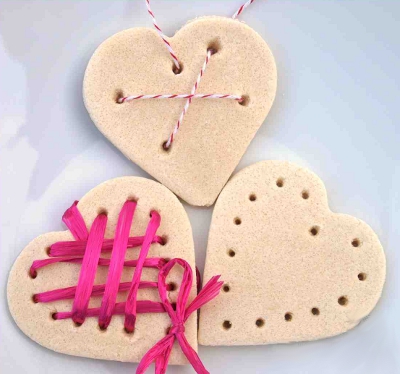
You can give Christmas tree decorations made from salt dough a festive look using beautiful ribbons and threads.
Note: if you do not have a suitable mold, you can cut out a stencil from cardboard and use it to cut the salt dough for the craft.
Modeling from salt dough. Salt dough photo
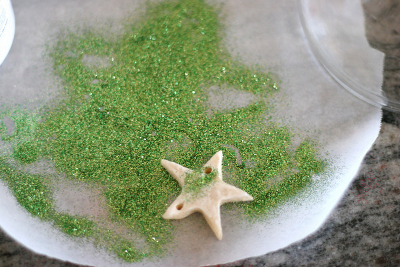
Finished, already dried salt dough products can be decorated with sparkles by applying them to a layer of glue.

Crafts made from salt dough. Salt dough master class
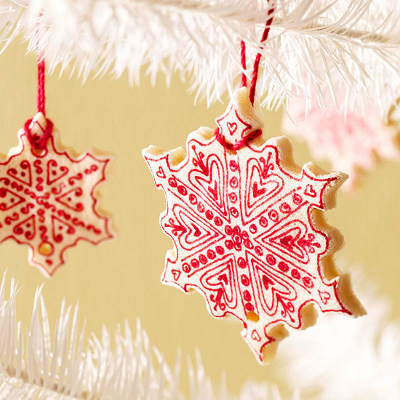
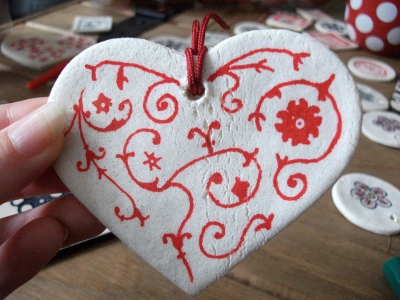
Christmas decorations made from salt dough, painted using colored permanent markers, look beautiful.

Products made from salt dough. Salt dough modeling
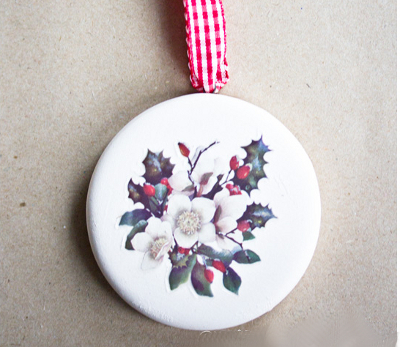
You can decorate New Year's crafts made from salt dough using the decoupage technique, pasting them with beautiful pictures or decals. For decoupage, you can use pictures cut out from New Year's napkins. For New Year's decoupage, regular PVA glue diluted with water in a 1:1 ratio is suitable. Cut out pictures or patterns from New Year's napkins, separate the top layer and paste it onto the finished salt dough craft. Apply another layer of glue on top.

Salt dough figures. Crafts made from salt dough
Here are some more examples of decorating salt dough figures.


Christmas tree decorations made from salt dough. Salt dough modeling
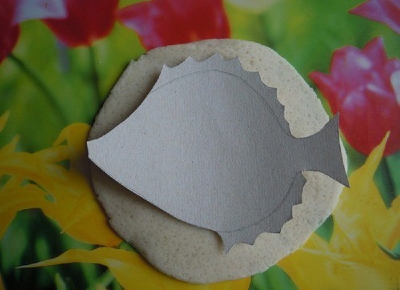
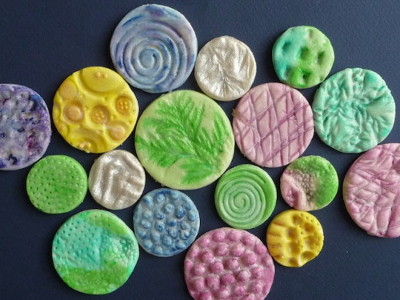
A simple and original way to decorate salt dough products is to make prints on them. Prints can be made from all sorts of objects with interesting textures that you can find around your home.
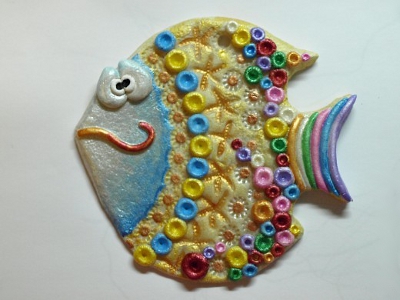
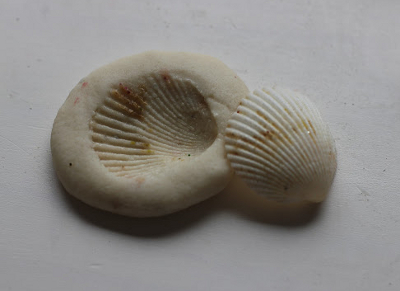
The salt dough craft “Fish” in the photo below was made using various textured items that the author of the craft found at home. For a detailed master class on making this original craft from salt dough, see the link
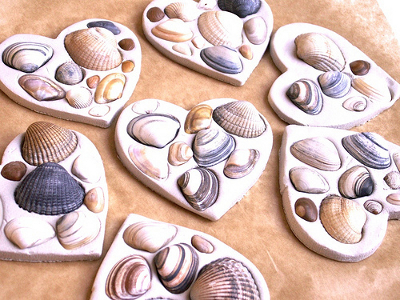
Natural materials are also suitable for making Christmas tree decorations with your own hands from salt dough: twigs, shells, leaves with thick veins.


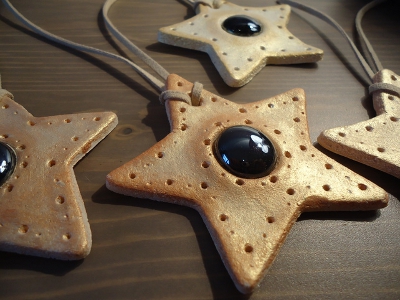
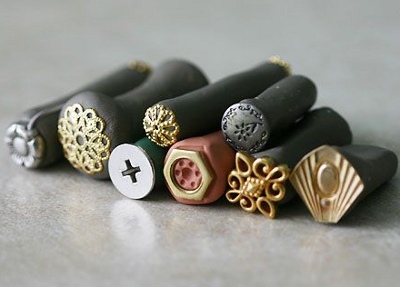
When making New Year's crafts from salt dough with your children, you can use purchased stamps for children's creativity. The ink is suitable for both black and colored.
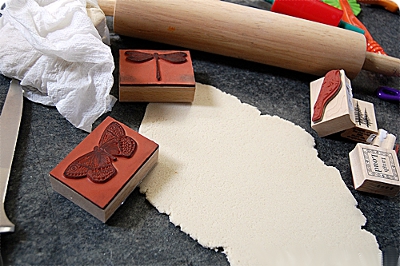

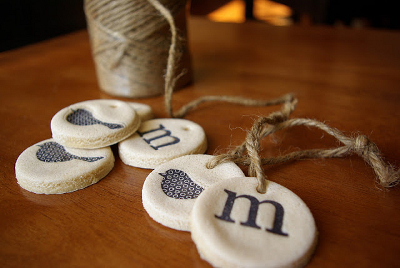

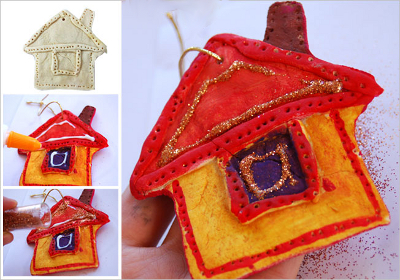
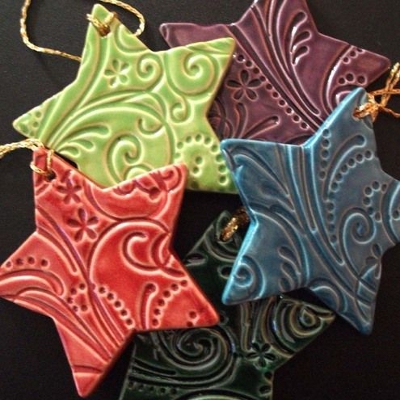
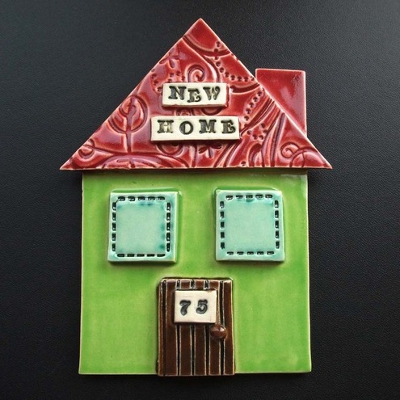
The DIY Christmas tree decorations stars, house and cockerel in the photo below are also made from salt dough using patterned stamps.

By the way, you can make stamps for children’s creativity yourself. Read about how to make stamps with your own hands on our website in a special article.
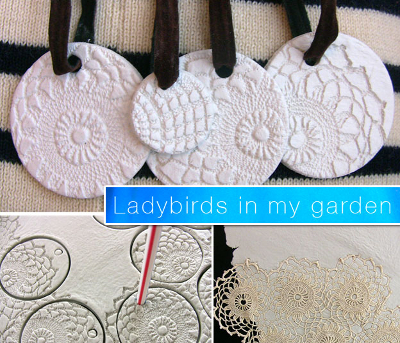
An interesting way to make New Year's decorations from salt dough is offered by the Ladybirds in my garden website. Using textile or paper lace, openwork prints are created on salt dough, from which figures are then cut out using shaped molds or a simple glass.
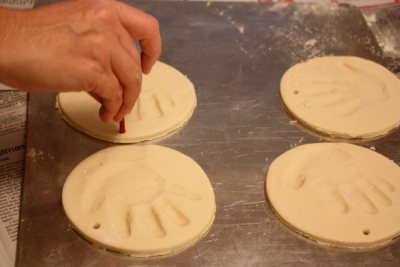
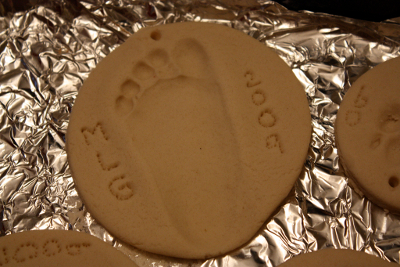
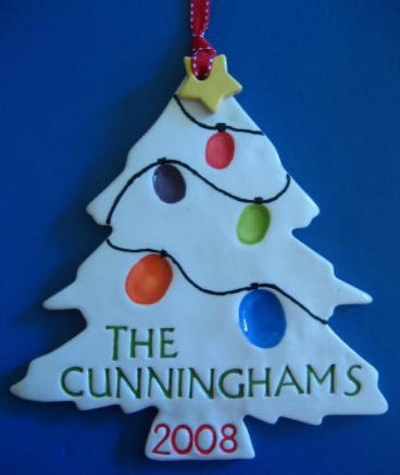
From fingerprints and palm prints on salt dough you can make these memorable Christmas tree decorations with your own hands: a New Year tree and Santa Claus.

Crafts made from salt dough. Salt dough figurines
Concluding our review article on the topic “New Year’s crafts from salt dough”, here are a few more interesting New Year’s crafts that can be made from both salt dough and plasticine.
1. New Year's mosaic made of beads and bugles
To make this original New Year's decoration, you will need:
Plasticine or salt dough
- plastic covers
- beads, beads
- gold paint (optional)

Paint the lids with gold paint, then fill them with plasticine or salt dough, and lay a mosaic of beads and bugles on top.
Even kids can make such New Year's crafts.
2. DIY craft for the New Year “New Year’s candles”
To make this New Year's craft you will need:
Salt dough or plasticine
- cardboard base from a toilet paper roll

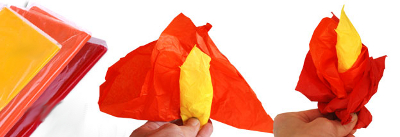
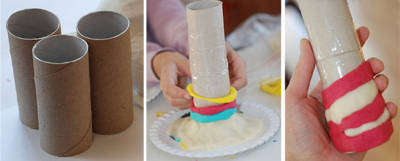
- corrugated paper in red, yellow and orange colors
Make rings from plasticine or salt dough of different colors, then put them on a cardboard roll. Make a flame from corrugated paper and insert it inside the candle.
3. New Year's craft for children "Christmas tree"
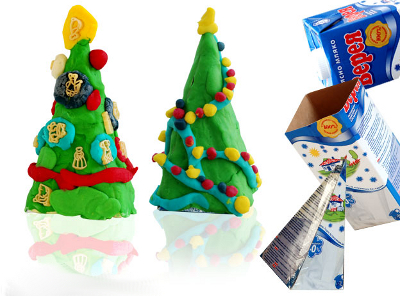
You can make a cute Christmas tree from cardboard packaging of milk, kefir or juice and plasticine (salt dough). For a master class on making this craft from salt dough, see the photo below.
See also articles on our website:
4. New Year's compositions made of plasticine

An interesting master class on creating New Year's compositions from plasticine by cutting has been posted on the website Country of Masters. Check out the Christmas tree below. It is assembled from individual branches, cut from one plasticine blank, and then decorated with Christmas tree decorations made of plasticine, made using the same technique.

Images of burning candles will help decorate the New Year's composition.

The Country of Masters will teach you how to make original twisted candles from plasticine.
This composition is complemented by a chrysanthemum flower and a small driftwood made of plasticine.
From this article you will learn how to make salt dough yourself and how to dry it. Lots of photos and step-by-step instructions will help you make a dough craft for any holiday.
For modeling lessons with small children, it is better to use salt dough or Play Doh plasticine.
How to make dough for crafts: recipe
You can make the dough yourself; for this you will need just a few simple ingredients: flour, fine salt, citric acid, vegetable oil and water.
First mix 1 cup of flour with 0.5 cups of salt and 2 teaspoons of citric acid. Pour into a saucepan, add 1 tablespoon of oil to the dry mixture. Place over medium heat, gradually add water and stir. No more than 0.5 cup of water should be used. When the mass leaves the sides of the pan and becomes one lump, remove the pan from the heat. Take the mixture out, place it on a board sprinkled with flour, and knead it with your hands like regular dough.
If you want to make colored play dough, you first need to dilute dry food coloring in water. You can also add a little gouache to the finished dough and knead it well so that the color becomes uniform.
How to prepare salt dough for modeling?
Prepare salt dough. Paint it in different colors, depending on what you want to make. The dough can be made uncolored, divided into balls and add a little gouache of the desired color to each and knead. It's better to make the dough in regular colors, and then mix them to achieve the desired one.
Keep the dough in a bag, or wrap it in cling film, or put it in a closed container so that it does not dry out. If it is still dry, add a little water, and if it is too wet, add a little flour.


- Make the dough thinner and simply spread it on the base of the craft, so you can make butter on a piece of bread, or use brown dough to make chocolate frosting for a cake.
- Try on the food you made with the toy plates that you will later play with so that they match in size
- To stick the salt dough pieces together, use a wet brush. Apply a brush to the joint and stick the parts to each other
- When making food for dolls, it is very important to make the dough as much as possible the same color as the original, for example, the carrots should be orange, not yellow or red
- To prevent the colors from fading, open the craft with varnish. For activities with children, you need to use special harmless varnishes; they do not have an unpleasant odor because they are water-based


Drying figures from salt dough for modeling
There are two ways to dry salt dough crafts.
- Air dry crafts. It is best if you place them on a smooth surface and leave them for several days. When the craft is dry, turn it over or lay it on its side so that it dries on all sides.
- Baking in the oven. Preheat the oven well, place baking paper on a baking sheet, place crafts on top, place in the oven and turn off the heat. The oven should be closed and not opened until completely dry. You can also bake crafts at a temperature of 100°C, but in this case you need to watch them so that they do not burn
These two methods can be combined, for example, dry it in the oven for an hour, then leave it in the air, after a while in the oven, and so on until it dries.
Of course, if the craft contains other decorations (beads, beads), you need to dry it using the first method.
New Year's crafts made from salt dough
The child will really enjoy decorating the house before the New Year and making handicrafts together with his parents.
Christmas tree toys made of dough
 You can make excellent Christmas tree decorations from salt dough, and even kids can handle making them.
- Prepare play dough in different colors or uncolored
- Roll out a flat cake and squeeze out a shape; you can use cookie cutters
- Make a hole with a cocktail straw so that you can hang the figurine on the Christmas tree.
- Decorate the toy as you and your child want: stick multi-colored balls on the Christmas tree, make a garland for it, let it rain, add a white snowball to the toy
- Unpainted dough can be dried first and then painted with paints or markers
- Dry the dough or bake in the oven
- Pass the ribbon through the hole and hang the toy on the tree
You can make a lot of holes in the figures.


Or stick beads, beads and other beautiful stones into the dough, but in this case these toys cannot be baked in the oven.


You can decorate toys with ribbons or decorative ropes.


After the dough has dried, apply PVA glue to it and sprinkle the figures with glitter.


Color the uncolored dried dough with a permanent marker.

Cut out a figure in the shape of a mitten, make it a beautiful colored ribbon from colored dough and decorate it with a homemade button. This figurine can be baked in the oven.


Print the baby’s palm and draw Santa Claus in it - it will not only be a wonderful toy for the New Year tree, but will also remain as a keepsake.

You can also make a Santa Claus toy like this. To give him a beard, use a garlic press. 

Make these other gingerbread toys from brown dough.


Making a New Year's candle from dough
To make a New Year's candle you will need modeling dough of different colors, a cardboard cylinder, for example, from a roll of paper napkins and red and yellow napkins.
- Let your child roll colorful sausages.
- Stick them on our cardboard base

- Decorate it with colorful balls
- You can simply cover a cardboard cylinder with one color and then decorate it


- Make a fire out of napkins and attach it to the top of our candle


Christmas tree made from dough
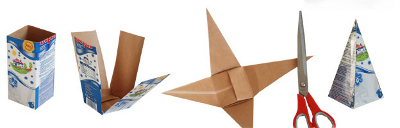
- First make a preparation for the Christmas tree; for this you will need a cardboard container of juice or milk. First cut off its top, cut along the side folds, and open it. You need to cut off the excess from the rectangles so that you get isosceles triangles. See how to do this in the diagram below


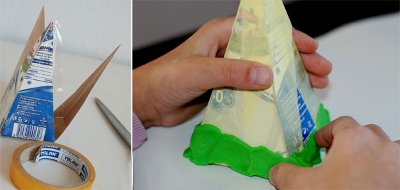
- Glue a cardboard base for your Christmas tree

- Now let your child decorate it: let him cover it with green dough - you will get a Christmas tree. All that remains is to add balls, a garland, a star, and don’t forget about the gifts under the Christmas tree


You can also make a Christmas tree like this


Easter crafts made from salt dough
For Easter you can make the following crafts from salt dough:
- Decorated eggs made from flatbread dough

- Bunny figures carved from salted dough flatbread.
- Decorated three-dimensional Easter egg


- Egg cup

Easter eggs made from dough
Even a baby can cope with this task.
- Take the dough and mold it into an egg-shaped figure.
- Decorate it as you and your child want.


You can use mixed dough of different colors for the base, or you can make a base from unpainted dough and then paint it with paints or markers. Open the eggs with glue and sprinkle with cosmetic glitter. Glue the multi-colored balls by moistening the joint with a wet brush. Press beads, pasta, cereal, and other decorations into the eggs. Make prints with different objects.
In general, fantasize!

Dough egg cup
For this you will need a cardboard cylinder, dough and paints.
Cover a cut circle of cardboard with unpainted dough and mold it into a tail, head and other parts, as shown in the diagrams below.


Don't forget to cover the stand on all sides with dough.


Decorate the craft as your imagination dictates; you can use gouache or watercolors.


Open with water-based varnish to make the colors brighter and the craft to last longer.

Dough crafts for February 14th for Valentine's Day
What does everyone associate with this wonderful holiday? Of course the heart! Let's make a festive heart with your child and give it to your parents.
Salt dough heart

Here, as everywhere else, we first make the base, in our case the heart, and decorate it!


You can decorate it with roses, it will be very beautiful. How to sculpt roses, see step-by-step instructions with photos below.


You can make a keychain like this with paws.

These cute couples are made very quickly and easily.


You can make a lot of these heart figures, make holes in them and make a garland out of them, which you can use to decorate a wall in your house.


Dough photo frame
Make an empty heart, decorate it and use it as a frame for a family photo, securing it on the back with colored cardboard.


Salt dough decoration
This kind of love fish will definitely suit your mother’s outfit on this special day.

Crafts from dough for March 8
On March 8th you can make these flower keychains for mothers, grandmothers, aunts and sisters. They can be done with younger children. You can use multi-colored dough or uncolored dough, and then decorate it with paints.


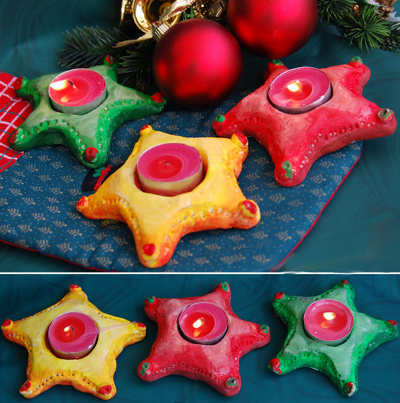
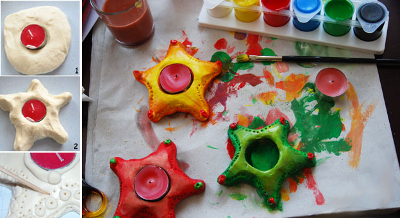
You can make this flower candlestick for a gift.

Make such interesting medals with your children, and most importantly, they are all different. Let the child give them himself.

Make figures in the shape of a figure eight and decorate them with flowers, stones, beads, in general, whatever your imagination allows.

Make a pendant with your child, for example, in the shape of a heart and decorate it: make flowers, leaves, decorate with paints, sign a congratulation.


Salt dough roses
- Take play dough, need colors
- Making a cone


- Roll the ball, flatten it carefully into a round cake
- Stick the ball to the cone


- We make a second ball and glue it on the other side - we have a bud
- We make a few more balls and also sculpt petals from them. We chain them in a circle

- We bend the upper edges of the petals slightly back, and press the sides to the center


- We make several side by side, depending on how lush you want the flower to be.
The rose is ready!
 If necessary, make leaves from green dough, press the veins with a toothpick. Make legs from sausages. Combine all the details into one flower.
Crafts from dough for February 23


You will definitely like this medal.


Airplane - craft made from salt dough
A wonderful gift for dad or grandfather would be a salt dough airplane.
- Roll out the base for the figure - this will be the body
- Bend one side of it a little - this will be the tail. Attach the remaining parts to it


- Roll up the wheels and fenders for it


- Go over with a damp brush and attach the parts to the body


- Blind and attach wings in the form of triangles on toothpicks

- Make a propeller and also attach it to the body using a toothpick

- Let the figurine dry for several days


- Decorate the airplane with gouache


Crafts from dough for Maslenitsa
Maslenitsa is an ancient holiday that has many symbols and traditions. Crafts for this holiday are very diverse, you have plenty to choose from.
For the little ones, you can suggest making a sun, which symbolizes the onset of spring.

 This is some sunshine for older children.

 Invite your child to make their own pancakes from salt dough.
 Pancake keychains

Panels and pictures made from salt dough
With older children, you can make a picture from salt dough.
For example, it could be a fruit basket. Follow the step-by-step instructions with the photo below.
- Roll out the uncolored dough to about 0.5 cm thick
- Prepare a basket template and, applying it to the dough, cut out the basket from it.
- Squeeze out the dough using a garlic press, twist it into flagella, stick it, moistening the joint first, onto the handle of your future basket. You can also add flagella to the rim

- Using a stack or knife, push through lines to imitate basket weaving


- Squeeze out the rolled out dough with a mold or cut out several leaves according to the template. Sell them veins
- Stick leaves on the basket


- Now prepare the fruits: apples, plums, grapes, etc. Roll them into balls of different sizes and give them the desired shape. For apples, stick cloves in the place where the dried inflorescence should have been, the apples will look like real ones
- Combine everything in one picture


- Leave your craft to dry for several days, preferably naturally
- Decorate as you wish
This is a simpler picture you can make with smaller children.
- Draw a background for it
- Draw the outlines of the character figures
- Ask your child to stick the dough without going beyond the outline.
- Leave the painting to dry
- When it's dry, invite your child to decorate the characters with paints.
- Add small details
- Open the picture with varnish, put it in a frame and you can hang it on the wall

Step-by-step dough crafts
Below are some step-by-step instructions with photos for modeling salt dough with children.
Salt dough beads
- We take colored dough, it can be one color, it can be different
- We roll balls out of it, preferably evenly and of the same size. You can make the size descending
- Pierce the balls carefully in the center with a toothpick
- We leave them to air dry for several days. Periodically turn them over to different sides.
- When the balls are dry, carefully remove the toothpicks
- We string the resulting beads onto a string or ribbon.
- You can paint the beads with paints or markers

Horseshoe made of salt dough
- Roll out the dough into a flat cake, 1 cm thick
- Attach the horseshoe template and cut out the figure with a knife
- Blind the leaves, cut off the excess, press the veins on them
- Make berries and a flower, use a toothpick to make holes in the berries and stripes on the flower
- Lubricate the horseshoe with water and stick all the parts
- Use a toothpick to make holes around the perimeter of the horseshoe. Make two through holes at the top to hang the figurine on a cord
- Leave the horseshoe until completely dry or bake in the oven
- The dough can initially be taken of a certain color for each part, or you can decorate it with paints at the end


Dough star
- Roll out the dough into a layer approximately 1cm thick
- Using a cookie cutter, cut out a star or other shape
- Gently lubricate the corners with a wet finger so that they are smooth
- Decorate the figurine: make eyes, mouth, nose, poke holes with a toothpick, add decorations
- Bake in the oven or air dry
- Open with varnish


Dough caterpillar
- Rolling a sausage from green dough
- Cut it into equal circles and roll them into balls
- We stick the balls together, do not forget to moisten the joint.
- Making a face for the caterpillar
- We pierce the figure with a toothpick or a pin in the place where we will attach it to the ring
- Drying our craft


Salt dough apple
- Roll out the ball of dough into the shape of half an apple. To ensure an even cut, press it onto a flat surface.
- Add a flat white center
- Roll apple seeds and a tail from brown dough. We make leaves from green
- We collect the figurine and dry it


Crafts made from salt dough - hedgehog
- Form the body and head of a hedgehog from uncolored dough.


- Make him a nose and eyes, you can use black dough or peppercorns


- Using nail scissors, cut the dough, making needles, lift them up a little. Cut the second row in a checkerboard pattern, and so on until the end.


- Leave the hedgehog to dry. When it has completely hardened, you can decorate it with paints and spray it with varnish.


Crafts made from salt dough - animals
You can sculpt many animals from salt dough with children. Below are some step-by-step instructions with photos.
Dough sheep
- Roll 4 balls - these will be the sheep's feet. Place them in a square, pressing their sides tightly against each other (look at the photo)
- Fold up a piece of foil and place it inside the dough ball. Roll it into a ball - this will be the body of a sheep
- Add a head to the sheep, make balls-eyes, horns and ears from sausages
- To imitate wool, make a lot of small balls and stick them around the back of the figure, pressing them down a little
- Dry your craft and decorate with paints and/or markers


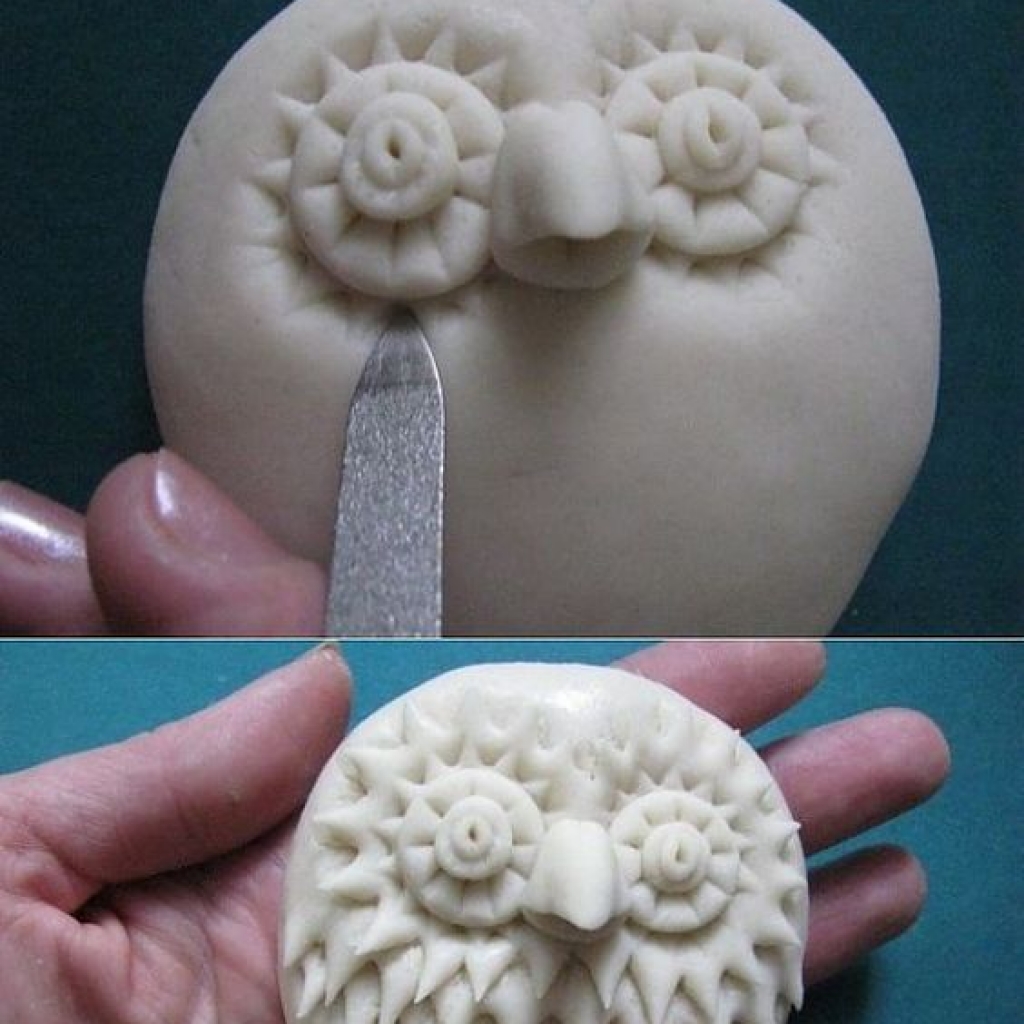
Salt dough owl
- Roll out the dough into a round cake
- Use a felt-tip pen cap to press waves, imitating plumage.
- Fold the sides inward - these will be wings
- Fold the top part towards the center too, extending it a little on the sides - this will be the head and ears
- Stamp the eyes with a cap and add a beak with a toothpick
- Dry and paint


Dough elephant
- Roll the ball, stretch it out a little - this will be the body of the elephant
- Make 4 thick sausages - these will be the legs
- Make a trunk from another one
- Make a tail out of a thin sausage
- Roll out two flat cakes, put plates of smaller diameter and pink color on them - you will get ears
- Collect everything into one figurine and don’t forget about the eyes
- Dry the elephant and open it with varnish


Dough crafts - cat
- Cut out a cat template from cardboard

- Roll out the dough into a 0.5 cm layer
- Attach the template and cut out the cat from the dough


- Let the dough dry
- Using sandpaper, sand around the perimeter of the figure.


Paint the cat with a pencil and then with paints, let dry


Frame the panel


Making fish from salt dough
- Roll out the dough to a thickness of 0.5 to 1 cm
- Cut out the fish according to the template
- Decorate it: make voluminous eyes, fins and a tail, imitate scales with caps from felt-tip pens or other improvised means
Let the mushroom dry and decorate it


Dough crafts - fruits and vegetables
You can make many different vegetables and fruits from salt dough, which you can then play with and feed your dolls.
Remember that the colors of food for dolls should be matched as closely as possible to the original ones.


By following the step-by-step instructions and photos, you can make interesting figures from salt dough, which you can then give to friends and family for various holidays. We hope in this article you found a lot of interesting work and useful information. Have fun activities and beautiful crafts!
VIDEO: Craft from salt dough “Owl”
-
 April 17, 2015The most delicious chicken pilaf recipe!
 -
 April 17, 2015How many calories are in chicken?
 -
 April 17, 2015Lingonberry jam How to make lingonberry jam for the winter


