Draw a winter landscape with a pencil step by step. How to draw a beautiful winter nature landscape with pencil and paints step by step for beginners? How to draw an easy winter landscape with a pencil for beginners
Gouache drawing lesson. This lesson is dedicated to the winter season and is called how to paint winter with gouache paints step by step. Winter is a harsh time of year, but also a beautiful one. Very beautiful landscapes of white steppes, trees with white crowns, and when the snow falls it becomes fun and you want to frolic. Then you come home, it’s warm, you drink hot tea and it’s also great, because there is a place where they are waiting for you and you can warm up. These days you understand all the beauty and all the severity of nature, then you get tired of it all and want summer, bask in the sun, swim in the sea.
We will draw winter at night, when the sun has set below the horizon, it has gotten dark, but the moon is shining and something is visible, the lights are on in the house, the water in the lake is frozen, the tree is covered in snow, there are stars in the sky.
First, you need to make a preliminary pencil sketch on a sheet of paper. It is better to take an A3 sheet, that is, like two landscape sheets together. You can add your own details to this drawing if it seems incomplete to you.

You don’t have to carefully draw out the details, just try to maintain the balance of the composition on a sheet of paper. Using a large brush (it is better to use a bristle brush) we will draw the sky. It is necessary to ensure that the transition is fairly even and smooth. At the top - mix dark blue paint with black (mix first on the palette), then smoothly move to blue and gradually introduce white paint. You can see all this in the picture.

Now let's slowly get to the house. Our house is located quite close to us, so let’s draw it in more detail. I suggest drawing the house a little exaggeratedly, cartoonishly or something, so it’s easier to practice working with strokes.
We'll need ocher first. This is approximately halfway between brown and yellow paint. If you don’t have such paint, mix yellow, brown and a little white paint on the palette. Make a few strokes along the logs of the house.

Then at the bottom of the log, make a few more short strokes of brown paint. Do not wait for the ocher to dry - apply directly to the wet paint. Just don't use too much water - the paint shouldn't be liquid - it's not watercolor.

This is how we achieved halftones. Now, by mixing black and brown, we will enhance the shadow at the bottom of the log. Apply paint in short, small strokes.

Thus, you need to draw all the logs that make up the house - a light top and a dark bottom.

The upper part of the house, where the attic window is located, is painted over with vertical strokes. Try to apply strokes at a time, without smearing, so as not to disturb the texture of the wood.

There is still a long way to go before the house is completed. Now let's move on to the window. Since it is night outside, the lights are on in the house. Let's try to draw it now. For this we need yellow, brown and white paint. Draw a yellow stripe around the perimeter of the window.

Now let's add white paint to the middle. Do not take it too liquid - the paint should be thick enough. Gently blend the edges to create a smooth transition. Apply a little brown paint along the edges of the window, also smoothly mixing it with the yellow. Draw a frame around the perimeter of the window. And in the middle, do not bring a little to a white spot - as if the light is blurring the outlines of the frame.

When the window is ready, you can paint the shutters and trim. It's up to your taste. Place some snow on the outside windowsill and between the logs. The end circles of the logs must also be drawn according to their shape. Apply strokes in a circle, first with ocher, then mark the annual rings more dark color, brown and highlight the shadow below with black (mixing it with brown so as not to look aggressive).
First paint over the snow on the roof with white gouache, then mix blue, black and white on your palette. Try to get a light blue-gray color. Use this color to draw a shadow at the bottom of the snow. Don't wait for the paint to dry - the colors should lie on top of each other and blend.

We have painted the sky, now we need to draw the distant forest. First, mixing black and white (you need to get a color just a little darker than the sky), draw with vertical strokes the outlines of trees that are not visible at night long distance. Then, adding to mixed paint a little dark blue, a little lower we’ll draw another silhouette of the trees - they will be closer to our house.

Drawing foreground, forming a frozen lake. The lake itself can be drawn in the same way as the sky, only upside down. That is, the colors should be mixed in the reverse order. Please note that the snow is not painted over with an even white color. Try to form snowdrifts. This must be done with the help of a shadow. The figure shows how this can be done.

On the left we left space to draw a Christmas tree covered with snow. We have already discussed how to simply draw a Christmas tree here. Now you can simply draw the outline of the tree with a few strokes. Many colors are lost in the dark, so just paint with dark green paint. You can add a little blue to it.

Place snow on the feet of the tree. You can darken the bottom edge of the snow a little, but it’s not necessary. Take a large, hard brush, pick up some paint on it so that the brush is semi-dry (do not dip it in a jar of water before adding paint) and add the snow on the ice.
We forgot to draw a stove heating pipe at the house! What a house without a stove in winter. Mix brown, black and white paint and paint a pipe, draw lines with a thin brush to represent the bricks, Draw smoke coming from the pipe.
In the background, use a thin brush to draw silhouettes of trees.
The picture can be improved endlessly. You can draw stars in the sky, put a picket fence around the house, etc. But sometimes it’s better to stop in time so as not to ruin the work.
Our winter is so severe that soon pedestrian crossings will be made under the snow, and cars clearly need anti-gravity gadgets to fly above the snow level. I'll tell you how to draw winter with a pencil. So many holidays and fun, first Santa Claus with his big red hat will visit us, and his eternal girlfriend the Snow Maiden will also not disappear anywhere, she will come running covered in snow, late, as always. And we’ll just go outside, look at the snow, throw snowballs, and wake up next to an unknown snow woman. Then we’ll go home, and there the whole table will already be set, the Christmas tree sparkles with a rainbow, whoever has a fireplace in the house is completely lucky. There is no better time to gather with family or friends in cozy warmth, dream about summer, reminisce old times. Let's try to draw one of the beautiful landscapes that can be seen in winter.
How to draw winter with a pencil step by step
Step one. Let's draw a long path going beyond the horizon, right above it is a small but noticeable moon, and draw a horizontal line of the mountains.  Step two. Let's create a small winter town. We need several houses with sharp roofs, several trees and, in the very center, their leader - a decorated and shiny Christmas tree.
  Step three. Let's shade it all mountainous area in the background, as well as the walls of houses and the trunk of each tree. In addition, we will add a small snowman on the right side.
  Step four. Now the picture needs more liveliness. Let's shade out the houses and mountains more closely, draw lines on the path, take a closer look at each noticeable tree, and draw a small fence around the snowman.
  Step five. Don't forget the moon. Let's turn it into a small one glowing ball in heaven, and also finish with affairs on earth. And let's draw another large tree sticking out in the upper right corner.
  However, topics for drawing winter landscapes there is an infinite number. For it is enough just to go outside and see the picture created for us by nature. Stay safe and have a great winter, don't forget about DayFun and keep drawing. Leave your wishes on the comments page, I will always be glad to see you. Come back often. Several Yet interesting lessons especially for you.
The winter landscape is always interesting for its unusual fantasies. I propose to draw a landscape like this using gouache, but also use an interesting move with an imprint of a leaf from a tree.
We draw on a landscape sheet, applying pre-mixed blue and white paint for the background. To do this, take the largest brush

With the same brush we paint snowdrifts and reflections of stars more light colors, in any case, brighter than the sky.

Let the paint dry and paint the stars with white paint using a thin brush. Now we draw the silhouettes of houses and fences. And then we take a sheet, having previously adjusted it to the size of the drawing, with the veins up and apply gouache white. It is advisable to apply with an almost dry brush without water, so that the entire leaf is not completely imprinted, but gives us the effect of a beautiful winter tree


Carefully apply it to the drawing, it is advisable to press it down with something or roll it with a roller

To make the trees different from each other, you can take leaves with different vein structures. And we complete our masterpiece by drawing the remaining elements - snow on the roofs, trees in the distance. You can sprinkle small white drops all over the design.

You can draw a winter village landscape like this.

First let's start drawing the sun:

then we will gradually draw it:

we cross the sky:


draw the outlines of the houses:

draw the roofs:


To draw such a picture well, you need to have at least some drawing skills, especially with gouache.
Prepare paint, sheet, brushes, cloth for painting. First, paint the sheet with white gouache. Apply the wet paint on top with a brush. Blue colour. Then we take a brush with white paint and paint clouds with light curls over the blue paint. Mix blue, ruby with white and draw a shadow from below with a cloud. Let's add white highlights to the clouds.
We draw bushes/trees in the distance with small strokes; to do this, mix light purple and green paint, then add a little to the palette yellow color and use the resulting color to paint the tops of the bushes. Draw a Christmas tree by mixing blue and green color. First, a straight tree trunk, then mark the branches from the top with strokes and go down, expanding with each stroke. We draw smaller Christmas trees nearby. Apply light strokes of snow to the trees with gray paint. Use the same color to draw a shadow under the Christmas trees.
On the palette, mix blue with ruby and a drop of white and draw a river for expansion. Brown paint draw a house. Draw a big tree behind the house. Add white to its main color and paint snow on the branches. Use pure white to mark highlights on the snow strokes. Draw a shadow from the house.
On the right, draw more rays, snow on them, highlights, and then use a dark color to mark the shadow of the locs in the picture.
Using a wet brush, lightly blur the banks of the river, the shadow of the trees and the hut. Then paint one side of the house with dark brown paint, paint the windows and highlights on the walls with yellow paint. Paint on the roof snow and snowdrifts near the house. Yellow paint glare from the windows. White paint highlights on the river. Using black with a thin brush, draw a snag and its shadow. And on the tree branches add a little shadow from them with black paint. The painting Winter landscape is ready.


To draw a winter landscape you need gouache, drawing supplies and good paper.
Place the paper on the table so that it does not leave at the moment you need.
The colors we will use are blue, white and quite a bit of green.
Draw Christmas trees, which are then covered with snow.
And at the end we decorate everything with snowdrifts.
The end result will be a winter landscape - snowdrifts, snow-covered fir trees and a frozen lake.
You can learn another lesson on how to draw a winter landscape by watching the video below
Winter. What associations does this word evoke for you? I'll assume that there is snow, a Christmas tree, a snowman, snow-covered roads...
Agree that winter mountain scenery very handsome. I suggest you draw his step by step gouache. This lesson is very simple and even a beginner can handle it.
Take a sheet of paper, paint, brushes and create!
First draw the background. as shown in the photo:


Draw the spruce trees using dark tones of green gouache, without going into detail, but simply applying strokes:


That's all. The winter landscape painted in gouache is ready. I wish you creative inspiration and success!
Drawing a winter landscape in gouache is not at all difficult even for a novice artist. For this we will need paints, brushes, a sheet of paper and a little patience and perseverance.
Here are a few video lessons that will help you in this difficult and enjoyable task:
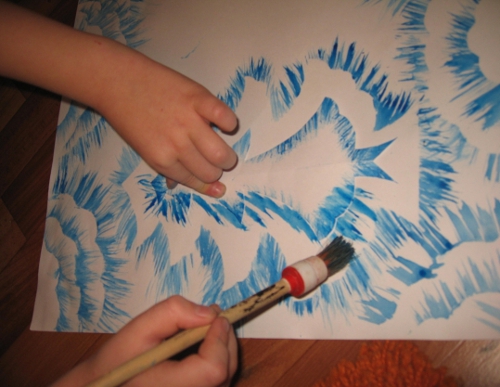
We place a sheet of paper horizontally and begin to draw the sky. To do this, draw a horizon line with a pencil. After this we will no longer need the pencil. To paint the sky we take light pink and yellow paints.

We blur the boundaries between colors so that the transition from one color to another is smooth.

To do this, let's remember very simple technique erosion.

Our snowdrifts will be gentle - blue color, so we add a blue stripe.


We draw the forest in the distance.

Let's start drawing out the houses. One is bigger, the other is small. For this we need brown paint.

When we speak " Winter night", then of course we immediately imagine white fluffy snow, starry sky and warm light coming from the windows. All this can be depicted in a picture. Artist Marina Tereshkova especially for young artists showed how it can be drawn.
1. First, draw the background by mixing blue and white paint. Let's place the landscape sheet horizontally and take the largest brush for the background.
2. Using the same large brush, we will draw snowdrifts and reflections from the stars. The reflections should not be very white and bright. To do this, you need to mix white with blue gouache. Let them be just a little lighter than the sky. When the paint has dried, use a thin brush to paint star points with bright white paint and draw dark silhouettes of houses and fences around them.

3. Take a sheet, cut it to size, if necessary, turn it upside down with the side with convex veins.

4. Paint the sheet with white gouache. It is better to paint with an almost dry brush so that there is not too much water, because otherwise the entire leaf will be printed completely and you will not get a beautiful snow tree.

5. Carefully place the leaf on the drawing, cover it with another leaf and press down a little. You can use a small roller for this.

6. You can take different leaves for different trees. Then add snow on the roofs, trees in the distance, near the houses. Although these trees can also be printed with small leaves. Finally, spray a little white paint. So we have a nice winter landscape.
Found it on the Internet interesting selection. (the most interesting, for me, is at the end))
1. Winter drawings. "Volume snow paint"
If you mix equal amounts of PVA glue and shaving foam, you will get wonderful airy snow paint. She can draw snowflakes, snowmen, polar bears or winter landscapes. For beauty, you can add glitter to the paint. When painting with this paint, it is better to first with a simple pencil outline the contours of the drawing, and then color it with paint. After some time, the paint will harden, and you will get a voluminous winter picture.

2. Winter drawings of children. Using electrical tape in children's creativity
If there is snow outside the window, you can depict it using a cotton swab.
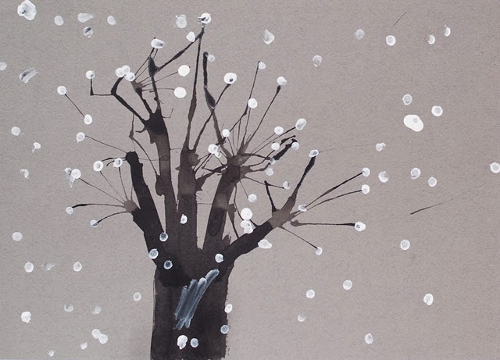
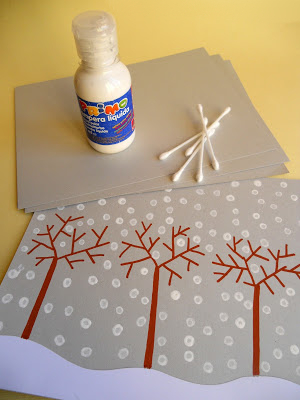
Or use a brush to put snow on each branch.

11. Winter drawings. Drawings on the theme of winter
An interesting idea on the topic of children's winter drawings was suggested by the author of the blog Homeschool Creations. She used putty to paint snow on the transparent film. Now it can be applied to any winter pattern or appliqué, simulating falling snow. They put the film on the picture - it started snowing, they removed the film - the snow stopped.
12. Winter drawings. "New Year's lights" We would like to tell you about one interesting unconventional technology drawing. To draw New Year's garland as in the photo, you will need a sheet of thick paper of a dark color (blue, purple or black). You will also need regular chalk (the kind you use to draw on asphalt or a blackboard) and a light bulb stencil cut out of cardboard.
On a piece of paper, use a thin felt-tip pen to draw wires and light bulb sockets. Now apply the light bulb stencil to each socket in turn and outline it boldly with chalk. Then, without removing the stencil, smear the chalk on the paper using a piece of cotton wool or directly with your finger to create rays of light. You can replace chalk with colored pencil graphite chips.
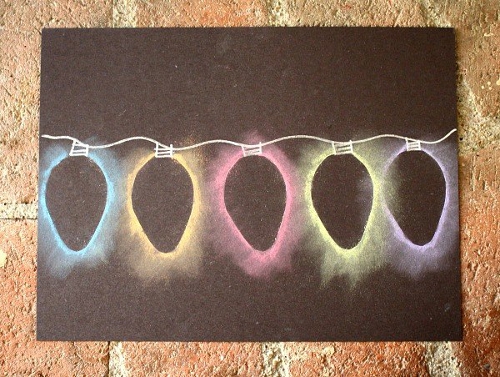
It is not necessary to use a stencil. You can simply paint over the light bulbs with chalk, and then gently rub the chalk in different directions to make rays.
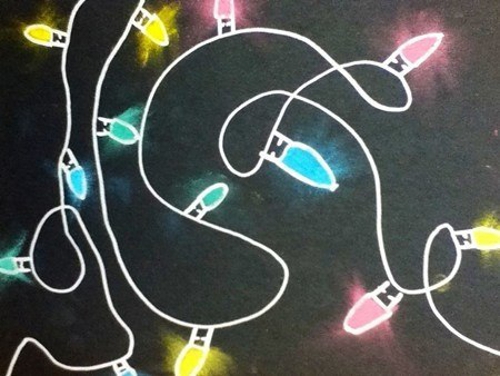
Using this technique, you can also draw a winter city, for example, or the northern lights.

13. Drawings winter's tale. Winter forest drawings
On the site already mentioned above Maam.ru you will find interesting master class on drawing winter landscapes using templates. You will only need one base color - blue, a coarse bristle brush and a white drawing sheet. When cutting out templates, use the cutting method from paper folded in half. Look how great the drawing is winter forest turned out to be the author of the picture. A real winter fairy tale!

14. Winter drawings. Drawings on the theme of winter
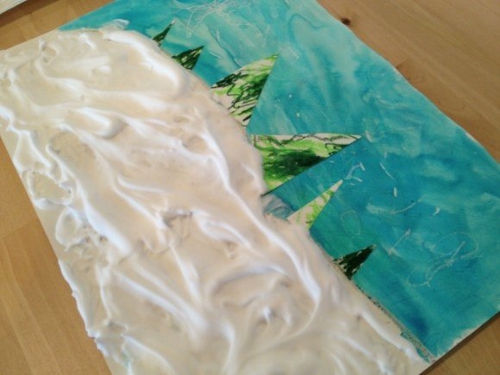
You are probably very eager to find out how the wonderful “marble” Christmas tree in the photo below was painted? Let's tell you everything in order...To draw this original drawing for the winter theme you will need:
Shaving cream (foam)
- watercolor paints or green food colorings
- flat plate for mixing shaving foam and paints
- paper
- scraper

1. Apply shaving foam to a plate in an even, thick layer.
2. Mix different shades of green paint or food coloring with a little water to make a rich solution.
3. Using a brush or pipette, drip paint onto the surface of the foam in a random order.
4. Now, using the same brush or stick, beautifully smear the paint over the surface so that it forms fancy zigzags, wavy lines and so on. This is the most creative stage all the work that will bring pleasure to the children.
5. Now take a sheet of paper and carefully apply it to the surface of the resulting patterned foam.
6. Place the sheet on the table. All you have to do is scrape off all the foam from the sheet of paper. For these purposes, you can use a piece of cardboard.
Simply amazing! Beneath the shaving foam you'll find stunning marble patterns. The paint has time to quickly absorb into the paper; you just need to let it dry for a few hours.
15. How to draw winter. How to paint winter with paints
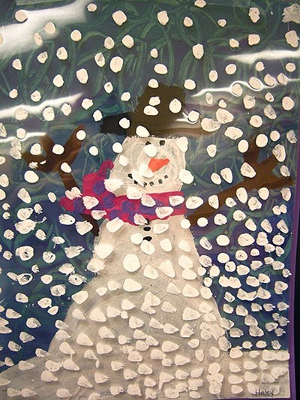
Concluding our review article on winter drawings for children, we want to tell you about another interesting way how you can paint winter with paints with your child. To work, you will need any small balls and a plastic cup (or any other cylindrical object with a lid).

Place a piece of colored paper inside the glass. Dip the balls in white paint. Now put them in a glass, close the lid on top and shake well. As a result, you will end up with colored paper with white streaks. Similarly, make colored paper with white streaks of other colors. From these blanks, cut out the details of the applique on a winter theme.


Material prepared by: Anna Ponomarenko


