Santa Claus face drawing in pencil step by step. How to draw Santa Claus with a pencil step by step. How to draw Santa Claus with a full beard with colored pencils
Already drawn +0 I want to draw +0 Thank you + 8
Today we will look in more detail at how to draw a face and head portrait of Santa Claus with pencils step by step. We have prepared 8 lessons with photos.
Tools and materials:
- Simple pencil;
- Eraser;
- A sheet of white paper;
- Colored pencils (red, burgundy, brown, beige, gray);
- Black marker.
Drawing the face of Santa Claus
Video: drawing the head of Santa Claus
How to draw the head of Santa Claus with a lush beard for the New Year
Hello. Today we will draw the head of Santa Claus with a lush beard for the New Year. For this we need:
- Pencil NV
- Eraser
- Step 1
First, let's draw the main lines of the face, as well as the top of the mustache.

- Step 2

- Step 3
Then we will draw the fur of the hat, as well as the disheveled hair on the sides.

- Step 4

- Step 5
Let's draw the hand on the side as shown in the figure.

- Step 6
Let's outline everything with a black pen or marker and move on to the next stage of coloring.

- Step 7
We paint the face of Grandfather Frost, add blush, shadows, and paint the mouth.

- Step 8

- Step 9
We dye grandfather's fur and suit. Add a snowflake in the background. Ready! Now you can draw the head of Santa Claus with a lush beard for the New Year

How to draw Santa Claus with a full beard with colored pencils
Hello. Today we will draw Santa Claus with a lush beard using colored pencils. For this we need:
- Pencil NV
- Eraser
- Colored pencils or markers
- Black gel pen or marker
- Step 1
First, let's draw the circumference of the head, mustache and mouth.

- Step 2

- Step 3
Then we’ll finish drawing the lush beard and suit. Try to draw the beard as full and curly as possible.

- Step 4
We outline everything with a black pen or marker and move on to the next stage of coloring.

- Step 5
We paint the face, add blush and shadows. Don't be afraid to add red to your nose.

- Step 6
Color the beard blue. You can shade it a little.

- Step 7
Add fur color to Grandfather's costume.

- Step 8
Color the suit red, add shadows and you're done!

How to draw Santa Claus
On the eve of the New Year holidays, many parents are wondering how to draw Santa Claus for their child? Such a drawing can decorate a handmade New Year's card, decorate a school wall newspaper, or simply make a beautiful drawing with your child.
Santa Claus is the main symbol of every New Year's celebration; he has long become a character in children's cartoons, good fairy tales and legends. Not only adults, but also children know exactly what Santa Claus looks like. Therefore, even any novice artist can draw Santa Claus with pencils.
To draw Santa Claus step by step you need to have on hand:
- Several blank sheets of paper;
- Black handle;
- Simple pencil;
- Eraser;
- Set of colored pencils.
How to draw Santa Claus step by step
- The first step is to make the initial outlines of our future drawing. Before starting to draw, every beginner and professional artist makes a general sketch. They outline with a simple pencil where certain parts of the future drawing will be located and only after that can they begin to carefully draw the details and check the proportions. This is exactly what we will do, having initially made approximate outlines of Santa Claus consisting of three parts. Or rather, a large circle for the chest, the approximate circumference of the head and light contours to outline the floor of the fur coat.

- Drawing the outline of the hands. Now you can draw the hands of Santa Claus, draw the joints using “balls”. Using this method, the exact proportions of the shape, as well as the thickness of the legs and arms, will be observed. Please note that the elbow should be located at waist level.

- Drawing the general outline of Santa Claus's hands and fur coat. Focusing on the “balls”, outline the general contour of the arms and fur coat. In this case, the thickness of both hands should be approximately the same. In the right hand of Santa Claus you need to draw a staff. Then you need to add additional details and use an eraser to remove all unnecessary contours. Well, now we have drawn almost all of Santa Claus, we just need to finish drawing the beard and head. Find out what to wear to celebrate the New Year of the Rooster 2017.

- Beard and head of Santa Claus. Mark where the future mouth, eyes and nose will be. After which you can more carefully draw the hat with the tassel. All that remains is to draw the beard and it will not be difficult at all, like other small details of clothing and face.

- Drawing the face of Santa Claus. Our character's face can only be drawn in general terms without carefully drawing out all the details. And to make Santa Claus more beautiful and elegant, the staff and fur coat need to be carefully drawn. At the bottom of the fur coat, draw the contours of the felt boots.

- The final stage of drawing. The finished drawing should turn out colorful and rich in bright colors, so be sure to color Santa Claus with multi-colored pencils. If you want to include the Snow Maiden in the picture, then be sure to leave free space for her.

How to draw Santa Claus quickly
- In this step-by-step instruction we will tell you how to quickly draw Santa Claus
- To draw Santa Claus beautifully, you need to prepare everything you need in advance. We begin to draw the contours of the head and beard. These are two circles intersecting with each other - one is larger and the other is slightly smaller.

- Draw a horizontal line in the very center of the drawing, which will indicate where the center of the future face will be.

- Draw two identical circles slightly above the drawn center line. You need to make sure that the drawn circles are located on a smaller circle. Thus, we depicted the eyes of Santa Claus.

- Draw a circle slightly larger than two circles for the eyes. The drawn circle should slightly intersect the central drawn line at the top. This is how we got the nose of Santa Claus.
- Draw an arc at the top of the largest circle. The resulting line will emphasize the contours of our character’s New Year’s hat.

- Now we will draw Santa Claus's hat, which consists of lines running parallel to each other. In this case, the lower part should cover the upper part of the larger circle. Draw a curved line and circle at the end of the hat. The drawn line should not be straight, otherwise the New Year's hat will look unnatural.

- Now you need to draw a beard and mustache. Draw the bottom of the beard in the form of a heart, and draw the mustache in the form of a curved line. The drawn mustaches should be similar to each other so that Santa Claus looks more neat.

- Draw ears in those places where the beard line reaches the face.

- In the eyes, draw black pupils and eyebrows in the form of two arcs.

- The main contours must be highlighted with smooth lines, which should look like curls. Make wavy lines on the hat.


Draw a handsome Santa Claus
- To draw Santa Claus with pencils, first of all, you need to outline the outline of the future drawing. If the lines turn out uneven, there is nothing to worry about, because later these lines will need to be removed with the help of an eraser.

- At the top of the outline draw a circle of the future head of Santa Claus.

- In the form of a trapezoid, mark the torso of the future Grandfather Frost, and draw the hem of the fur coat in the form of an oval. Draw two ovals on the sides of the trapezoid, so you should have arms.

- Now you can start drawing the face. Draw furry eyebrows, eyes, lips, mustaches and a wide nose.

- In the drawing, outline the contours of Santa Claus's beard. You can depict any beard at your discretion.
- Draw cuffs on the sleeves and a Santa Claus hat with cuffs. It is also necessary to draw mittens, because without them Santa Claus will be cold.

- Also, do not forget to draw a magic staff, which should end with a beautiful snowflake at the top.

- It is known that Santa Claus brings many gifts to children, so it is necessary to depict a bag of gifts.

- Draw the fur at the bottom of the hem and the belt on the fur coat.

- Draw folds on the cuffs and on the fur coat itself to make the pattern look more natural.
- And on the beard, mark small wavy strands.

- Do not forget that while creating a drawing you need to erase unnecessary details and lines.Clearly outline the lines and contours of the drawn Santa Claus.Grandfather Frost is ready. Ask your children for help and work with them to color the drawing with bright crayons.
Now you know how to draw Father Frost and the Snow Maiden, as you can see, this is not at all a difficult task that even a novice artist can master. You can also depict a decorated Christmas tree or the Snow Maiden next to Santa Claus.
We will need:
- a sheet of white paper;
- simple pencil HB;
- eraser;
- colored pencils or wax crayons.
Drawing order:
- On a white sheet of paper we mark the approximate dimensions of our hero - we mark the bottom and top of Santa Claus. We draw a vertical line - the axis. It is important to leave a little more white space at the bottom so that the drawing looks harmonious on a sheet of paper.

- We draw a hat and outline the wizard’s collar. The width of the collar should accommodate two hats. Make a mark where the beard will end. We connect the points with smooth lines so that the collar can be guessed in the outline. The sketch must be symmetrical, so you need to be oriented relative to the axis.
- Let's start drawing the body. Here you can no longer pay attention to symmetry. We draw sleeves with fur trim, shoulders and a fur coat to the place where it will be tied with a belt.
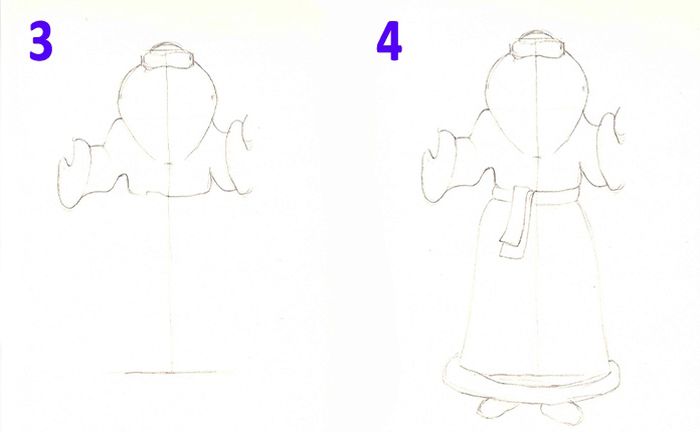
- We continue to schematically depict Santa Claus' fur coat. We draw a belt, a hem with fur trim and peeping boots. The sketch should turn out approximately as shown in the photo, but you can deviate from the lesson, following your imagination.
- We indicate the details of the image with a pencil. You can give the wizard a small Christmas tree in one hand, and his staff in the other.

- Remove markings and unnecessary lines using an eraser. We carefully draw out the details - we make fluffy fur trim for the fur coat, draw the beard and face of Santa Claus. We pay attention to the Christmas tree and the staff - we decorate them as we wish or as shown in the example.
- Color the drawing with colored pencils.
Advice!
Pay special attention to the drawing of the fur. Apply small lint strokes, leaving spaces between them.
Of course, it will be difficult to draw such a character with a pencil for a 2nd grade child. But, if you do this together with your parents, then the work process will go smoothly, and the New Year’s mood will rapidly increase.
Drawing the Snow Maiden (step by step)
Another popular thematic character, the hero of the New Year holidays, is the Snow Maiden. She often appears with her grandfather on cards and holidays, so it will be useful to learn how to draw not only Father Frost, but also the Snow Maiden. For the work you will need the same materials and tools, so let’s immediately move on to the step-by-step lesson.

Drawing order:
- We designate schematically the place where our heroine will be located. Let's draw a vertical line - an axis - in the center of the sheet and draw a rectangle, as shown in the figure. These will be the boundaries beyond which the drawing should not go.
- Draw an oval for the Snow Maiden's head. We draw the shoulders with a smooth line and connect them to the head with the neck.
- We draw out the arms and upper body beautifully. Don't forget about the fur trim on the sleeves - at this stage it can be depicted as an oval.
- Let's start drawing the heroine's fur coat. We schematically designate the floors of outerwear.
- On the second sleeve we draw an oval for the fur trim, and connect the fur coat's floors with a smooth curved line.
- We remove unnecessary marking lines. The result should be a slender figure of a girl.
- We draw the elements of the traditional costume of the Snow Maiden. We draw the fur trim on the fur coat and the collar. We depict a kokoshnik in the form of a semicircular shield.
- Since Moroz’s granddaughter has long hair, we draw on her braid with a large bow and bangs peeking out from under the kokoshnik.
- Let’s add expressiveness to the Snow Maiden’s face – draw eyes, mouth, nose and rosy cheeks.
- We put warm mittens on our hands.
- We decorate the Snow Maiden as desired with paints or wax crayons.
Advice!
Finally, erase all the schematic elements. Therefore, do not press hard on the pencil while drawing.
Since we have already shown how to draw Father Frost and the Snow Maiden with a pencil step by step easily and beautifully, it’s time to present another version of the New Year’s card. Often on greeting cards you can see the main winter wizard with a bag of gifts in his hands. Learn how to make such a design on your own postcard in this step-by-step lesson.
Drawing order:
- Let's start drawing the face of Santa Claus. To do this, draw a figure on a piece of paper that resembles a sleep mask.

- We draw a nose resembling a small potato in shape, a mustache extending from the nose in different directions, and small eyes. Draw thick eyebrows above them, as shown in the diagram.
- We draw a hat - we designate the fur trim in the form of a voluminous semicircle above the face, and then we draw on the headdress itself.
- Let's move on to the body. We draw an axis in the form of a vertical strip and a wizard’s fur coat. We draw the sleeves and schematically depict the mittens. At this stage you should get a drawing like the one in the picture.

- We outline the beard - a “sharp”, realistic kennel and a few hairs. After that we move on to the bag of gifts. He should be located on the shoulder of Santa Claus. We carefully draw out with a pencil all the folds and the hand in which he holds the neck of the bag.
- On the other side, draw part of the bag, which appears from behind the hero’s hat. We draw the second arm and sleeve, as well as the staff, which is topped with a large, openwork snowflake.

- We complement the costume with traditional elements - fur trim on the fur coat and a belt.
- Remove unnecessary marking lines with an eraser.
- We color Santa Claus at our own discretion.

Advice!
At the stage of drawing the staff, it should be noted that it diverges downwards, so you should not make it straight in all areas.
What do we associate with the New Year? Of course, with a Christmas tree, tangerines, fun and surprises. And what is a holiday without the traditional Father Frost, this kind forest wizard with a bag of gifts on his back. His images will help decorate your home for New Year's celebrations or will be an excellent theme for DIY children's cards.
Let's look at several ways to draw Santa Claus. They differ both in degree of complexity and in design.
How to draw a cartoon Santa Claus step by step?
The main character of many New Year's cartoons is Grandfather Frost with a long beard and a red fur coat down to his toes. It is quite easy to draw, gradually moving from schematic forms to a more “live” image. If at first your child is unable to draw a character on his own, be sure to help him and make a drawing together. This is a great idea to spend the evening together.

How to help your child draw Santa Claus?
You can draw a New Year's guest in a more schematic way, which even a preschooler can do. Tell your child how to draw the main lines and make the drawing symmetrical.

How to easily draw the face of Santa Claus?
Often, for a school wall newspaper or, for example, window decoration, you only need to depict the face of Santa Claus. Here, a schematic image is no longer enough; a more detailed elaboration of the facial features will be required. But doing this is not as difficult as it seems. So, arm yourself with a gel pen and colored pencils (or gouache if you are going to paint a window) and start drawing:
- Draw two perpendicular lines.
- In the center of the picture, at the place where they intersect, draw a small circle - the nose.
- Add a mustache to it.
- Below is a smiling mouth.
- On both sides there are contours of the cheeks.
- A horizontal elongated rectangle will serve as the base of the hat.
- Inside the resulting closed figure, draw the character’s eyes and eyebrows.
- Draw a large bushy beard.
- At the top of the sheet, complete the image of the header.
- Paint your masterpiece in bright colors.

New Year is just around the corner - it's time to draw Santa Claus! It is more complex than giraffes and hedgehogs, so today's lesson turned out to be long. At first glance, it may seem strange that we will draw the arms first and then the body, but believe me, it’s easier to make it proportional. In general, first just repeat, and then draw as you feel most comfortable.
UPD-2012: NEW SANTA CLAUS has been posted, he is prettier - like this (click on the picture):
(A small digression from the topic: have you already found a New Year's gift?)
So, I took Santa Claus from Irina and Visha’s blog as the basis for the drawing (for which I thank them very much) - be sure to take a look, they have him a little different, but in color!
We draw a horizontal oval, more precisely, a loaf:

We add a cap to the loaf, this will be our hat:

Right under the hat we draw eyebrows that look like half a cloud...

...and the eyes - two lines sticking out straight from the eyebrows:

Draw a strongly flattened nose, approximately the same width as the distance between the eyes. The nose is located almost immediately under the eyes:

Now let's take care of the beard. From the nose to the hat there are two lines like this in an arc, on the left and on the right. Please note: they do not extend from the nose exactly from the side or from below, but at half past four and half past seven. They fit the “loaf” of the hat exactly opposite the cap:

Well, now from the same points where the “sideburns” approach the hat, we draw a beard. Her “curls” are larger than her “sideburns”:

So far, Santa Claus looks like a gloomy forest man. Let's add a smile! :)

We're done with the head, now the body. Estimate by eye where the chin is hidden under the beard - at this level we will draw the shoulder. More precisely, its upper edge. We draw a hand: first an outer arc, then an inner one, and then another loaf, only smaller:

And a glove:

With this hand, Santa Claus holds a bag of gifts. According to our plan, the bag stands on the ground, so figure out in advance how tall Santa Claus is.

Opposite the first hand we draw the second. Santa Claus will have a magic staff in this hand, so we draw the hand at an angle (about 45 degrees):

We’ll leave the palm for later, but for now we’ll finish drawing the body. Now you have to rely on your eye: draw the edge of the fur coat and the lower edge (a long loaf). Under the fur coat we will also draw felt boots, so the bottom edge of the fur coat should be slightly higher than the bottom edge of the bag - our bag is on the ground. Take a closer look - the edge of a fur coat is also visible on Grandfather’s right hand (for us it’s on the left).
THE MOST IMPORTANT thing is that it may turn out a little differently for you: your hand is to the left or to the right, the bag is wider, Santa Claus is thicker or taller. Naturally, this won’t make the drawing any worse :)

Drawing felt boots...

...a wide strip in the center of the fur coat and a small bar - the edging of the pocket. My second pocket is covered with a bag, yours may be visible.

Now let's return to the palm in which the staff is clutched. Let's start with the thumb...

...and all the other fingers are bent like this. Actually, I didn’t get the dimensions right, but it turned out good too:

We stick a staff into the resulting fist - almost perpendicular to the palm. One end of it stands on the ground. For me it is not visible because of my felt boots, but for you it may be visible - decorate it to your taste.

Finally, we draw some kind of knob and paint the staff itself - Happy New Year!


