How to make a graphic drawing from a photograph. How to make a photo look like it was drawn using PhotoShop
To create one that would look as believable as possible, and could be used to create various graphic works, it is not enough to use standard filters or programs. It is necessary to master the principles of operation Adobe Photoshop.
We decided to simplify your work and have put together several lessons that tell you in detail how to make pencil drawing in Photoshop to make it as realistic as possible.
Pencil drawing effect
This is perhaps the best method that I have ever found on the Internet. Using this video lesson, achieve pencil drawing effect you can literally do it within 5 – 10 minutes.
Drawing with colored pencils
In this tutorial you will learn how to turn any photo into crayon by using Adobe programs Photoshop. For beginners, it will take a little effort to complete this lesson in this program.

Pencil drawing from color photo

Making a pencil drawing
Our masters also decided to keep up with fashion trends in the world of Adobe Photoshop. That's why make a pencil drawing in Photoshop together with you on the pages of our website.


There are several ways to do it pencil drawing in Photoshop. This program even has special filters to create a similar effect. However, in this lesson you will learn how to create a sketch with a pencil without resorting to them.

It is not at all necessary to be able to hold a pencil in your hand or be professional artist. This lesson will show you how make a pencil drawing in Photoshop with the most realistic imitation of living materials.

A great example of how you can quickly and easily transform photo into pencil drawing (sketch) in Photoshop. In this video tutorial you will find all the necessary information, so even a beginner can cope with the implementation.

To convert any photos to drawing, done with a simple pencil , there are many plugins and programs. However, the author's opinion this lesson unequivocally: “We haven’t yet created such a button to make a pencil drawing in Photoshop with one click.”

Pencil drawing in Photoshop
Many professional designers and wedding photographers use pencil drawing effect from a photograph in Photoshop to add grace and artistry to the photo. There are a lot of methods to transform a photo into a sketch with a simple pencil.
Many people would like to learn how to make a real drawing from a photograph. Indeed, sometimes combinations look advantageous beautiful photos and pencil drawings. This business has its own charm.
But the catch is that making a good, real, high-quality drawing from a photograph is not so easy. Most existing plugins and programs do not pencil drawing, but some kind of similarity. Yes, it looks like it, but it’s a long way from a real drawing.
Let's consider two approaches to solving this issue:
Let's start exploring the first option.
I caught my eye quite interesting video lesson filmed by Alexey Kuzmichev. Indeed, the end result was a good pencil drawing from a photograph.
Turning a photo into a pencil drawing
Well, let's meet. I hope you liked the result. For me personally, yes. But, there is a small catch. Remembering all this is not so easy. So I decided to make a small cheat sheet that outlines all the necessary steps step by step.
Making a pencil drawing from a photograph step by step instructions
This is the image I got with this approach. There is a certain resemblance to a pencil drawing, but, you know, we still need to work on the final result. Hover your mouse over to see the opening photo.
1. Make two copies of the selected photo - Ctrl+J. Turn off the visibility of the first top copy.
2. Go to the second copy and click Ctrl+I– invert the layer. Convert the layer to smart object. Making a blend mode - lightening the base. Go to Filters – Gaussian Blur – make the blur radius 15 px.
- - add an adjustment layer to this layer Saturation– lower the saturation to –100 (bleach the image);
- - second adjustment layer - Levels, in the left window set the value to 95 (add contrast for the photo);
- — group all three layers (select the layers while holding Shift and pressing Ctrl+G), call this group Warp;
3. Go to the top layer and turn on its visibility.
- - convert it to smart object, select black color from the color palette, the background color should be white;
- - select a filter Filter Gallery – Sketch – Photocopy– detail 3, darkening – 20;
- filter Filter Gallery – Strokes – Slanted Strokes– Direction balance – 78, stroke length – 50, sharpness – 10; Change the blending mode to Darken; Name the layer Circuit;
- - duplicate this layer Ctrl+J, change the blending mode to Darkening the base, reduce the transparency of the layer to 80%, name the layer in Outline - copy;
4. Create a copy of the Outline-copy layer Ctrl+J;
- - filter Filter Gallery – Imitation – Fresco– size 10, detail – 10, texture – 1;
- - filter Filter Gallery – Sketch – Letter Paper– Tone ballast – 50, grain – 5, relief – 25;
- — change the transparency to 60%;
5. Copy the main, bottom layer with the photo Ctrl+J, move the copy to the very top;
- - filter Filter Gallery – Texture – Texturizer– Texture – brick, scale – 100%, relief – 15, light – on the right, tick opposite Invert;
- - filter Filter Gallery – Sketch – Halftone Pattern– size – 4, contrast – 4, pattern type – line;
- - filter Blur - Motion Blur– angle 45, offset 40 px;
- — The blending mode for this layer is – Hard light;
- - name the layer Halftones;
6. Duplicate this layer Ctrl+J;
- — filter – Grain, intensity – 45, contrast – 45, grain type – splashes;
- — change the transparency of the layer – 85%;
- - name the layer Corn;
7. Duplicate the Outline layer Ctrl+J and place a copy at the very top;
- - filter Filter Gallery – Simulation – Fresco– size –10, detail – 10, texture – 1;
- – Layer blend mode – Darkening the base, transparency – 60%;
8. Duplicate the Halftone layer, place the copy at the very top;
- - filter Filter Gallery – Texture – Grain– grain, intensity – 45, contrast – 65, grain type – splashes;
- - filter Filter Gallery – Sketch – Charcoal– intensity – 6, detail – 5, tonal balance – 88;
- - filter Filter Gallery – Sketch – Halftone Pattern– size – 1, contrast – 0, pattern type – line;
- - filter Blur – Motion Blur– angle 45, offset 100 px;
- – layer blending mode – Ordinary, layer transparency – 70% ;
8. Duplicate the main photo Ctrl+J, place a copy at the very top, convert to smart object;
- -filter Filter Gallery – Sketch – Photocopy– detail –3 (sometimes it’s better to set 2 for a more elegant line), shading – 20;
- — layer blending mode Multiplication, transparency – 50% ;
9. Add a paper texture to the drawing:
- - download the image with the paper texture to your computer, here;
- — drag the image with the paper texture onto our image, it should be on top;
- - stretch to fit the entire photo through Transformation;
- - change the blending mode to Multiplication;
- - change transparency to 60% ;
For myself, I made a file in Word and printed it out; the whole thing easily fit on one sheet of paper on both sides. With this approach, mastering this technique is much easier and more convenient.
Here is another picture that I got. We move the mouse and see the original. Here, however, I had to work a little with masks to further blur the background:
For those who want to apply this approach in their work on a regular basis, I recommend making an Action for Photoshop in which you can record all the necessary actions, as a result, the process of turning any photo into a pencil drawing will take a couple of minutes.
This is one way. The result, in principle, is not bad, it may be suitable for certain tasks, but, alas, it is far from a real drawing. To fully master the technique of converting a photograph into a pencil drawing, I propose another method in which there are no filters and end result will depend only on your artistic taste.
Pencil drawing from a photograph without filters
This option is more like drawing and you will have to rely on your inner sense of proportion and harmony. You can get completely different results from the same picture. But, as they say, the more interesting it is.
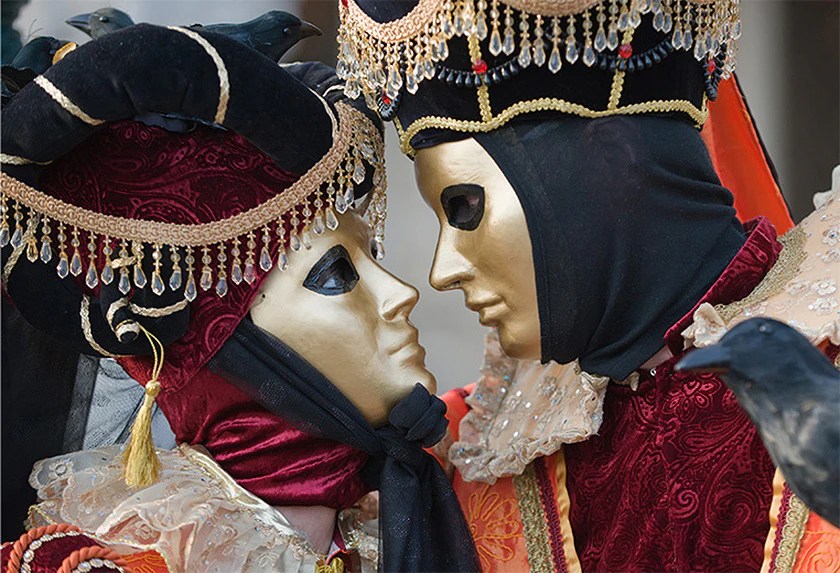
It is important to choose a good, contrasting photo. The more expressive the eyes and facial features are, the greater the chances of getting a high-quality drawing as a result.
I chose a photo of a girl wearing a hat with snow. The contrast is good, the eyes are expressive. In my opinion, transferring to pencil can give a photograph lightness, airiness, and greater consonance. inner world child. Which is what happened in the end. When you hover your mouse over you can see the difference between the original and the final result:
Now let's look at what needs to be done for this.
- Take our photo and make two copies using a key combination Ctrl+J, on the color palette Main color– white, background – black;
- We call the top layer Crib, keys Ctrl+Shift+U bleach it, Layer transparency install on 40% ;
- We call the second layer Drawing, Ctrl+Shift+U bleach it, Layer – Layer Mask – Hide All– make a layer mask;
- Create a new layer above the Main image and fill it with white;
- We highlight Layer mask on layer Drawing, we will draw on it;
This is what we should have at this stage:
Creating the necessary layers for a pencil drawing from a photograph
First brush – Line Pencil
To highlight the most expressive elements of the image, we will need a Brush that looks like a pencil mark.
- Choosing a tool Brush– key B, turn on Brushes control panel F5;
- Select a regular, round brush with hard edges, set the size from 2 to 6 pixels. I put 4px;
- Put a tick in the box Dynamics of shape (Shape Dynamics) – Size fluctuation (Size Jitter) we put it on 60% ;
- Diffusion (Scattering) – Diffusion put 43% ;
- Broadcast (Other Dynamics) – Opacity fluctuation (Opacity Jitter) put on 10% ;
- Upper right corner of the Brush Control Panel - select New set of brush options– Save our new brush called Pencil line;
You can start with the initial sketch. The task at this stage is to carefully highlight the necessary parts of the drawing for greater expressiveness. It is advisable to start as carefully as possible, setting the transparency from 10 to 30%. Here it’s better not to finish drawing a little, then, closer to the end, you can once again make the necessary selections.
Don't be afraid to make mistakes. Remember, we are working on a Mask, and the white brush in this mode only reveals the image of the lower layer.
This is what I got at this stage with the layer turned off Crib. I deliberately did not finish drawing all the details; it is better, in my opinion, to add the necessary touches later, at the final stage:
Initial sketch of pencil drawing
Second brush Pencil-shading
Now it's time to move on to the shading. To do this you will need a special brush.
- Turn off the visibility of the layers Drawing and Cheat Sheet;
- Let's do main color Black, Transparency we put it on 100% ;
- Brush Pencil line, make the thickness 2px and draw a line along the white layer while holding down the key Shift, line length approximately 80px;
- Magic Wand (W) select this line;
- Editing – Define Brush– save this new brush called Temporary, remove the line from the white layer;
- Turn on F5 Brush Control Panel and make the necessary settings for the new brush;
- Dynamics of shape (Shape Dynamics) – Size fluctuation (Size Jitter)60%, Angle fluctuation ( Angle Jitter) – 3% ;
- Diffusion (Scattering) – Diffusion — 43% ;
- Broadcast (Other Dynamics) – Opacity fluctuation (Opacity Jitter) — 10%, Fluctuation in paint amount ( Flow Jitter) – 80% ;
- Brush imprint shape (Brush Tip Shape) – Intervals (Spacing) – 70%, Angle ( Angle) set the value (-20 degrees);
- Save the new brush with the name Hatching pencil;
Setting the brush transparency Pencil shading by 5-10% and begin to carefully shade your drawing. The Cheat Sheet layer can be turned off so that you can immediately see what happens on the white sheet.
Gradually, by changing the brush size, transparency and brush angle, you can achieve a very good result. Don’t be lazy, change all these values more often, thereby bringing your creation closer to a real pencil drawing.
If necessary, the desired areas can be further treated with a Pencil Line brush.
And don't forget simple truth, it’s better to underdo a little than to overdo it. Gradually, as you master the technique, a stable understanding of when to stop will be formed.
This is the technique. There is nothing complicated, you just need desire and a little time to master. And the results can be very interesting.
Good luck to everyone and unusual creative solutions.
AKVIS Sketch allows you to turn a photo into a pencil drawing.
Now you don't need to master a pencil to create an original work of art.
All you need is a little imagination and AKVIS Sketch!
The program turns photographs into sketches made pencil or coal, allows you to create not only black and white pencil sketch, but also color drawing, and also get the effect of watercolors and pastels.

The drawings created by the program can compete with real works. Sketch allows you to get amazing quality result, similar to the work of an artist.
If you've always dreamed of learning how to draw, but didn't know how, try AKVIS Sketch!

The program features two main styles that allow you to create drawings with different types hatching: Classical And Art. Each style comes with a set of ready-made presets.
An intuitive interface, the ability to select parameters using the quick view window, a hint panel and a rich collection of presets will help you quickly get used to the program and learn how to create your own masterpieces.

The transformation of a photograph into a drawing occurs before your eyes. Frame feed allows you to track the photo conversion process at different stages and get drawings of different degrees of elaboration without changing the effect parameters.


Using the program, you can prepare illustrations for a book or article, create a unique greeting card, an interesting avatar, a poster or painting for the wall, a print for a T-shirt.
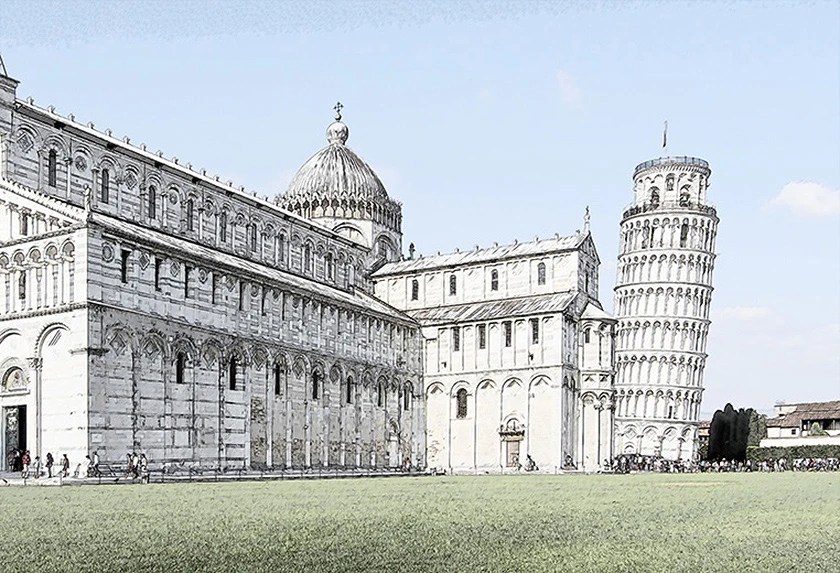
The program is good not only for processing portrait photographs, but also views of nature and architectural monuments. Sketch is used by professionals to demonstrate the features of architectural styles and prepare presentations. The program is indispensable when working on an advertising brochure or website, when you need to present a set of images in the same style.
AKVIS Sketch makes everyone feel like an artist!


Batch file processing helps quickly, automatically, turn into drawings huge amount photographs, create cartoons, comics.
Using bookmarks Background, Canvas And Inscription you can add additional effects to the image: get a combination of photography and drawing, imitate drawing of various types
11 votesGood day, dear readers my blog. Drawing self made. About 15 years ago, no one would have thought of such a phrase, but now - please. Modern technologies have reached such a level that anyone can get their portrait in any artistic style whatever he wants.
Today I will do a short review of services that allow you to take a photo like a pencil drawing online. A huge number of techniques: animation, stylization, collaging, insertion. More than 3,000 effects: impressionism, Van Gogh style, automatic retouching, watercolor drawings, pastel, oil paint, chalk.

The result will not take long to arrive. You will learn about the best ways photo editing.
Benefits for the webmaster
It may seem strange to many to have such an article on a blog about website creation. Very in vain. Well, firstly, a picture processed by a similar method can be used as a design element: a header, background, or even a thumbnail of an article or a picture in the body of a publication.
However, I must tell you right away that if you like one of the techniques and want to process all the photos this way and post them on your blog, then the idea will be wonderful. However, do not forget about copyright.
Don't think that after this she will belong to you. No matter how many manipulations you make with a picture, it belongs to the photographer or artist who created it.
Read the article about. Although search engines define such content as unique.
So, if you take a photo from a free source, process it in a photo editor, and post it on your blog, then Yandex and Google will think that you are doing a great job and using your unique materials. At the same time, you are not afraid of any persecution. Everyone is happy and satisfied. These steps will take you no more than a couple of minutes.
But that's not all the benefits. Developers are people too. We all have friends and sometimes they celebrate birthdays, weddings, new years and so on. The portrait can be printed in large format and framed. You will spend several times less money than if you ordered a drawing from an artist. In any case, the result will exceed all expectations.
Well, now I think everything is clear. Let's move on to the review of services.
Services overview
To write this article, I analyzed many resources. Most of them turned out to be inconvenient. Somewhere the loading is constantly lagging or the result is below average. I left only three resources on the list. Moreover, I will say right away that I recognize only one as truly worthwhile.
I won’t waste any more of your time and will proceed with a detailed review.
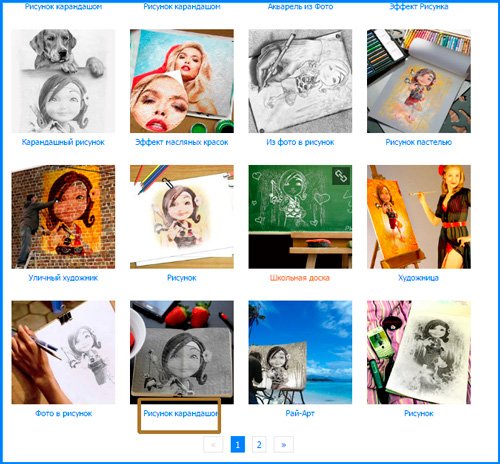
Photofacefun
Website www.photofacefun.com quite nice and completely free. Here you will find over 1,400 options for your photography.

If you want to turn a picture into a drawing, then go straight to the section of the same name and look at the options. For example, the third one, pencil drawing. Click on it.

Uploading the file. By the way, you don’t have to upload the same photo every time. It will be saved on the server and you will have quick access to it until you leave the portal.

You need to crop the picture so that it fits into the collage.

Ready. I got this result.
As you can see, they basically offer to insert your portrait into some beautiful picture or make a collage. This is, of course, great. There's a bunch here interesting examples, the result is almost always pleasing. But this is not exactly what we would like.
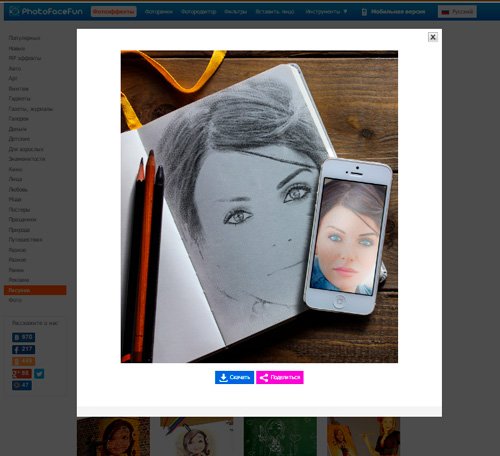
If you just insert your photo and get exactly the same one, but in a different style, then this resource will not suit you. Nevertheless, let's try another option: a pencil drawing on the same page.
As promised, you have quick access to the last downloaded one.

It's hard not to agree that the picture is cool. No logos, watermarks, etc. The service is completely free.

But I’ll tell you right away, there are better ones. This is what we will talk about now.
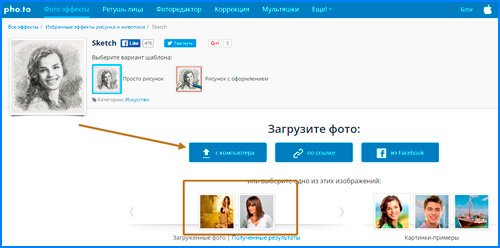
Pho.to
Portal funny.pho.to/ru/ can really be funny. I've already come here twice and every time I can't help but laugh and smile contentedly. This resource is awesome. More than 600 frames, effects and filters. In addition, fast automatic retouching of portraits, creation gif animation based on your photo and quick correction.
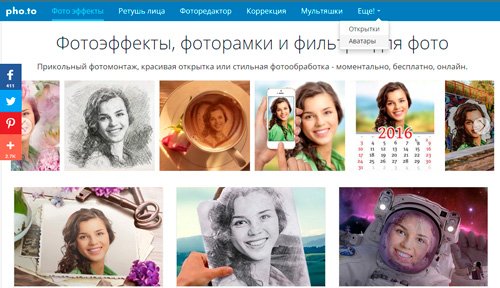
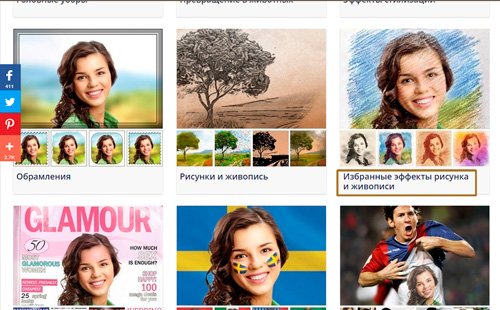
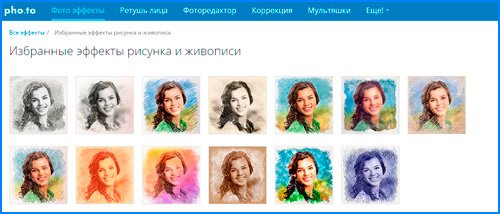
Go to “Drawings and Paintings” or “Selected Drawing Effects”. I advise you to try both categories, as there is a huge selection of pencil drawings.
Here you will be offered sketches for pencil or ballpoint pen, pastels, oil paints, Van Gogh drawing effect, impressionism and much more. Try it and enjoy.
Upload photos from your computer and have quick access to them for a while at the bottom of the panel.
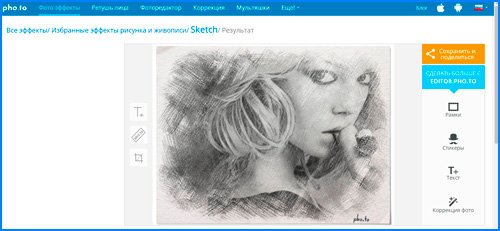
This is the result I got. The only downside is the link at the bottom of the photo.
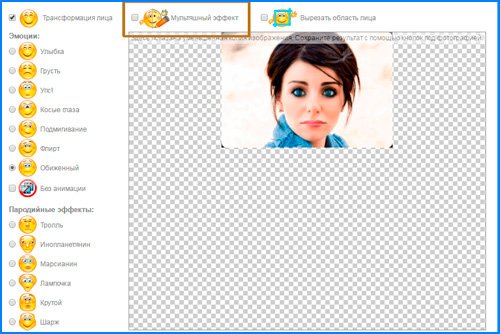
I was immediately interested in cartoons. It's really fun! You load a photo from the disk and on the right side you begin to change your emotions.

In my opinion it is realistic and funny.

Can be removed cartoon effect and send to friends on social networks instead of emoticons.
I would also call face retouching a useful feature. You simply insert a photo and wait for processing to complete.

If you go to effects, you can replace the background, add color effects or lighting, and also stylize the picture.

In my opinion, this is the best resource on the Internet, but you also have another way to turn a photo into a pencil portrait.
Photophania
The good thing about the service is that you won’t have any additional logos added. The portal is free. But nevertheless, it has a lot of flaws. For example, for a couple of days now I can’t go to the main page, some effects don’t work, categories don’t open. In general, the site still needs work.
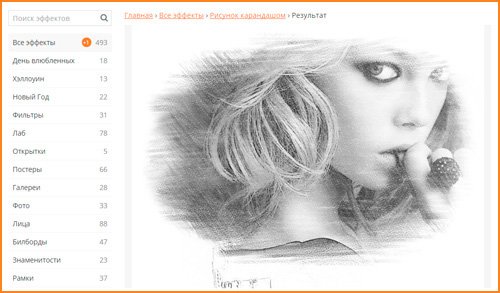
It is likely that these are temporary difficulties and by the time you want to create your portrait the situation will change. However, I will leave you with a direct link to pencil drawing creation page . I had no problems with this filter.

Upload a photo from your computer.

Trim it.


This is the result I got. Can be downloaded.
Photoshop in three steps
In fact, pencil drawing is not like that. difficult task even for Photoshop. Watch this video. Here we show you how to create your masterpiece in just three minutes. By the way, the video is very cool. I can’t help but note the author’s work.
Online services are, of course, simple and fast, but they limit you. It’s good to sit for a couple of minutes and laugh at the funny results, but thanks to them you won’t get far.
Working in Photoshop yourself is much more interesting. Projects turn out much better. You see what you are doing. You can adjust it based on the specifics of a particular photo and you will probably move on. Photoshop won't keep you busy for just a couple of minutes. You will want to work with him, develop, improve your skills.
See how easy and simple it is or. And all this will not go to waste. Download the free course " Profession web designer in 10 days " This introductory course could be your first step towards a profitable hobby.

Well, if you are more interested in creating beautiful pictures, but you don’t know anything about Photoshop, then I can recommend “ Photoshop from scratch " Thanks to this course, you will learn everything about this program within a few days. You will understand how to work in it, what functions it has and what you are really capable of.

Open up to change. If you have a passion for design, don't limit yourself with excuses. Get started new life, in which you will do what you love. Subscribe to my blog newsletter and VKontakte group , and learn more about working on the Internet.
There are many things people try to surprise each other by posting photos, for example, on Instagram: sunset at sea, strange animals close up, cute couples, etc. But one of the most big problems user social networks- keeping the entire account in one style.
To solve this “problem”, there are many applications or sites on the Internet. Your photographs can easily be turned into paintings painted in watercolor, oil, acrylic, pencil and in absolutely any style - be it portraits of Van Gogh or masterpieces of Chagall.
Quite often, people take the simple route and turn photographs into pencil sketches, without using fancy programs like Photoshop. A special website found in a search engine can help you make your photo a wonderful pencil drawing.
How to make a pencil drawing from a photo
Turning a photo into a pencil drawing is quite easy - you just need to find a web resource that will meet your requirements. Maybe you just need to edit a photo to put it on your personal blog, or maybe you need to create a whole collage in a frame, in the same style.
In this article we will consider two options for solving this problem, using such resources as Pho.to and PhotoFunia.
Option 1: Pho.to
The proposed site contains quite extensive functionality and at the same time you can work directly in the browser without purchasing paid subscriptions or downloading additional software. "Photo effects", the section you need makes it possible to automatically select the effect that suits the photo. This section, in turn, has subcategories - the Pho.to website has many options for photo processing. The desired photo effect, obviously, is in the subcategory "Art".

This service is good because the photo you processed is converted to JPG format and differs high quality. The site presents many additional photo effects with several variations. For example, there are several options for the pencil drawing effect.
Option 2: PhotoFunia
This online resource does not process your photos, but rather pastes them in and stylizes them to suit the given environment. There's a whole category of effects that can be applied to pictures - and almost all of them place your photo on a specific third-party object.
Again, PhotoFunia provides the ability to “turn” your photo into a painting, even in multiple versions.

PhotoMania is a very popular service that processes a huge number of images every day. And with such a load, delays during processing are minimal.
The site presents large number effects that will turn ordinary photographs into extraordinary shots.
The services discussed in this article allow you to creatively process a photo. You can spend a few seconds to get masterpieces, while using professional services or utilities would require much more effort and time.
-
 April 17, 2015Stewed potatoes with vegetables
 -
 April 17, 2015Taxon - a systematic group of organisms related by kinship
 Cookies with butter technological map")


