How to draw a gray cat. How to draw a beautiful cat with a pencil
Cats are incredibly graceful and beautiful animals, so drawing them is a real pleasure. For beginning artists who have recently begun to master graphics, master classes on how to draw a cat with a pencil step by step are suitable.
Creating such cats does not require skill, talent or artistic taste. If a child asks to draw a cat, and time is short, then you can limit yourself to funny images.
Sleeping kitten
Anyone can easily draw such a sleeping miracle. All you need for this is an A4 sheet, soft and hard pencils, an eraser, a little patience and perseverance.
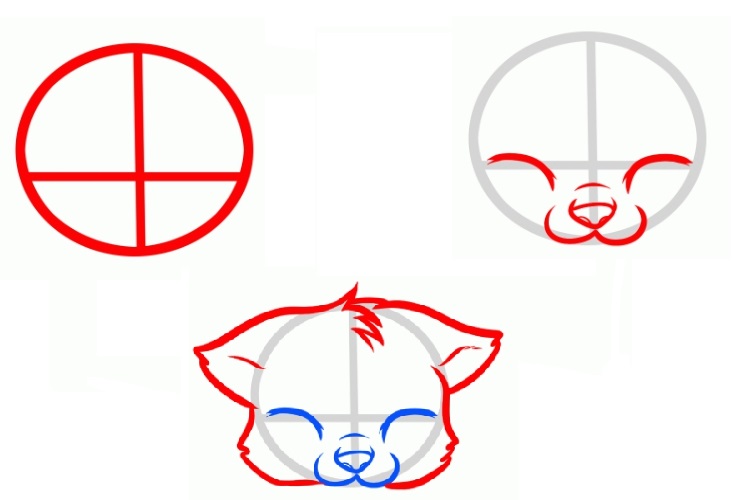
Stage 1: We start drawing a sleeping cat from the head. For this hard pencil draw a circle and mark thin auxiliary lines. The vertical divides the muzzle clearly in half, and the horizontal goes so that the upper part accounts for more than half of the circle.
Stage 2: Focusing on the auxiliary lines marked in the first stage, we outline the kitten’s eyes, nose and mouth.
Stage 3: Mark the outline of the head with a soft pencil. We draw the ears, protruding fur, and a funny “whirlwind”.
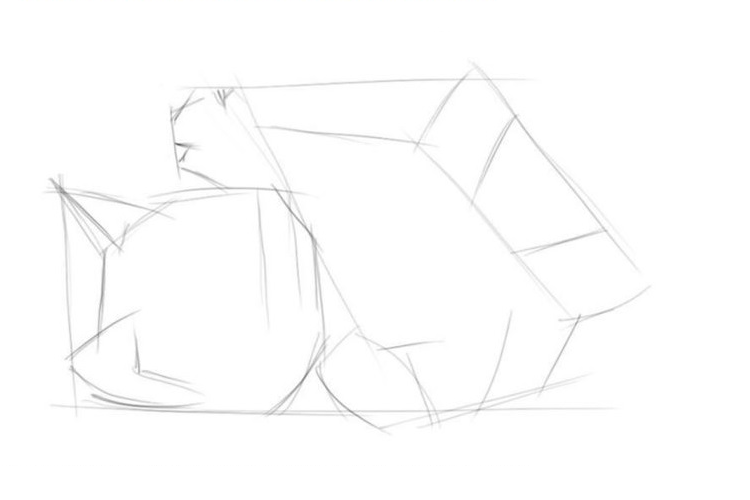
Stage 4: draw the body of the animal and draw the tail. Please note that the kitten is curled up into a ball, so the tail covers part of the muzzle.

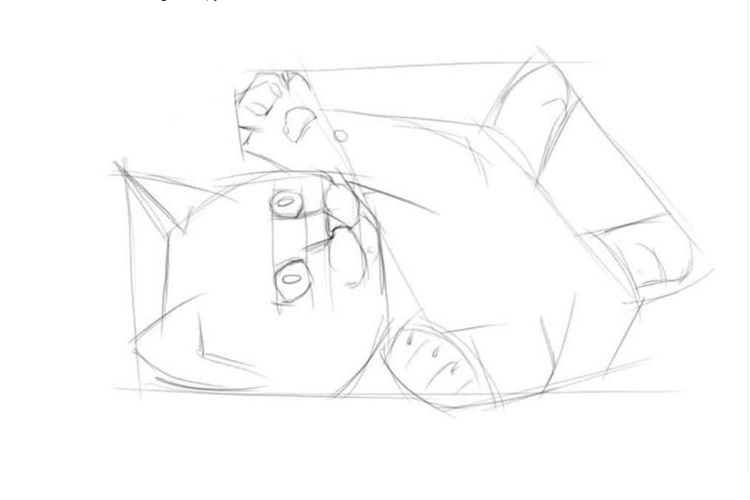
Stage 5: At the last stage, the paws and whiskers are drawn. Use an eraser to carefully erase any excess lines and markings. The kitten is ready. If desired, you can color it with paints or colored pencils, or leave it as is.

Mischievous kitten

Any child will love this naughty baby. You need to start drawing a mischievous kitten from the head. Draw a circle, add triangular ears and draw a muzzle. Then comes the drawing of the torso and paws. Play with the kitten's emotions and show your child that the mood of the cat shown in the picture depends on small details. Surprise can be conveyed through wide-open eyes; a protruding tongue will add mischief, and by moving the pupils slightly to the side, you can make a thoughtful or sad cat.
Kitten made of circles

Even a child can make this drawing of a cat from circles with a pencil, since it is one of the most simple ways for beginners. The animal is drawn from the back, so there is no need to draw features and maintain proportions.
First, two circles are drawn on the sheet so that they slightly intersect each other. In this case, the diameter of the lower one should be approximately twice as large as the upper one. Then the ears are drawn to the upper part, and the tail to the lower part. Then the mustache is drawn and the fur is randomly marked.
One circle, two circle
Another clear example how to quickly and easily draw a cat with a pencil.

The larger circle is drawn first, and then another, smaller circle is drawn inside it. Add ears, facial features and a tail. Children will love a funny sleeping kitten and can quickly distract a child and cheer him up.
Such a sketch is something between simple schematic images and realistic drawings animals.
We mark the outline of the animal with thin auxiliary lines made with a hard stylus. The sketch of the head looks like an octagon, the ears are triangles, and the body is a rectangle or cylinder. After this we make markings for the paws.
We draw a horizontal line in the center of the head, thus indicating the level of the eyes. We draw sketches of the mouth and nose, round eyes. We draw a chin and mustache.
We define the muzzle more clearly. We draw in detail the eyes, nose, mustache and cheeks. Using a soft pencil, draw fibers on the ears, head and muzzle. Then we draw the front paws with claws and pads, and detail the hind paws.


On final stage All auxiliary lines are carefully erased. It's time to draw fur. For these purposes, a 2M (or 2B) lead is best suited, but in principle you can use any soft one.

Realistic
Many people think that realistic portraits pets - not the best simple task for beginners, but in reality not all sketches are difficult. You can verify this using the example step by step instructions to the portrait of the Scottish Fold.
Draw a Scottish fold cat with a pencil
Scottish Folds are loved by many breeders for their disposition and charming appearance. Thanks to distinctive feature breed - with ears curved forward and down, these cats look so cute that it is impossible to resist squeezing such a mustache. We offer simple step by step lesson for beginners how to draw a British cat with a pencil step by step.
At the first stage, auxiliary lines are drawn with a hard pencil: 1 vertical and 2 horizontal. The vertical one shows the center of the muzzle, so it needs to be slightly shifted to the right relative to the center of the page, since the cat is sitting slightly turned.
The horizontal ones should be parallel to each other, as they indicate the size of the animal's eyes. After this, you need to start drawing the contour of the muzzle and eyes.
Important! For a cat to be proportional, the distance between the eyes must correspond to the size of the eye.
When drawing a nose, remember that its size should be less (narrower) than the distance between the eyes.

Then, using an M or TM stylus, we darken the eyes and nose. More experienced artists If you are confident in your movements, you can use a black pen for these purposes.
To make the cat’s look “alive”, do not forget to leave unpainted, white areas, as in the picture.

For the third step, you will need a 2M (or B2) pencil. Carefully, smooth lines, shading the strokes, darken the areas around the pupils. Notice how the color goes from darkest (around the pupils) to lightest. Then, with a hard stylus, arrows are marked in the direction from the nose. They show directions for drawing fur.

Using the softest stylus (it is better to use B4 or 4M), focusing on the arrows, draw the darkest fur. The crown and fur under the ears should be the darkest.

To complete the picture, draw in the remaining fur. The cat is ready
Attention! The color of the bristles depends on the force of pressure.

Now we will learn how to simply and beautifully draw a cat with a pencil step by step for beginners. For this we need at least one very soft pencil, I use 6V. To draw the outline of a cat (kote), it is better to take a hard or hard-soft pencil.
Step 1. First, we will draw a circle and parallel lines. Then we draw the nose, muzzle and mouth of the cat. Then we start drawing the eyes. First we draw the upper part of the eye in the form of an arc, then the lower part and the pupils in the eyes. Draw three hairs on top of the cat's eyes.

Step 2. Now we sketch the edges of the cat’s eyes and draw the outline of the head.

Step 3. Draw the ears, then draw the cat’s body. First we draw the folds on the neck, then we draw the outline of the back and tail, then the line of the cat’s chest.

Step 4. Draw the cat's paws.

Step 5. Draw a mustache. This is how we should get a cat (kote), in principle, we can finish drawing here, or we can try the next step.

Step 6. In previous lessons on drawing techniques, we simply drew lines and smeared them (for example, in the lesson about a flower), and also learned to understand how to place a shadow on an object, how the shape of the object itself can change because of the shadow. Now we will draw differently, we will need a soft pencil and an eraser. The whole technique consists of a soft transition of shading from dark to light. To achieve it darker, press the pencil hard, then the pressure is weakened and weakened, and in the end we barely touch the pencil to the paper. We shade either with a zigzag, where appropriate, or with separate lines close to each other so that they merge. And at the end of the hatching, so that it merges with the unhatched area, we go over it with an eraser, but not with the edge, but with the entire side (width), it turns out that the eraser does not erase, but smears. In principle, the edges can be smeared not with an eraser, but with a napkin, cotton wool, paper, just the edges themselves and not be overzealous. You could practice on a ball or cone, as they force you to do in schools, but this is boring and not interesting. We will study on the object that we like, so we can learn faster. The shadow from the edge, for example the muzzle, will always be darker, then it goes lighter into the middle, i.e. to add volume, always make the edge darker than the other part. Let's try and post pictures.
The top ten most popular drawings among children and adults include the image of a cat. Let's look at how to draw a cat from a cartoon or your favorite book, how to draw cats in profile and full face, lying down, sitting, in motion. It will take a little patience, attention, and a desire to create and experiment. The schemes proposed below will vary in complexity and will require certain skills and abilities.
Drawing, like other activities (roller skating, music lessons, reading), requires training. Beginning artists should know that:
How to draw a cat with a child 5-8 years old
Children over five years old are good at repeating the actions of an adult. The parent (teacher) explains each element of the diagram slowly, encourages the child, and in difficult moments shows an incomprehensible action in his personal drawing.
Cat made of circles
Sleeping cat.
If young artist has not yet achieved accuracy in drawing figures, they suggest he use a ruler. Further:
- draw big circle, but inside it’s small. They try to keep the proportions 1:2 accordingly;
- two triangles (ears) are attached to a small circle; the inside represents the eyes, nose (inverted triangle), and mouth. Add a mustache;
- draw on the tail.
Cat sitting with its back.
Two circles are depicted on top of each other (proportions 1:2). Add ears and whiskers to the small circle, and a tail to the large circle. Shade the back, tail, back heads. 
How to draw a happy cat
The child is asked to draw the whole cat. Instructions:
- draw two circles (for the body and head) of different sizes with a dotted line;
- The small one is circled entirely and two ears are added. The large one is partially outlined (to the small one), two semicircular legs are added;
- Claws are drawn on the paws, and a tail is added to the body. Draw the face: eyes with pupils, nose, mustache, smile.
There are stripes on the tail and back. 
Drawing a sad cat
Let's look at how to draw a cat from a triangle. For this:
- draw a triangle and divide it in half with a dotted line. Ears are outlined at the top;
- circle the triangle, while the corners are rounded. Add a nose and mouth;
- erase the extra dotted line. The eyes, mustache, and front legs are completed.
Two lines are added to each paw. Draw a tail. 
Next, they move on to depicting more complex cats.
Let's draw a sitting cat
Realistic cat
The body is drawn in the shape of an oval, stretched vertically. Further:

The cat is being painted different colors, use the hatching technique, so the skin will look more like the real thing. 
Cheerful animated cat
First, draw the vertical axis of symmetry. The following is the diagram:
- draw the lower part of the cat’s body in the shape of a heart;
- add a small circle (upper body) and a large round head;
- indicate eyes, ears, nose, paws;
- add a smile, a mustache, and an inverted number “3” - this will serve as the basis for the front legs.
Draw the front and hind legs. 
Let's look at how to draw a cat sitting in profile.
According to the diagram, draw an oval body and a round head. Add ears, a paw, and the outline of a face. Draw eyes, nose, mouth. Indicate the front legs and tail. Erase auxiliary lines. 
How to Draw a Realistic Cat Head
For more experienced drawing lovers, diagrams describing the process of creating a cat's head or an entire animal are suitable. 
Instructions:

Using a soft, blunt pencil, add a “fluffy” look to the face. To do this, shading is done in dark places. The frontal part, eye sockets are highlighted, and the pupils are drawn. You can practice and draw a cat’s head in profile (see diagram). 
How to draw a cat that sits sideways with its head turned
Start trying with a simple scheme:

Color as desired. As they gain experience, they move on to depicting purebred cats: Himalayan blue, Burmese, longhaired motley. Follow the suggested diagrams, use simple pencils different hardness, eraser.


How to draw a cat in motion
A compositional placement of the drawing is made on the sheet. For this:

Clarify the details. Get the cat on the move. 
Kitten in motion
Step-by-step instruction:

Honing a skill using different schemes, get cats in different angles and movements.
Cat tattoos are usually chosen by girls. This is due to the fact that such drawings look attractive. With their help, you can complement your look and emphasize your individual taste preferences. Moreover, a cat tattoo can say a lot about a lady’s character. Before you do it, you need to understand what it means. Unfortunately, according to most ladies, a cat is only a symbol of slyness, playfulness, femininity and grace, but this is not so. What is the meaning of a Cat tattoo and why should you choose it?
Cat tattoos. What did they mean in the distant past?
You can learn a lot by studying history interesting facts about a cat tattoo. Residents Medieval Europe These animals were considered accomplices of witches. If a person had a cat tattoo, he was burned at the stake, since for the Inquisition this indicated a connection with evil spirits. In Norse mythology, the chariot of the goddess Freya was drawn by cats, so the Scandinavians were tolerant of these animals. Two centuries ago, tattoos with the image of a cat were very often done by sailors. For them, this drawing was a symbol of good luck. These tattoos had a special relationship with Ancient Egypt. Its inhabitants worshiped cats, so they were made only to representatives of the nobility and priests of the cult of the goddess Basta.
Current meaning of tattoos.
Before getting a cat tattoo, a person needs to know the following:
- The kitten is a symbol of touching and gentle ladies. It often represents their memories of a happy and unforgettable childhood.
- A tattoo in the form of a cat and a mouse is suitable for people who are not afraid of their enemies and are ready to stand up for themselves.
- The tiger and panther, which are also cats, indicate the masculine and feminine principles.
- If a panther is with a small kitten, this denotes the strength and tenderness of a woman.
- The black cat is a symbol of femininity, grace, cunning and wisdom. You should not think that such a tattoo will not bring good luck, because black cats are also considered very beautiful and completely harmless animals.
- A tattoo depicting an aggressive cat indicates that a lady, despite her fragility, can stand up for herself. As a rule, it is a drawing where the animal has a grinning muzzle and an arched back, ready to jump.
- An image in the form of a jumping animal or paw prints indicates a person’s ability to react quickly in difficult situation and get out of it.
On what part of the body should I get a tattoo?
If the sketch is quite large, then the ideal place for it would be a shoulder blade. This part of the body can be hidden even in summer, but a tattoo on the shoulder blade will still look catchy and original. On the wrist, a cat tattoo looks very cute, since this part of the body is quite delicate. Men prefer to have it done on the forearm. This image is a symbol of masculinity. To emphasize their sexuality and superiority, many ladies get a cat tattoo on their leg, namely below the calf and on the side.
You can draw a cat using paints, crayons, pencils and other visual arts. However, if you are a beginner, it is better to start with the simplest ones, gradually moving on to more complex ones. Having mastered the technique of drawing with a pencil, in the future it will be easier for you to draw with paints and other materials. It is also worth considering that when using the same drawing technique, the result, due to the individual abilities of each artist, always turns out differently.
Learn to draw a cat step by step
First you need to remember what the cat's body consists of - this is the body, head, tail, ears and paws. The listed body parts are simple figures: the body is an oval, the head is a slightly flattened circle, the ears are triangles with rounded corners, and the paws and tail are elongated ovals.
Connecting the drawn figures together
This needs to be done smoothly, as if adding parts of the body to each other, as in the process of modeling from plasticine. If the face of the future cat is designed to be half a turn, then the far ear should be depicted rotated, and its outline in the drawing should be made thinner so that its inner side is almost invisible. To make a cat more believable, you should not draw only straight lines; any part of the body has irregular shape with bulges and smooth curves.

Draw a face
The eyes and nose of the future cat should be drawn in the lower part of the head, having previously delimited the areas on the muzzle: first, mentally divide it in half, determining where the upper border of the eyes will be, and then divide the lower part into three lobes. Thus, in the middle part of the lower lobe the nose will be outlined, and below it - the mouth of the future cat. The inner corners of the eyes should form a triangle with the lower corner of the nose.

Drawing wool
How to draw a cat fluffy? In place of the old outline we apply small lines - wool. There is no need to rush to draw a broom in place of the tail; the result will be much neater and more natural if you draw individual hairs along the contour of the tail.

Shading the body
On at this stage We shade the cat’s body, completely covering it with small hairs, observing the direction and length. Breast and inner side The ear closest to us can be left unshaded.

Adding volume
We do this by drawing the legs, torso and head with brighter bold strokes. The strokes should go in an arc from the edges to the middle. We make the far paws darker than the near ones. Apply shadows over the nose, eyebrows and on the paws.

Finishing touches
We enhance the shadows, add whiskers and some random lines on the ears, tail and paws. Voila, the cat is ready!

Drawing a cat with a pencil (method for beginners)
A simpler version of drawing a cat using a pencil is clearly shown in the following diagram:
- We depict a circle and an oval, which will later become the head and body of the animal.
- We add 4 small ovals to the large oval - these will be the limbs of the future cat, and in the circle we outline a smaller circle - the muzzle.
- We draw triangular ears, paws in the form of two small ovals and outline places for the eyes.
- We complete the tail with an arc, add the front limbs with elongated oval details - paws, and draw the eyes.
- We finish marking the body parts.
- We draw the mustache in detail, add a little fur on the muzzle, and give the drawing a finished look.

Cartoon cat coloring book for child
It’s not at all difficult to draw a funny cartoon cat in anime style that will bring a lot of joy to your child. We follow the visual instructions and repeat.
- Draw a large circle, divided into 4 parts, and an oval under it.
- We slightly stretch the face of the future cat to the sides and decorate the ears.

- We designate the nose, eyes and eyebrows.
- We finish drawing the paws.

- We complete the drawing of the animal with the image of the body (in place of the previously outlined oval) and tail.
- We remove the auxiliary lines, outline the outline of the coloring cat and let your child color the resulting cute kitten with paints or felt-tip pens.

Another option for creating a simple but very cute cartoon cat coloring book can be seen in the video below.
Here are a few more simple ways to depict a cat, which are suitable even for beginners.

And, using the step-by-step diagrams below, you can quickly and easily draw cats of various breeds.


