How to fix the missing Wireless Network Connection icon in Windows. What is a wireless connection. No Wi-Fi network connection on laptop
If you forget your Wi-Fi network password, you should not panic or immediately call the technical support service of your Internet operator, since you can find out the forgotten password yourself. Which does not require you to have any specific technical knowledge or install additional software. All you need to do is follow the steps below.
The easiest way
The “Wireless network management” column is missing
In the version of Windows 7 SP1, the “Wireless Network Management” column is usually absent. Therefore, the instructions for recovering a Wi-Fi network password will be slightly different in terms of the points for opening the “Wireless network properties...” window.
The window of interest can be opened in two ways:


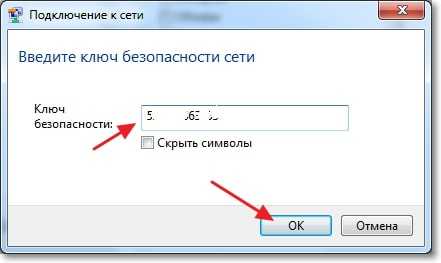
The familiar “Network Security Properties...” window will open, where we open the “Security” tab again and check the box next to “Display network security key.” We save the password.
Find out a forgotten Wi-Fi password by opening the router settings

If your manufacturer is different, then look in the settings for the “Wireless” tab and the “Security” tab. In which, among other things, there is a line “Password” - this is the forgotten password.
Other options to get a password for a Wi-Fi network
In addition to the above options, you can:
- Reset (zero) the router settings (if you can configure them again), as a result of which you will be able to specify a new access password;
- Your Internet operator's support service can help you recover your forgotten password. However, you will need to confirm the right to manage the Wi-Fi network by providing some data: the amount of the last few payments, the contract number, contact details of the person who concluded the contract, etc. (individually for each operator);
- You can also find out your forgotten password using a tablet or smartphone with an enabled Wi-Fi connection. The actions are similar to viewing the password in the router settings - open the router settings (using a mobile device) and look at the specified network key. This is the password.
How to view your Wi-Fi password
dontfear.ru

This article will talk about what to do if Window 7 does not connect to the WiFi network. The fact is that although this operating system is more stable than its predecessors, various errors may still occur that must be corrected manually.
Before moving on to connection problems and their solutions, you need to understand what WiFi is and how the technology works. This will allow you to fix some problems faster.
The fact is that to connect to such a network you need an access point. Its functions are usually performed by a wireless router. And therefore, first of all, if there are no available connections to the WiFi network in Windows 7, you should pay attention to the router.
As a rule, this is the reason. But of course, there are other problems. So, let's take it in order.
Checking the router
Everything is very simple here. If the laptop does not see available connections, then you should go to the router’s WiFi settings menu and check whether the wireless network is turned on. To do this, you need to connect to the router using a regular Internet cable. After that, open a browser (any) and enter 192.168.0.1 in the address bar. Press "Enter". Next, a window will appear asking you to enter your password and login. As a rule, the default key and login are admin, admin, respectively.

How to easily find out the IP address of a WiFi router: Video

If you changed this data, then enter your values. Next we get to the settings menu. We are interested in NetworkWireless settings. In the wireless network settings, you need to check the box next to “Enable Wireless Router Radio”. That's it, setting up the router is complete. And if your laptop with Windows 7 still has problems with WiFi, then you should move on to setting up the operating system.

Why doesn't my computer see available wireless networks?
There can be many reasons for this, as well as solutions. Fortunately, Windows 7 is convenient and has many options for diagnosing and fixing certain problems. But we will consider only the most common ones.
Read also
The first thing you should check is the status of your WiFi wireless connection. To do this, you need to open the Network Control Center. To do this, click on the network icon in the tray and select “Network and Sharing Center” in the window that appears.

A menu will open in which all network-related settings are made. Here we are interested in the “Change adapter settings” item. In the window that opens, you need to find a shortcut called “Wireless Network Connection”. If this connection is gray, it means it is disabled. To enable it, you need to right-click on it and select “Enable”.


Windows 7 does not connect to Wi-Fi: Video
The wireless network icon does not appear in the tray
Users often ask the question, what to do if the WiFi icon is not displayed in the tray in Windows 7? This can only mean one thing - the wireless module is turned off or not working. Activation of Wi-Fi occurs, as a rule, using the key combination Fn + adapter power button. On different laptops, this button may be located in different places.
Articles on the topic

For example, on Asus laptops it is the combination Fn+F2, on Lenovo it is Fn+F5. The WiFi power key itself is indicated by a corresponding image. In addition, on some models there is a separate button to activate the wireless connection module. In this case, just press it.
So, after turning on the wireless adapter, Windows 7 should automatically start searching for available networks. If this does not happen and the tray icon does not appear, then you should check that the drivers are working correctly.
What to do if a laptop with Windows 7 does not see Wi-Fi: Video
Checking drivers
You can check the software in Windows 7 in the task manager.
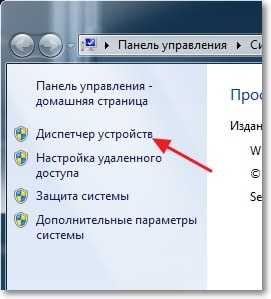
You can launch it by clicking on the “My Computer” shortcut, which can be found on the desktop, in the start menu or in Windows Explorer, with the right mouse button. In the window that appears, click “Properties”. Next, a menu will open in which you need to open “Device Manager”.
In the window that appears, we are interested in network adapters. If you do not find this, then there are no drivers for the device and you need to install the driver for this module. If there is such an item, then open it. Typically, the wireless adapter is called Wireless Network Adapter. The device may also be indicated by an exclamation mark. This indicates that the driver is not working properly and needs to be updated or reinstalled.
Read also

It's very easy to do. As a rule, the laptop comes with a special disk that contains all the necessary programs and drivers. If there is no such disk, do not rush to get upset. The necessary software can always be downloaded from the Internet, since manufacturers have taken care of supporting their customers.
To do this, find the official website of your laptop manufacturer and write the exact name of the laptop (exact model) in the search. Next, download the necessary drivers and install them. It is worth noting that it is not recommended to install software downloaded from third-party sources, as such drivers can be unstable and sometimes even pose a threat to the integrity of the system.
How to reinstall the WiFi driver: Video
It is also important to know that sometimes, even with the driver installed, the adapter cannot be turned on, since additional keyboard functions are used for this. This means that along with the software for the network adapter, you should also download the driver for the keyboard, as well as the recommended utility for managing the wireless module.
After installing all the necessary components, we try to turn on the WiFi connection again, as described above. If everything is done correctly, windows7 will automatically start searching for available networks.
System diagnostics
If you have completed all the above steps, but the laptop still does not connect to WiFi in Windows 7, then you should run diagnostics. As a rule, in such cases, the system itself prompts you to turn it on, but if this does not happen, then you can start it as follows.

Open the “Network Sharing Center” and go to the “Change adapter settings” menu. Here we look for “Wireless network connection” and right-click on it. In the menu that appears, select “Diagnostics”. Next, follow the prompts on the screen. The system will automatically search for and fix problems. After this, the system itself will begin searching for available connections.

Above, we looked at the most common problems with connecting to WiFi networks on laptops with Windows 7 and options for solving them. However, other problems are quite possible, the solution of which requires an individual approach and a more in-depth diagnosis performed by a specialist.
What to do if the laptop sees Wi-Fi, but does not connect: Video
Read also
windows 7 won't connect to wifi
What to do if a laptop with Windows 7 does not see Wi-Fi
What to do if the laptop sees Wi-Fi, but does not connect
How to easily connect and configure Wi-Fi in a Windows 7 laptop
bezprovodoff.com
There are no available connections in Windows 7. Wi-Fi has disappeared, the network with a red cross
Yesterday I turned on my laptop, opened the browser, but the Internet did not work. I look at the status of my Internet connection, and there the Wi-Fi network is crossed out with a red cross. I click on it and see the status “No connections available”.
I went straight to Control Panel\Network and Internet\Network Connections Adapter. The wireless network connection is enabled, but again there are no connections available. I checked that my Wi-Fi network is displayed on my phone and tablet. Strange situation. Everything is turned on, everything seems to be working, but Windows 7 doesn’t want to see the wireless network. Moreover, Wi-Fi disappeared suddenly. When I turned off the computer, everything worked.
I think I’ll run diagnostics and see if it helps. Launched:
The system looked for something there and gave me a window asking “Enable the ability to use a wireless network.” I agreed by selecting "Make this correction".

Oddly enough, Wi-Fi worked immediately. The laptop itself connected to the Wi-Fi network. All that remains is to close the diagnostic window.

That's it, the problem with "No connections available" is solved. It’s just not clear why at the end, the system diagnostics showed “Wireless communication is disabled,” and how would Windows fix this if the Wi-Fi adapter was turned on. Also, I like the status in the diagnostic window: “Searching for additional problems...” :). There are already enough of them in Windows.
“No connections available”: check whether the WLAN auto-configuration service is enabled
If the WLAN auto-configuration service is disabled, then Windows simply will not be able to find Wi-Fi networks. Therefore, the Wi-Fi icon will be crossed out with a red cross, with the status “No connections available”.
Let's check it out. Open the Start menu, right-click Computer and select Manage.

In the new window, go to the Services tab, and find “WLAN AutoConfig Service” in the list. The status should be "Running" and the startup type should be "Automatic".

If this is not the case for you, then right-click on the service and select Run. Better yet, open properties, set the startup type there to automatic, and restart the computer.
In fact, such a problem can appear due to various reasons, and diagnostics will not always help. But in my case, everything worked, one might say, without any action on my part. Otherwise, now I would start checking drivers and all that. Later I will try to write about other causes and solutions to the problem with the “No connections available” status in Windows 7. And also, before you run diagnostics and do anything, check whether you even have a Wi-Fi network nearby. After all, the connection status will be exactly the same if there is no wireless network nearby.
Windows 10 - all instructions for setting up the Internet and solving problems Setting up a router - instructions for different models and manufacturers Useful programs - for setting up HotSpot, Wi-Fi, 3G/4G modems.
help-wifi.com
Setting up a wireless network in Windows 7
Setting up a local network in Windows 7
Testing Wi-Fi connection
Setting up Wi-Fi security
Setting up Wi-Fi routing
Wireless Network Design
call a technician?

- On weekends and holidays
- Work guarantees
and components
- Highly qualified specialists
remont-comp-pomosh.ru
How to set up a wireless network in windows 7
Today, wireless networking is more popular than ever. Yes, this is not surprising, because it is incredibly convenient: you can use the Internet without being tied to, say, a cable. The main condition under which using a wireless network becomes possible is the availability of Wi-Fi coverage.
Settings
So, to begin with, I will note that there is a main computer and other computers on the network. In the first case, your PC acts as a conductor of a wireless network, and in the second, other computers use the main one to connect to Wi-Fi. There are also programs that make it easy to create an access point, for example, you can read how to set up connectify on Windows 7. To set up a Windows 7 wireless network on the main computer, you need to: turn on the wireless module, then go to “Start”, and then to “Computer” " Next, you should select “Properties”, where, on the left side, there is an active line “Advanced system settings”.

There you will see a “Computer Name” tab, where you should enter the name of your network (this could be, for example, your name). If you also want to change the computer name and workgroup name, then click the “Change” button under the description, click on it and rename everything to your taste. If you don’t need to do any of this, then after filling out the “Description” line, just click “OK”.
If your desktop computer or laptop is connected to the Internet, then an unpleasant moment may come when you lose access to the network, and the network connections icon in the notification area will be crossed out with a red cross. When you hover your cursor over it, a message will appear explaining everything. "No connections available". This happens especially often when using a Wi-Fi adapter. Let's find out how to solve a similar problem if you are using a PC with Windows 7.
There are quite a few reasons that can cause the problem we are studying:
- Real lack of available networks;
- Damage to the Wi-Fi adapter, router or modem;
- PC hardware failure (for example, network card failure);
- Software glitch;
- Lack of current drivers;
- Damage to the operating system;
- Virus.

We will not talk in detail about such a banal reason as the real lack of accessible networks. This can only be “cured” by returning to the Internet accessibility zone or changing the connection method to one that is valid in the given area. There is also no point in talking too much about hardware faults. They can be eliminated either by a hardware repair technician or by replacing a failed part or equipment (Wi-Fi adapter, network card, router, modem, etc.). But we’ll talk in detail about the other reasons and ways to eliminate them.
Method 1: Standard diagnostics
First of all, if you experience the error discussed in this article, follow these simple steps:
- Unplug the Wi-Fi adapter from the computer connector and then connect it again;
- Reboot the router (it is better to do this by completely disconnecting it from the power supply, that is, you need to remove the plug from the socket);
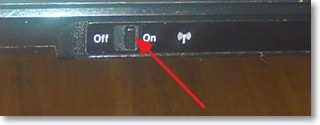
- Make sure you have your Wi-Fi hardware switch turned on if you are using a laptop. It is turned on in different laptop models in different ways: either using a special switch on the case, or using a certain key combination (for example, Fn+F2).
If none of the above helped, then it makes sense to carry out a standard diagnostic procedure.


Unfortunately, this method helps in a fairly limited number of cases. Therefore, if you are unable to resolve the problem when using it, then proceed to the following methods, which are described below.
Method 2: Enable Network Connection
It is likely that the cause of the error may be a disconnected connection in the network connections section "Control Panels". Then you need to activate the corresponding object.
- Click "Start" and open "Control Panel".
- Go to section "Network and Internet".
- Go to "Network Control Center...".
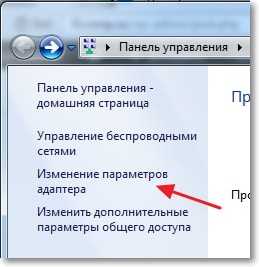
- In the left part of the window that appears, click on the inscription "Changing adapter settings".
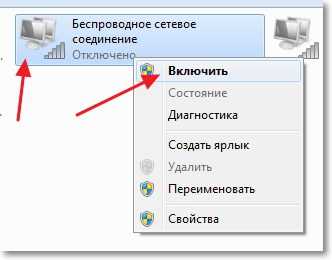
- The window that appears shows all the network connections configured on this computer. Find an item that is relevant to you and look at its status. If set to "Disabled", then you need to activate the connection. Right-click on the object ( RMB) and select "Turn on".
- After activating the connection, the problem described in this article will most likely be resolved.


Method 3: Removing the adapter from Device Manager
If you connect to the Internet via a Wi-Fi adapter, then one of the ways to solve the problem is to disable it in "Device Manager", and then reactivation.
- Go to "Control Panel" by the method that was considered in the description Method 2, and then open the section "System and Security".
- Click on the one posted in the group "System" element "Device Manager".
- Will start "Device Manager". In the list of equipment types that opens, click "Network adapters".
- In the drop-down list, find the name of the equipment that you use to connect to the Internet. Click on it RMB. Carefully examine the context menu that appears. If it contains a clause "Engage", click on it. This will be enough and you will not need to perform all further actions described in this method. The device was simply turned off, and now you have turned it on.

If the specified item is not present, then this means that the device is likely to malfunction. Therefore, it needs to be temporarily deactivated and then turned on. Click in the context menu "Delete".
- A dialog box will open warning you that the device will now be removed from the system. Confirm your actions by clicking "OK".
- The procedure for deleting the selected device will be performed.
- After that, in the horizontal menu, click "Action", and then from the list that opens, click "Update configuration...".
- A search will be made for devices connected using the technology "Plug and Play". The network adapter will be reconnected, and its drivers will be reinstalled.
- Next, restart your PC. Perhaps after this the connection availability error will disappear.


Method 4: Reinstalling drivers
One of the reasons for the error we are studying is that incorrect or outdated network adapter drivers are installed in the system. Most often it occurs when connecting the device for the first time or after reinstalling the OS. Then the drivers should be replaced with a current analogue. It is advisable to use exactly those copies that were supplied on a CD or other media along with the device itself. If you do not have such media, you can download the required object from the official website of the adapter manufacturer. Using similar software from other sources does not guarantee a solution to the problem.
- Go to "Device Manager", using the same algorithm of actions as in the previous method. Open the section again "Network adapters" and click RMB by the name of the desired device. In the list that appears, select "Update drivers...".
- Next, the shell for selecting the update method is activated. Select an option “Search for drivers...”.
- In the window that opens, you must specify the media and directory where the drivers will be installed. To do this, click "Review…".
- The shell opens "Browse folders". Here you need to indicate the folder or media (for example, CD/DVD) where the drivers supplied with the device or pre-downloaded from the official website are located. After selecting a directory, click "OK".
- After the directory address is displayed in the driver search window, you can proceed to install them by clicking the button "Next", but before doing this, make sure that opposite the parameter "Including subfolders" the checkbox has been checked.
- The necessary drivers will be installed, and the problem with the lack of Internet connection will probably disappear.


But what to do if for some reason you do not have the driver media that came with the device, and the company’s official website does not work? In this case, there are additional options to install the necessary drivers, although they are recommended to be used only in the most extreme cases, since they do not 100% guarantee interconnection between the OS and the adapter. You can use the following options:


If your Internet does not start at all, then you will have to search and download from another device.
Method 5: Enable the service
If you use Wi-Fi to connect to the Internet, the problem we are investigating may occur due to a service outage "WLAN Auto Configuration". Then it needs to be activated.
- Go to the section "Control Panels" called "System and Security". This is discussed in the description Method 3. Click on the title "Administration".
- In the list of system tools that opens, select "Services".

"Service Manager" can be activated in another way. To do this, dial Win+R and enter in the displayed area:
Then apply button click "OK".
- "Service Manager" will be open. To quickly find an element "WLAN AutoConfig Service", arrange all services in alphabetical order by clicking on the column title "Name".
- Find the name of the service you need. If the status is not set opposite its name "Works", then in this case it is necessary to activate. Double-click on her name with the left mouse button.
- The service properties window opens. If in the field "Startup type" set value "Disabled", then in this case click on it.
- A drop-down list will open where you need to select "Automatically". Then click "Apply" And "OK".
- After returning to the main interface "Service Manager" select the name "WLAN AutoConfig Service", and on the left side of the shell click "Run".
- The service will be activated.
- After this, the status will be displayed opposite its name "Works" and the problem with lack of connections will be solved.


Method 6: Checking system files
If none of the above methods help, then there is a possibility that the integrity of the system files has been compromised. In this case, it is necessary to perform an appropriate check and then restore if problems are found.
- Click "Start" and select "All programs".
- Open the folder "Standard".
- Find the element with the name "Command line". Click on it RMB. From the list of action options that appears, choose to run as administrator.
- Opens "Command line". Type into its interface:
Then click Enter.
- The procedure for scanning the integrity of system elements will be launched. Information about the dynamics of its passage will be displayed right there in the window. "Command line" in percentage terms. While this process is running, you should not close the current window, but you can minimize it. If violations in the structure are detected, a procedure for restoring missing or damaged files will be automatically performed.
- If, after completing the scanning procedure, a message appears informing you that recovery is impossible, repeat the entire process again, but this time you will need to.


Method 7: Eliminate viruses
The cause of the problem of lack of available networks may be a virus infection of the computer. Some malicious programs specifically disable access to the Internet so that the user cannot use external help to remove them, while others simply arbitrarily “kill” or modify system files, which ultimately leads to the same result.
To remove malicious code, there is no point in using a standard antivirus, since it has already missed the threat, which means it will not react to the virus, and may also be infected by this time. Therefore, we recommend using specialized anti-virus utilities that do not require installation. One of the best programs in this class is. It is best to check from another device or when starting from LiveCD/USB. This is the only way to ensure the maximum likelihood of detecting a threat.

If the antivirus utility detects malicious code, then follow the advice that will be displayed in its interface. There is a possibility that the virus has already damaged system files. Then, after eliminating it, it is necessary to carry out the appropriate check discussed in the description Method 6.
As you can see, the source of the problem with the availability of connections, and therefore with the performance of the Internet, can be a lot of different factors. They can be both external (real lack of network) and internal (various failures), caused by both the software and hardware components of the system. Of course, before fixing a problem, it is recommended to establish its exact root cause, but, unfortunately, this is not always possible. In this case, simply use the methods described in this article, checking each time whether the malfunction is eliminated or not.
If you do not have a Wi-Fi wireless network connection on your laptop with the Windows operating system installed, these instructions are for you.
Many Windows 7 users have difficulty connecting their laptop to a Wi-Fi network. Or, in other words, there is no wireless network icon in the operating system interface on the taskbar, there are no networks available for connection, and the “Wireless network” or “Wireless network connection” connection is not displayed in the control panel in the network and Internet settings. We will analyze this problem only for Windows 7, so that it is easier for you to navigate using the screenshots.
If there is no Wi-Fi connection, then in the lower right corner of the taskbar you will see an icon with a red cross through it. Next, you should also make sure that there is no adapter for setting up a wireless network. To do this, go to “Control Panel” → “Network and Internet” → “Network Connections”.
In such a situation, the problem lies either at the software level or at the level of the hardware itself.
Two conclusions can be drawn from this:
Firstly, your laptop may not have a network driver installed, which means you can only access the Internet with a direct cable connection. This problem is common among laptop users. Secondly, it is possible that the computer does not physically have a network card for wireless communication. Then you should purchase this network adapter from the store. They are divided into internal and external. Most often, you will have to solve the problem in a similar radical way if you are the owner of a desktop PC. As for a laptop, the adapter is usually built into it by default, so it doesn’t cost anything to buy additionally.
How to make sure you don't have the right driver
To find out whether the network driver is really not installed, you should start the device manager in one of two ways:
- Press on the keyboard at the same time Win+R, then in the “Open” field type msc and click on the button Ok.
- In the “Computer” menu, move the mouse cursor over an empty space and select “Properties” from the context menu. Find and open the device manager or, as it is also called “Device Manager”, in a new window.
In the window that opens, find the list Network adapters and expand it. Most likely, you will see only one adapter for the network card in the list, and at the top of the list the device manager will place some kind of “Unknown device” with a yellow exclamation mark icon. It should detect at least one such device and display it as in the screenshot:
How to install a wireless driver
Now that the problem is completely clear, all that remains is to install the necessary driver on the computer. Once the driver has been successfully installed, the Wi-Fi icon should appear on the taskbar. Otherwise, incorrect installation or an inappropriate driver version is possible. Check both options and try to install again. In general, the driver should be included with the adapter or laptop.
I hope that after reading these instructions you will be able to connect to a Wi-Fi network on your laptop. Probably, some points in your opinion remained untouched in the current article, then leave comments with questions.
This solution to the problem is partially relevant for Windows 10 users
Hello, dear friends. As you probably already understood from the title, today I decided to touch on a very serious and painful topic, and try to figure out what to do when Wi-Fi on a laptop or netbook does not work and how to still connect a laptop to a Wi-Fi router. By the way, this can be not only a laptop or netbook, it can also be an ordinary desktop computer with a Wi-Fi receiver. A lot of similar questions have been popping up lately, mostly related to the article.
Now we will try to figure out step by step what and why problems may arise when connecting a laptop to a wireless Wi-Fi network. We will also try to find a solution to this very popular and unpleasant problem with connecting to Wi-Fi, or rather, an unsuccessful connection.
Most often, problems arise when it is not possible to turn on the Wi-Fi module itself on the laptop. And when Wi-Fi turns on, the laptop finds all available networks, but when trying to connect it writes . You need to check whether the drivers are installed on the Wi-Fi adapter, whether Wi-Fi is turned on on the laptop, etc. Now we will do this.
I noticed that most often problems with connecting to Wi-Fi occur in Windows 7. It is on this OS that the network without Internet access error very often appears; I wrote how to solve this problem in the article linked above. In fact, as practice shows, there can be many reasons for this problem. And if there are many reasons, then there are many ways in which you can force a laptop to connect to a Wi-Fi router.
But it’s not always the laptop, netbook, etc. that is to blame. There may also be a problem with the access point, that is, with the Wi-Fi router. And the first thing we need to do when a problem arises with connecting to Wi-Fi is to determine what the reason is, in the laptop, or in the Wi-Fi router. Now I will consider the problem with connecting to my own router. Because if you can’t establish a connection with someone else’s Wi-Fi, then all the complaints are against your neighbor, it’s most likely his problem :).
Who is to blame, the laptop or the Wi-Fi router?
As I wrote above, you first need to find the culprit. Before you make any settings on your laptop or Wi-Fi router, you need to understand what the problem is, which is why you can’t connect your laptop to Wi-Fi. You can just set it up in such a way that then you have to do it and set everything up again. The best way to determine which device is hiding the problem is to try connecting another device to the router, for example another laptop, tablet, or phone. If you have a laptop that has problems connecting to Wi-Fi, you should try connecting it to a different wireless network.
I think that you understood my point. If there are other devices connected to your router (best with a similar operating system) will connect without problems, then the problem is in the laptop. Read this article further, now let’s try to solve it.
Well, if problems connecting to your network also occur on other devices, and the “problematic” laptop connects to other networks without problems, then the problem is in setting up the Wi-Fi router. See the article on, it might come in handy.
I will show the example of a laptop that runs on Windows 7. This is currently the most popular operating system.
I advise you to immediately pay attention to the icon that displays the status of your Internet connection. It's located in the notification panel.
If the Internet connection status looks like this:
![]()
First you need to check whether the drivers for Wi-Fi are installed and whether the Wi-Fi adapter is turned on.
Right click on “My computer” and select “Properties”. On the left select "Device Manager".
Open a tab in a new window “Network adapters” and see if there is a device like Wireless Network Adapter (You may have a different name for it). If you have such a device, then right-click on it and select “Properties”. Another window will open, make sure it says “The device is working normally.”

If everything is approximately the same as mine above in the screenshot, then everything is fine, the driver is installed. And if there is no Wireless Network Adapter device and you have unidentified devices, go to the website of your laptop manufacturer, download and install the Wireless Network Adapter driver for your model.
Learn more about installing and updating the driver for the wireless adapter.
We sorted out the drivers.
Checking whether Wi-Fi is turned on on the laptop
If the driver is installed, but the Wi-Fi module is disabled, the connection status will be the same:
Usually the wireless adapter on your laptop is turned on, but it doesn't hurt to check. Wi-Fi on laptops (netbooks) is usually turned on and off using a keyboard shortcut. On my ASUS K56cm, these are the keys FN+F2. But although when I press these keys I get a message that the wireless adapters are enabled/disabled, nothing happens. Look for the key on your laptop FN and a key with a picture of a wireless network. Press them at the same time.

Some laptops may have a special switch on the case that can be used to enable or disable Wi-Fi. For example on Toshiba Satellite L300 it looks like this:
Enable or disable the Wi-Fi wireless adapter in Windows 7
But the best way to check whether the wireless network adapter is working or not is to go to the network control center and take a look.
So, on the notification panel, right-click on the Internet connection status icon and select “Network and Sharing Center”.
Then select on the left.
Among the connections we are looking for “Wireless network connection”. If everything is fine and the Wi-Fi adapter is turned on, then it should look like this:

If the adapter is disabled, it will look like the screenshot below. Right-click on it and select “Enable”.
Using the methods described above, we must make sure that the status of the Internet connection in the notification panel is like this:

This status means “No connection – There are connections available”- this means that the Wi-Fi adapter is turned on and there are available wireless networks to connect to.
If the connection status is like this:

This means that Wi-Fi is turned on, but the laptop simply does not see the networks available for connection.
Error “Windows could not connect to...”
We have sorted out the problem when the wireless network module is disabled or does not work at all. Now consider the case when the laptop finds available Wi-Fi networks, but when trying to connect to Wi-Fi it writes: “Windows was unable to connect to...”, where instead of dots is the name of the network you want to connect to.
If your network connection status is the same as in the screenshot above (via one, network with yellow icon), then click on it and you will see a list of networks available for connection.
Select the desired network, click on it, then click the “Connect” button.

If the set is password protected, Windows will ask you to provide the password. Enter your network password and click “Ok”.
And if everything is fine, then your laptop should connect to the Internet via a wireless connection. And the Internet connection status should look like this:

But it is at the moment of connection that the error “Windows could not connect to...” very often appears. She looks like this:

Unfortunately, friends, there is no definite solution to this problem. But I can download that very often the problem with such an error appears due to the settings of the Wi-Fi router. It may be through the type of security and encryption that is installed on the Wi-Fi router, read more about this in the article. There may also be a problem with the distribution of IP addresses.
If you notice that in the window with the error “Windows was unable to connect to...” you can run “Troubleshooting”, it would be a sin not to take advantage. Try running it, I heard somewhere that there are cases in which it helps :). But seriously, sometimes it really helps. Windows will check the readiness of the wireless adapter, check the settings, etc. And if it can, it will fix the problem that is preventing you from connecting to Wi-Fi.
Just reboot your router and then your laptop. Very often this helps.
Update
I noticed that in Windows this error appears when the settings that are saved on the computer for your network do not match the current network settings. I'll explain now.
For example, your laptop was connected to Wi-Fi, it automatically connected to the network. But you went and changed the password, or the type of network encryption. Now the laptop is trying to connect to the network, but the parameters no longer match, and that’s the error.
It is enough to simply delete the network on your computer and re-establish the connection. I wrote about this in an article
Conclusion
It’s a great article, and I hope it’s useful. I wrote it for half a day, with interruptions of course, there were still problems with adding screenshots to the site, but I seemed to have solved it.
I tried to collect all the necessary information that should help you solve the problem that arises when connecting a laptop or netbook to Wi-Fi. If I forgot to write something, I will definitely add to the article in the future, and I will also be very grateful if you share in the comments the information that helped you solve the problem with connecting to a wireless network.
If you have any questions, ask them in the comments, we will try to figure it out. Best wishes!
Also on the site:
Why doesn't Wi-Fi work on a laptop (netbook)? How to connect a laptop to a Wi-Fi router? Error “Windows could not connect to...” updated: February 7, 2018 by: admin
-
 April 17, 2015Taxon - a systematic group of organisms related by kinship
 -
 April 17, 2015Accounting info Extract in 1s
 -
 April 17, 2015Sabrina from actually


